 VOICE Homepage: http://de.os2voice.org |
[Previous Page] [Next Page] [Features] |
|
VOICE Homepage: http://de.os2voice.org |
[Previous Page] [Next Page] [Features] |
|
By Bob
Stan © May 2001 |
I have used OS/2 for over 6 years and have never been comfortable with graphical
file management. Using the Drives Object or Object Desktop's Object Navigator had
some advantages, but by and large I found myself opening an OS/2 Window to copy,
list, or move files. Recently I saw some information on FileStar/2 and checked out
the developer's web site. I liked what I saw and immediately bought it. For me,
it replaced everything I really used in Object Desktop (except multiple desktops).
If you do frequent file manipulation, deal with multiple drives/partitions, or frequently
work with zip archives - this program is for you!
For this review, FileStar/2 was installed on my home system, running eComStation
Preview 1, with an AMD KII 400 processor and 196 Meg of RAM. I run with SciTech's
Display Doctor Beta 39 and a Matrox Millennium II video card at a resolution of
1024 by 768. I have also installed a beta version of eStylerLite and XWorkplace.
My system has FAT, FAT32, HPFS, JFS, and Linux partitions. I access the FAT32 partitions
with Henk Kelder's FAT32 IFS . I set up one JFS partition to confirm that FileStar/2
would work with it, which it does, but did not extensively test anything on JFS.
I have no driver that will access Linux from eCS Preview, so those partitions were
inaccessible.
When purchased electronically from a vendor like BMT-Micro you receive an e-mail
with download and installation instructions. A boxed copy with documentation is
also available for about $25 more, or you can get the electronic version and purchase
the documentation separately.
The installation of the electronic version is very simple. You download the file
FS21BASE.EXE and execute it in a temporary directory. From this directory you then
execute the SHSINST command followed by the program package name, currently F2199306.001.
Answer a few questions during the install about installation locations and you are
done. The program creates a desktop folder which you can use to start the program.
There are extensive setup and configuration options available in the setup menu
once the program starts. Do yourself a favor and read the on-line help. It contains
a wealth of information and gives you an idea of what some of the setup options
mean. You can choose your favorite editor as the "edit" application and
assign a program of choice as a viewer. I set up my system to use MED as the editor
and PMView as the viewer. If these aren't enough, you can also set up 17 additional
user defined associations to open certain types of files when they are double-clicked
or run in FileStar/2. I decided to add Netscape 4.61 as my HTML viewer, but I could
just have easily picked Star Office or any other suitable program. I don't know
what I'll do with the remaining 16. The program includes a version of InfoZip but
you can use any version you have currently installed. It is impossible in a short
review to mention all the features available in this program. I will cover that
ones I use most frequently.
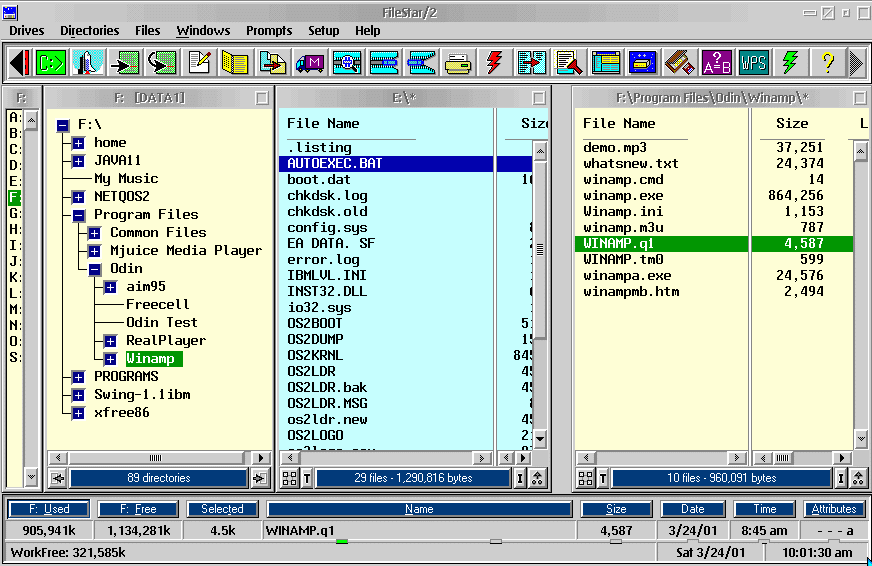
FileStar/2 opens in a window dominated by a drive listing and three panels. The
drive letters on the extreme left are in the Drives Window, the leftmost panel is
the Directories Window , and the two remaining panels are the File Windows (Figure
1) . This working window consists of a top ActionBar , the Drives Window , the Directories
Window , the two File Windows and a bottom Data Panel . The Directories Window displays
the currently selected drive tree(s). One Files Window displays files in a currently
selected directory, while the other displays files in another selected directory.
More on this later. The Data Panel displays useful information on currently selected
items and contains objects that function as additional controls. All panels can
be resized and the Files Windows can be displayed either vertically as shown, horizontally,
or cascaded. Colors and fonts can be modified by the user.

Although not shown in Figure 2, there is an Undelete option, which requires that
you have enabled DELDIR in the config.sys and a Help button. A very useful feature
is that if Help is selected, the entire Action Bar is transformed into a help menu
(Figure 3). The online help is very good .

Of course, the purpose of the program is file management. Files are selected
through the use of the panels. Selections are interrelated. This is where the explanation
is difficult while the operation is sooooo simple. The Drives Window shows the selected
drive(s) and the Directories Window shows the tree for the selected drive(s) . Adding
more than one drive to this panel greatly assists in copying and moving files. The
two File Windows always show files contained in the selected directory, which is
highlighted in the tree. The question is WHAT selected directory? Well you've noticed
that the panels have different colors. While the colors used are user selectable,
the Drives Window and the three panels will always share two colors. As shown above,
I have clicked in the right Directories Window, making it the active panel. I know
this because the Drives Window and Directories Window have also changed color to
yellow, showing me that they are associated with each other. If I clicked on the
center Directories Window, the Drives Window and center Directories Window would
change to blue and reflect the drive and tree information associated with the center
panel. The right panel file list would remain unchanged. If I then clicked on drive
D: in the Drives Window, the Directories Window would change to the D: drive tree
and the center panel would show files from the last selected directory on drive
D:. You can begin to see how easy this makes working with files. To get images into
my review directory, I can simply drag and drop or copy them from panel to panel.
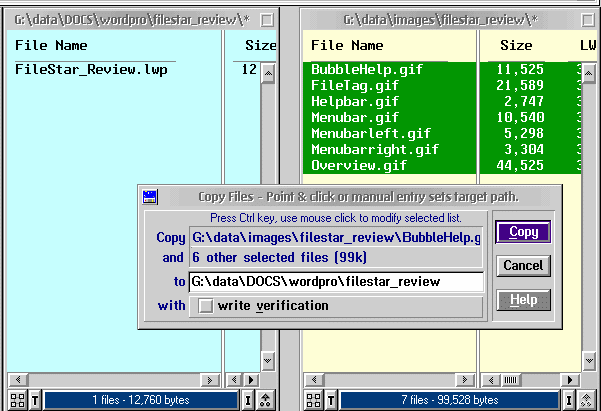
The copy action also illustrates the interrelation between the panels. I select
the file(s) in the right panel I want to copy with standard mouse actions. With
a RMB, I bring up the Pop-Up menu and select Copy. The copy dialog is already filled
in with the directory selected in Panel 2 (Figure 5). The program assumes, probably
correctly, that the copy destination is the other panel. If the choice is not the
one I want, I can change the destination by typing the correct one, or I could click
on the drive in the Drives Window and the directory in Directories Window to get
to the destination I wanted, then select it by clicking. If I was simply moving
them, I could drag them to the center panel to place them in that displayed directory
OR all the way to a directory in the Directories Window and drop them there. Incidentally,
the fact that moving is the default action for a drag and drop is a choice I made
in the setup options. I could have made copying the default action for a drop if
I wanted.
For those of you who like to work with icon views, they can be displayed by clicking
the "I " in the lower left of each panel (Figure5). Notice that the icons
for my gifs are thumbnails of the image. Similarly, clicking the " T "
in the lower right of each panel switches between detailed and plain text views
(Figure 6). The view for each panel is selected independently, and is remembered
from session to session. There is even a setting that will display EA sizes in the
detailed text views.

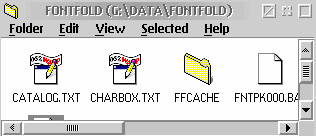
If these displays aren't sufficient, you can open up the standard OS2 folder
with its default layout (Figure 7).
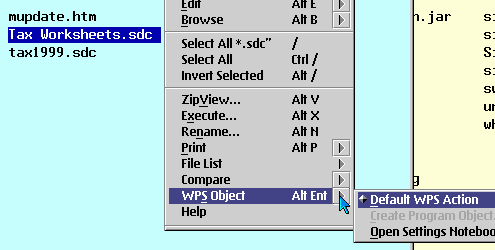
A double-click on a file in any panel causes actions dependent on the type of
file. An executable file will execute, other files will open in the editor, file
browser, or in any application for which you have created an association. If you
have NOT set up a specific association in FileStar/2, you will NOT open a data file's
application by default. Clicking on a *.sdc (StarCalc File) does not open the file
in Star Calc if there is no established association in FileStar/2. However, you
can still open the file in its application by using the WPS_OBJECT option
from the Pop-Up menu (Figure 8). This means you don't have to set up a bunch of
associations for files types you use infrequently. By the way, you can use the same
menu to get to the Settings Notebook for the file.
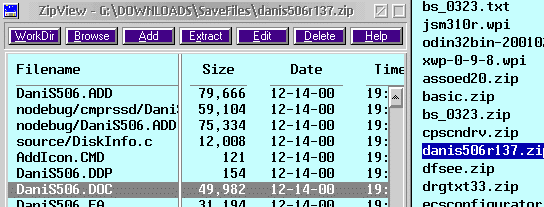
When a zip archive is clicked, the ZipView Window opens. You can read documentation
within the archive without extracting anything, select files to extract, set the
working directory, etc. Think of the possibilities - without leaving FileStar/2
you could launch Netscape, download the latest PMView Beta into a directory, double
click on the zip file, read the instructions, select a destination, unzip the files,
execute the install, then delete the files from the temporary directory you installed
from . Talk about convenience! The program is multi-threaded, so operations that
take some time, like copying or zipping a lot files can continue in one panel, while
you work with a different directory in the other panel.
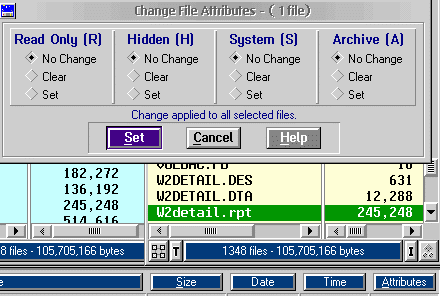
The bottom Data Panel has features to make file management more convenient. At
first glance it appears to be nothing more than labels and brief messages. It is
actually a convenient set of controls. The blue "labels" are actually
buttons. If you have a file or files selected in the window, pressing the Name,
Date, Time, or Attributes button allows you to change that item for the selected
file(s).
 Figure 10
For example, clicking the Attributes button brings up the panel where the attributes
of any (or all) selected files can be set.
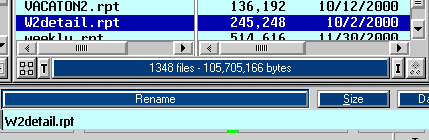
To rename a selected file, just press the Name button. Then type in the new name
(Figure 8).
The little "LED" like indicators on this Data Panel also have a handy
feature. If they are green, the File List is sorted in ascending order by that attribute.
If it is red, the files are sorted in descending order by that attribute. Notice
that there are two "LED's" under the name panel (Figure 13). That is because
the files can be sorted by name OR by extension. The active sort "LED"
is red or green while the inactive one is off. Select sorts in ascending order with
a right click in the panel under the attribute you want to sort by. Left click to
sort in descending order. The sorts are really quick. In the Name panel, because
you can sort by name or extension; clicks on the left side of the panel affect sorts
by name and those on the right side of the panel affect sorts by extension.

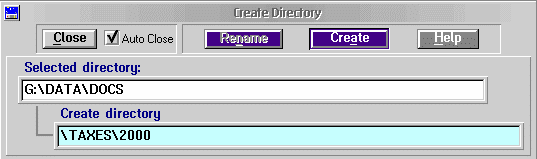
Another neat feature is that you can use the Create menu item to create
new directories with as many levels as you need. For example, I needed to new directory
under Q:\DOCS to store my scanned tax returns. I wanted to make a subdirectory
TAXES and then 2000 for this year. All I needed to do was create Q:\DOCS\TAXES\2000
and both the TAXES and the 2000 directory were created in one go.
Some of the more advanced features are difficult to describe, but easy to accomplish.
It is very simple to place the directories of two different drives in the Directories
Window. Window. This makes it extremely easy to move files. By selecting "Multiple
Trees", I can put drive G: and drive Q: together and move files easily.
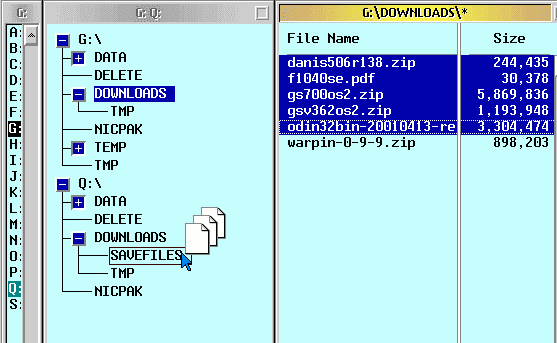
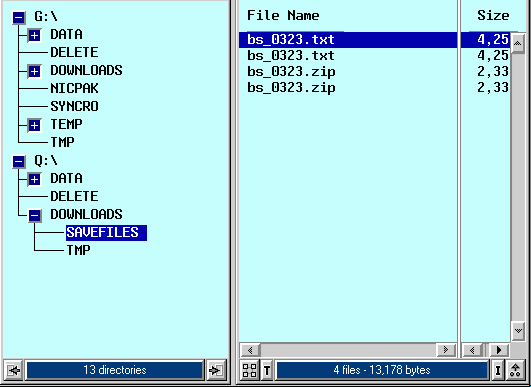
One real example of the power of these multiple trees is in finding duplicate
files As shown in Figure 16, I have selected drive G: and drive Q:. I want to see
if I have duplicate files in the G:\DOWNLOADS and the Q:\DOWNLOAD\SAVEFILES
directories. In the Drives Window, I made sure that I selected "Multiple Trees."
I placed both trees in the Directory Window. I then double-click on the Q:\DOWNLOAD\SAVEFILES
directory, which loads its files into the Files Window. Then I hold down the <CTRL>
Key while double-clicking on the G:\DOWNLOAD directory. This lists its files
in the same Files Window. Then from the menu, I select Files
I hope this has given you an overview of the power of this application. The developer
has provided an extensive setup menu so that you can configure many program defaults
to work exactly the way you want it to. Pop-Up menus are available almost everywhere
and the bubble help actual shows useful information. However, while anyway can get
tremendous benefit from using the program, it takes some time to learn all its features.
That's half the fun.
The developer, Jim Read, obviously takes great pride in his program and is very
responsive in answering questions. Would I buy it again - you bet. I'm only sorry
I took so long to discover this great program.
By the way, FileStar/2 V3.0 is due out in the near future. After playing with
the beta, it seems a little snappier, has its own lightning fast editor built in,
and allows you to perform the same actions on remote files that you can on local
drives. Plus, if you buy the current version now, the upgrade is free. You can't
go wrong with this program. You can learn more on FileStar/2 v3.0 at their page
describing Version
3.0
Article References:Filestar/2V2.10 available for electronic purchase $45.00 www.bmtmicro.com |