VOICE Home Page: http://www.os2voice.org
Newsletter Index
< Previous Page | Next Page >
Feature Index
|
VOICE Home Page: http://www.os2voice.org |
October 2004
Newsletter Index
|
| By Thomas Klein © October 2004 |
Amongst the handful of programs for OS/2 that I absolutely rely on, Embellish is one of the most important for me. The first time when I encountered this software, it was already being dropped by its developer Dadaware. There was no further development or support available. Unlike other companies, though, Dadware decided to give it away for free.
Up to that time, the only program I had for picture/photo editing was CorelDraw's PhotoPaint and Jasc's Paintshop Pro - both for Windows, of course. Unfortunately. Because I was heading for a totally Windows-free way of working, I came across Embellish and the first couple of times that I played around with it, I was heavily disappointed: I didn't quite understand what that tool was about. The way of working was different from what I was used to - at first sight. Then, after some time of messing around with StarOffice's "picture painting facility," I decided to give Embellish another try but now by starting with the will to understand. I worked myself through the basic online help items and then - magic!
Once I knew how to approach basic editing tasks within Embellish, I was impressed by its powerful features.
On the other hand, I quickly came across some bugs and flaws that had not been fixed by its developers before they "buried" it to become freeware. Luckily, I found that most of them can be worked-around by following a few simple guidelines.
Still, not being perfect and sometimes a little tedious to live with, they put Embellish into a "somewhat" stable and reliable state. It might not be "everybody's darling" and the fact of a dead-end state of development might also discourage people from working with it. Nevertheless: It's good, it's free, and I know that there's many folks out there who are still using it. In addition when focusing on specific tasks, Embellish is unbeatable, fast and flexible.
All in all it's my personal number one choice when it comes to doing screenshots or image editing for web site purposes.
I don't want to start a complete tutorial on working with Embellish (I might do that focused on specific tasks at some other time if there's enough people interested); I'd rather talk about the most frequently encountered problems and some great (yet not so commonly known) features.
If you already have a working copy of Embellish installed, simply skip the following paragraphs - they deal with the various versions of the distribution zip files lying around.
When the whole "Embellish 2.02 for OS/2" thing started, there was one version of the distribution zipfile available: At the Dadaware website.
This zip file had a little (but nasty) bug, as the included install.in_ package was missing a file called EPFIPII.DLL. The result was an error message showing up during the install process that could only be overcome by doing some "tricks" manually.
Next, there was a version provided by a user that is still available at hobbes, which still had the bug but had added a README.1ST addressing this very problem, plus a HTML version of the Embellish help file. The HTML file is plain text only which means that there's no chapter-wise links for example.
The third version now is the one that is available at Dadaware today. It does not include the HTML help file but has fixed the erroneous package file.
So here's what to do, if. . .
To get the HTML file download the hobbes version of the Embellish "distro," unpack it, and use UNPACK2 to expand the file emb.ht_ into 202.HTM (enter "UNPACK2 emb.htm" without the quotes).
If you can't download the "new" zipfile for any reason (e.g., no Internet connection) or simply don't want to do so, I explain how to overcome the install bug -- see section 2 below.
Anything else might leave you with the install bug as well (like the "bad" one). If you can afford a 2.5 megs download, go for the Dadaware zip file.
If you already have a working copy of Embellish installed, or your installation did not show the "missing file error message," feel free to skip the following paragraphs.
Embellish uses the IBM installer "technology" and thus (besides presenting you with that sliding animation annoyance) it relies upon specific libraries and files that should actually be included in the distribution package, but are not. At least not all that's needed it seems.
After having unpacked the distribution ZIP file, all you need to install Embellish without having to rely on the INSTALL.EXE is any application on a hard drive that was installed by the IBM installer and still has its installation files. Like Netscape or Hoblink X11, for example. Simply search your drive(s) for a file called EPFIINST.EXE. If there's such a file somewhere and the directory also contains a EPFIPII.DLL, you can very likely install Embellish without problems:
(The following is taken from the README.1ST file of the Hobbes-based distribution zip file that was provided by Petr Hanousek.)
- Execute the EPFIINST.EXE that you located
- From the menu select "File", "Open Catalog", "Drive..."
- Select the drive and click "search" to locate the directory that
  contains the unzipped files of the Embellish distribution zip file and
  select the file called "embelsh.icf"
- Click "OK"
- Click "Open" (you'll return to te main screen)
- From the menu select "Action", then "Install"
- The installation process will start; once finished: Quit the installer.
Well, so much for getting Embellish installed. Now let's go for the usage.
One very nasty bug sometimes occurs when you create a new image (e.g., by a screenshot or copy/paste) and save this new image as a JPG (or "JPEG") file. While everything seems to work and the new image is still displayed on the screen, the actual file that was written sometimes contains nothing. If you close and re-open the new file, you'll see nothing but boring blackness.
I tried to reproduce this behavior for this article, but, as usual, erratic errors don't show up when you want them to do so. ;-) I can't tell the exact situation when this happens. It might be related to colordepth, image size or possibly memory constraints... all I know is that it only happens with the JPEG format. (At least I never had this problem with any other format except JPG/JPEG.) Most of the time, this problem occurs upon cutting/editing JPEG files from my digital camera and saving the work into a new file. As I have completely given up using JPG in favor of PNG, this bug doesn't have any impact on me anymore.
But anyway: How to get around this problem and create JPEG files?
The simple solution is to select a different picture format first; save your new image as "BMP" for example. The image size might blow up but at least your work is safe! Close the new file, re-open it (via the list of recent files in the file menu) and use Save as from the file menu to finally save it as JPEG. This always works. You're free to use a different format than BMP for your "intermediate save," but remember that some formats (like GIF) can only handle a specific number of colors and thus might automatically decrease the picture quality during save!
Personally, I prefer the PNG format as it is not subject to any possible copyright issues and has better compression/quality than JPEG anyway (as far as I can tell) while providing the same features like interlacing. However, I didn't manage to get transparency (like in GIFs) working with PNG images from Embellish. There are options to define the transparency, but either Embellish doesn't do it correctly or my Mozillas are not capable of using transparency in PNG images. [Ed. note: Not a Mozilla problem.]
This one is also very annoying, yet not tremendously dangerous. Sometimes when working with a magnification other than 100%, or with a window size that does not match the image display size (using a "border"), the on-screen coordinates of a pixel are not matched to the pixel position within the image. Hard to understand?
Example:
If you zoom into an image and then resize the window of that image to show the complete (zoomed) picture, you might
size the window larger than needed. It shows a border. Okay so far. If you now use the color picker on a
specific pixel, it sometimes give you the wrong color because the pixel position in the image was not
calculated correctly from the pixel position on screen. Funny. The workaround for this problem is to select View
-> Display method -> Use sliders from the menu. This re-draws the image based upon the current zoom
factor and the possible value of the slider bars (if any) and thus provide new accurate offsets for the
screen-to-picture matching process.
The same effect sometimes can be observed when drawing shapes that are drawn in a different position than where they were supposed to be. This also indicates that the screen positions don't match the "internal" image pixels and you should initiate a redraw of the image first by using the above menu commands.
After having discussed the "major" flaws of Embellish as far as I have observed (and suffered), let's take a look at something more positive.

The file list context menu
Embellish does not use the standard file dialogs of the underlying operating system that you might be used to but rather something of its own to incorporate additional features. This also applies to the Windows version by the way.
Besides the obvious features which are explained in the online help (Info, Next, Previous buttons, the Options check boxes and the Priority selection) there are some nice enhancements available via context menus of certain parts of the dialog windows. Both "Open" and "Save" dialogs provide the following:
File list:
The context menu provides entries for displaying the size of each file along with along with its name and even
shows different sort methods for the file list. If a filename was selected before the context menu was invoked,
you find entries enabled for moving, renaming or deleting that file (see image to the right).
Directory list:
The context menu shows the functions of the shortcut utility which speeds up locating frequently used
directories (see following section 6).
Of course, the file dialogs themselves remain open during/after the use of these additional features.
This one is a real gem, especially if you're dealing with many different drives and directories for your images if they are categorized - like me. I have different directory trees for all the stuff needed for websites and of course I use different trees for the websites of customers and myself. Then, there's the images on CDs too, again with different directories. This means a lot of paths on different drives that are accessed. But most of the time, you notice that it's only 4 or 5 paths that you use most frequently.
The usual Open file dialog might (or might not - depending on the programmer) remember the directory that was last used. Well, even if it does, this can be tedious. For instance, if you have 4 "common" directories that you mostly access, making Embellish start with a default drive/directory when the file dialog is opened (this is available via Preferences) will not save you any time in 3 of 4 cases. ;-)
There are three ways of getting it done:
The latter method brings up Embellish's Shortcut menu:
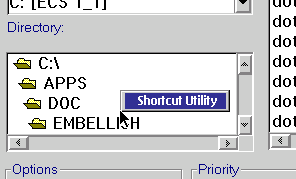
The directory list context menu
Initially, this menu does not contain anything except an entry that invokes the shortcut utility itself (see image to the left). Once you have defined some "shortcuts," they appear below the utilities entry in the popup menu. As your shortcuts menu is empty unless you already know what it's about, click the menu entry to bring up the shortcuts utility dialog.
First, let us clarify what "shortcut" actually means in Embellish. A shortcut is nothing but a combination of drive letter and directory (a path if you prefer) that is user-defined and simply "remembered" by Embellish. You might remember that a lot of other programs keep a list of the last couple of files that were opened (just as Embellish does). This list is available from the files menu to ease access to those files. Well, the shortcuts are just like that, except that they do not deal with a single file but a path and that you control what is contained in the list.
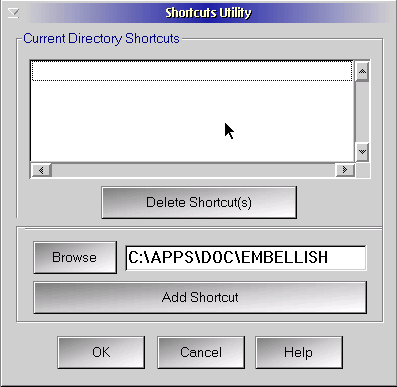
The shortcuts utility dialog
The shortcut utility has a dialog of its own which creates or deletes the shortcuts that appear in the menu mentioned above. All you need to do is specifiy (or browse to) a path of your choice and add it to the list by clicking the appropriate button. To remove a shortcut, simply select the entry from the listbox and click on the Delete button. Note that the list (like the file lists of Embellish) is capable of Multiple Selection - thus you can select and deselect each entry by clicking on it. (Not to be confused with Extended Selection, which uses the shift or control keys together with clicks to select ranges of entries or individual entries.)
As to the limit of entries which the list (and thus the menu) is capable of handling and storing: I can't tell. I stopped testing after there were more than a dozen of shortcuts in it. As the list items are made up of the paths themselves, you don't even have to specify any additional parameters like alias names.
The menu (along with the paths defined) is available from each of Embellish's dialogs that use a directory list box - thus the open and save file dialogs as well as those for Batch Conversion, Slide Show and Catalog.
This way, you can rapidly change to a certain drive/directory that you might be using more frequently without the hassle of having to select the drive first and then click your way through its directories.
Although Embellish's screen capturing feature is described in the online help (and actually is quite self-explanatory), it is worth mentioning here. The guys from Dadaware seem to have taken almost each and every kind of situation into consideration when they programmed that feature.
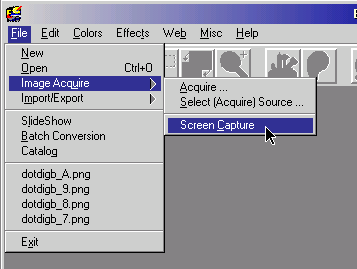
Invoking the screen capturing dialog
Sometimes for instance, you might want to capture a menu opened with a specific entry highlighted and even include the mouse pointer (just like I did for getting the screenshot to the left). Other programs for screen capturing might fail in such circumstances because the capturing process is initiated by certain keystrokes - which might result in the menu disappearing. No problem with Embellish though even in the most difficult circumstances.
Simply select the type of capturing area and use the timer method. Allow yourself some more seconds to change to the application desired and eventually walk though the menu entries. Then simply wait for the timer.
Remember that you should not save the captured file as JPEG directly. As I said above, Embellish sometimes fails to write the file correctly in this situation which results in a "black only" image.
Embellish also provides built-in tools for creating "animations," which means that you can create "animated GIFs" with Embellish. Animated GIFs are a special kind of picture format because they don't include just one picture but rather a sequence of single pictures along with interval settings. This basically is the same method as for animated mouse pointers for example.
Animated GIFs are almost only used for websites and are supported by every type of Internet browser (even vintage ones) as long as the browser is not text-only and capable of displaying pictures. You might have already encountered lots of animated GIFs like the colorful separator bar on the editorial page of the VOICE Newsletters or those animated letters and envelopes that lots of websites incorporate for their mail links.
And of course... ads! Almost each and every "animated" ad that appears on the upper edge of a website is done with animated GIFs (like on the Yahoo! pages) except for those ads that use Shockwave plug-ins.
Embellish provides 2 means of doing animations: The GIF animator and the object
animator. While both of them create an animated GIF which consists of an arbitrary number of
single images (called "frames"), they use different approaches for creating them:
The GIF animator is based upon multiple single images that already exist before you start the animator and provides different effects of transition and time interval between one picture and its successor.
The OBJECT animator works based upon objects. Objects are all the things that you "draw" in Embellish (like shapes or text). The object animator provides tools for "moving" these objects within the base image by letting you specify the objects position in each frame.
I won't explain how to use these tools here - that would be too much. Let me just tell you that it's a painful and tedious process depending on what you want to do. Simple effects like fading/slicing pictures or text that you might know from presentations are not too difficult to realize. But if you want to go for more complex effects, you should bring along some spare time. Remember that Embellish does not understand real "objects" - it's a 2D-only painting program. It might have powerful effects built-in, but it's still 2D. What does that mean to the user?
Well, you can't draw a 3D-like "ball," make it "rotate" and get your animation frames off that. In fact, you must draw the images yourself first and then incorporate them into a sequence.
In addition, as far as I can tell for the GIF animator, Embellish also shows some flaws when (re-) opening animations saved in an a GIF. So be aware that whatever you might be creating may end up in a "one-way ticket."
If you feel that the toolbars are consuming too much space, why not move them out of the Embellish window? They're "floating" - even outside of the main window. You are using Embellish maximized and can't move them away? Then resize them.
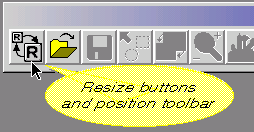
The toolbar settings button
Each of the floating toolbars has a small button (see image to the left) which invokes a settings dialog. Within the dialog, you find options to make the toolbar floating or fixed. For fixed toolbars you can select among the 4 possible regions of the program screen where you want the toolbar to be attached: upper, lower, left or right border.
Regardless of whether you want a toolbar to be fixed or floating, you can also select the size of the icons on it (thus increasing or decreasing the space needed by the toolbar too). The default size is set to "regular." Note that besides the "large" setting, there are two settings which decrease the space needed: Small and tiny. I prefer small because it reduces the space needed by the toolbar while still having recognizable icons. "Tiny" might use the least space, but to be honest, I don't recognize the icon images anymore at this scale. ;-)
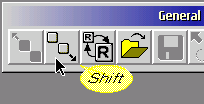
Scrolling through icons
In addition, floating toolbars can be sized to show different numbers of columns and rows of icons. This is done as you would do with other windows too: Simply move the mouse pointer to a corner edge of a floating toolbar and click-drag to change the size to your needs.
If a toolbar's size is too small to display all icons on it, it displays two additional buttons which shift the icons by 1 position forwards or backwards on the toolbar. Thus you can "scroll" through the icons on the toolbar.
Once you have drawn a complex picture by using multiple objects on different layers and moving them all in the right position, you certainly want to save all that work - right?
As long as you keep the current session of Embellish running, the image "remembers" the objects that it is made of. This is true even if you saved the picture to some standard image file format (like JPEG) in the meantime. But as soon as you close the session, all information is lost. If you then open the picture, you have a plain picture - nothing else. No objects anymore.
Unless: You don't save your work to a "standard" image file format like PNG, GIF, JPG, BMP and so on, but rather Embellish's own format which uses the filename extension "EFF."
The image size increases of course when compared to other formats, but it preserves all the objects contained in it so you don't have to restart from scratch if your picture requires additional work. Note that the Embellish File Format (EFF) is used by Embellish only - there is no other application available (to my knowledge) that understands this format. To sum it up, here's what Dadaware says about it:
"This format allows the storage of maps, objects and selected areas. These features are unique to Embellish and are not supported in most file formats. If the image is stored in a format other than Embellish, these features will be lost.
...
"Because of the ability of this format to support objects, always use the Embellish format when saving files that are being edited. Use other formats for distributing the finished images."
Well..., questions, anyone? ;-)
Sometimes Embellish seems to lock up the machine by consuming all CPU power while apparently doing nothing. Still, all tasks within the program are being executed but things take very, very long. If you ever noticed that behavior but could not resolve it, it might be due to an erraneous or even corrupt entry in Embellish's INI data.
When I had that very problem, I first decided to uninstall Embellish in despair. That of course solved the problem and after I reinstalled it, all was working well. At a later time, the problem was back for some reason - I can't quite remember what I did to trigger disaster - but this time, I simply ran the INIFILE.CMD off the installation directory. That also made me lose my settings (and shortcuts!) but at least it saved a lot of time. So if you are experiencing the same problem and want to give it a try by editing your INI files (e.g., with regedit2.exe) be aware that you are messing with data vital to your entire OS/2 or eCS system! The settings are stored in the actual OS/2 registry and not in a file that is specific to Embellish only.
The following is described for use with OS/2's own registry editor called REGEDIT2.EXE. If you use another registry (or INI) editor, you certainly know what you are doing and adapt what I say here to your needs.
Open the user-related part of the registry (when using REGEDIT2.EXE this is displayed as HINI_USER_PROFILE)
Select the entry called Embellish from the list of applications
The lower part shows all keys along with their appropriate values that are specific to Embellish
Now first delete only the key called settings and restart Embellish to see if the problem is gone
If the trouble stays, go along by deleting all other keys/values specific to Embellish except for QuickDirectoriesX (where X is a one-digit number) to keep your shortcuts if any and also LoadedFilesX (X being a digit again) if you want to keep the list of recent files accessible from the File menu of Embellish.
Upon the next launch, Embellish automatically re-creates the missing entries by using default values.
And that's it. I hope you give Embellish a try - once you are used to it and know the limitations, it can really speed up basic tasks of picture editing.
If you have trouble using one of the above features I described in here or you need help with a specific task in Embellish, feel free to drop me a note. I don't claim to be an expert but will try to help you. Although no longer being developed, I think that Embellish is one of the most "handy" (and free) programs for OS/2 and eCS and it deserves some "community-based support." ;-)
References:
|
Feature Index
editor@os2voice.org
< Previous Page | Newsletter Index | Next Page >
VOICE Home Page: http://www.os2voice.org