
VOICE Home Page: http://www.os2voice.org
[Newsletter Index]
[Previous Page] [Next Page]
[Feature Index]
|
VOICE Home Page: http://www.os2voice.org |
December 2003
[Newsletter Index]
|
| By Armin Schwarz © December 2003 |
The Dell Latitude C510/C610 is a perfect example of a corporate-issued laptop. It's dark gray and mixes in transparently with the equally suited business people in corporate conference rooms. For some reason, they all appear to run Windows 2000 that only contributes to the transparency - nobody wants to stand out. The movie Legally Blonde portrayed this in a scene showing rows of gray laptops except the heroine Reese, who jovially sported a pink iBook.
But I'm digressing. The computer scene is not as drab as it looks. I awaited the release of eCS 1.1 with great anticipation, as I knew that it would include a new installer plus all the fixes, enhancements and updates that had been done to OS/2 Warp 4 since it's initial release in 1995. I was especially interested in how eCS would perform on this Dell laptop, my first mobile computer.
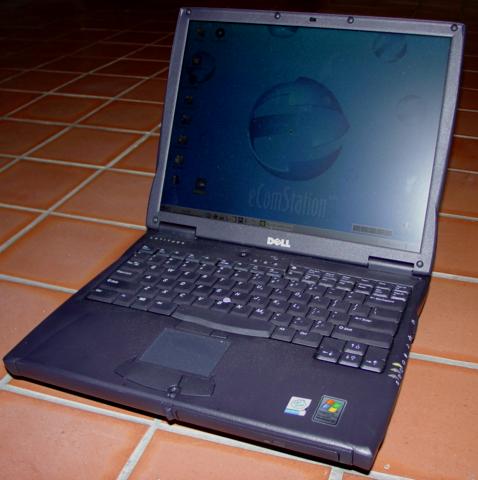
Figure 1. Dell Latitude C510/610
This laptop is now about a year old and has the following configuration: Pentium III 1.2GHz CPU, 512MB RAM, 30G hard disk, Toshiba combo CD-RW/DVD-ROM, one serial port, one parallel port, one USB port, two PCMCIA slots, one PS/2 connector for mouse or keyboard, one video out connector, headphone, microphone, telephone and network connectors, IR port and an ATI Mobility Radeon video card with maximum resolution of 1024x768 at 16 million colors.
Installing an operating system takes some planning ahead of time, no matter what OS it is. The manual included with eCS is short and to the point and well worth reading ahead of the actual installation. As an example, it listed some hints what to look for if installing along other operating systems. Since I wanted to install eCS alongside Win2000Pro, it recommended upgrading Windows to a certain service pack level to prevent boot manager corruption.
The various hardware and relevant part numbers of devices should be known and recorded in case automatic detection fails and installation asks for the information. The system specifications are a good source for device brands and chipset numbers.
Hard disk partitioning also needs to be planned for. If you want to share information
across multiple operating systems you will need to find out if there is at least
one common file system that is support by all. You can then plan accordingly for
a data exchange partition.
If system specifications are not readily available or contain insufficient information, then a good place to check is the Windows Control Panel. As mentioned earlier, the Dell Latitude came preloaded with Windows 2000Pro.
To open the device manager to display the hardware tree in Win200Pro select this sequence:
START - SETTINGS - Control Panel - System - Hardware Tab - Device Manager Button.
I wrote down device names and part numbers for display adapter, modem, network adapter, PCMCIA adapter, sound and USB controllers. If a SCSI controller is present, it is a good idea to write down that information as well.
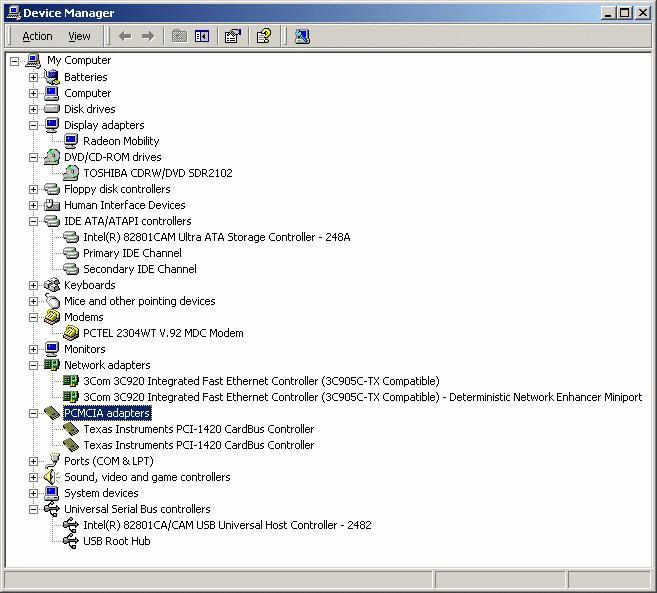
Figure 2. Windows 2000 Device Manager display of hardware devices
In my case, all devices except the sound card were identifiable with a part number. The sound card was listed as Crystal WDM Audio Codec by Cirrus Logic, Inc. No chip set number was given in the properties. I also knew from the laptop specifications that the sound was AC'97 compatible but I still didn't have sufficient information to know for sure if sound was supported through any drivers.
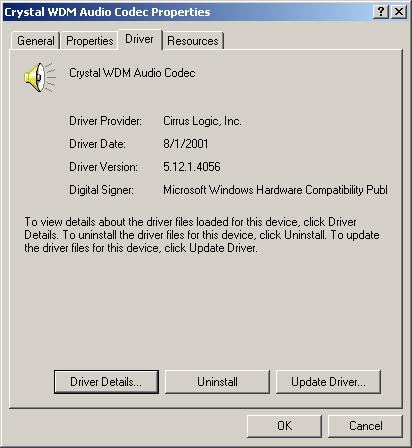
Figure 3. Sound card driver properties under Windows 2000
I decided to try pci.exe, a freely available program that scans the computer's PCI devices. This program does not run under Win2000 or WinXP and a bootable DOS disk I keep handy came in very convenient. Here is the output for the sound device I captured to a file by entering pci >pcidump.txt at the DOS prompt:
Vendor 8086h Intel CorporationThe device part number information is given here, but it doesn't appear to be a Cirrus part number. At least the AC'97 Audio Controller device is confirmed. I knew a bit more than before and decided to move on with my task at hand.
Device 2485h 82801CA/CAM AC'97 Audio Controller
Command 0005h (I/O Access, BusMaster)
Status 0280h (Supports Back-To-Back Trans., Medium Timing)
Revision 02h, Header Type 00h, Bus Latency 00h
Self test 00h (Self test not supported)
PCI Class Multimedia, type Audio
Subsystem ID 59591013h Unknown
Subsystem Vendor 1013h Cirrus Logic
Address 0 is an I/O Port : 0000D800h
Address 1 is an I/O Port : 0000DC80h
System IRQ 11, INT# B
Consulting my usual sources of OS/2 and eCS hardware support information, see listing below, I found that device drivers are available for everything except the built-in PCTel modem. Not a showstopper as you will find out later. I was ready to move on to the next step.
I was required for various reasons to install eCS without affecting the Windows side of operation. This included maintaining the same drive letter for the built-in CD-RW as some preinstalled applications required a CD Rom to run and I did not want to deal with reconfiguring all these applications. Luckily, the hard disk was partitioned into two with Win2000Pro on the C partition and a large partition D was allocated for data. Partition D was empty and sufficient in size to split into different partitions without having to tap into partition C.
Here is what my planned partitioning scheme was:
Win2000ProC: Win200Pro (NTFS)
D: Data (NTFS)
E: CD-RW
F: Data (FAT32)
G: Data (FAT)eCS 1.1
C: eCS (HPFS)
D: Data (FAT, same as G: in the Win2000Pro side)
E: Data (FAT32, same as F: in the Win2000Pro side)
S: CD-RW
The eCS C: drive is a hidden primary partition and Win2000Pro cannot see it. Similarly, eCS can't see any of the NTFS partitions.
The FAT and FAT32 partitions serve to transfer data between the two operating systems. FAT support is built-in on both Win2000Pro and eCS. Netlabs provides a FAT32 driver for OS/2 and eCS and I wanted to give it a try, especially since long filenames are maintained between the two operating systems unlike when using FAT partitions. In Win200Pro, FAT32 ended up as drive F: and FAT as drive G: an unimportant assignment for data storage and transfer only.
All the work I did up to this point did not include booting to eCS from the CD. To set up the actual partitioning as outlined above does require a boot to eCS. The program to do the partitioning scheme is called Logical Volume Manager (LVM). When booting up from the first eCS CD, I first selected "Boot from eComStation CD-ROM" and "Boot with default values". These were the only text-based screens during the installation. From this point on, all screens were fully graphical. The "Begin Installation" screen came up allowing me to select language, keyboard layout and font size. The next screen showed the license agreement that has to be acknowledged to continue installation. The "Installation Type" screen is next. Because I had to change the partitioning, I selected "Advanced Installation". The other options are "Easy Installation" used if eCS is the only OS on a system and "Management Console" which allows access to text editors and various utilities for customizing or troubleshooting. A nice option intended for power users.
"Advanced Installation" brings up MiniLVM, a simple interface to edit and create partitions. You are given a chance to read the LVM documentation and I recommend doing that. You don't have to become an LVM specialist to use it, but knowing the general idea will certainly speed up your work.
Since the empty D partition needed to be split, the first step was to delete that partition. I then recreated partition D at a smaller size intended for the Windows NTFS data partition. During the creation process you can select if the partition is to be bootable, assign drive letters, assign a name to it, select size and choose if the partition will be primary or not. For the data partition D I selected non-bootable, drive letter D, name as NTFS Data, 10Gig in size and left the primary partition box unchecked.
I then created partition C for eCS as bootable primary partition, drive letter C, name as eCS and size 8 Gig.
The FAT and FAT32 with drive letters D and E were created as non-bootable, non-primary partitions using sizes of 500 Meg and 1.5 Gig.
Closing out MiniLVM leads to the "Select Volume" screen where you can now select the newly created bootable volume from the list to install eCS. The next step is to format the partition. I chose the default HPFS file system and enabled the "check for errors" option. The installer warns you about data loss and the time it takes to format when checking for errors. It took approximately 5 minutes per gigabyte and is dependent on the CPU and hard disk speed.
With LVM, arbitrary drive letter assignment is possible and made my partitioning scheme a reality. Being able to keep the CD-RW as drive E: on the Windows side was a necessity and LVM allowed me to do that by assigning appropriate drive letters to the eCS, FAT and FAT32 partitions. I had the partitioning done in no time at all, including installation of the Boot Manager at the end of all partitions.
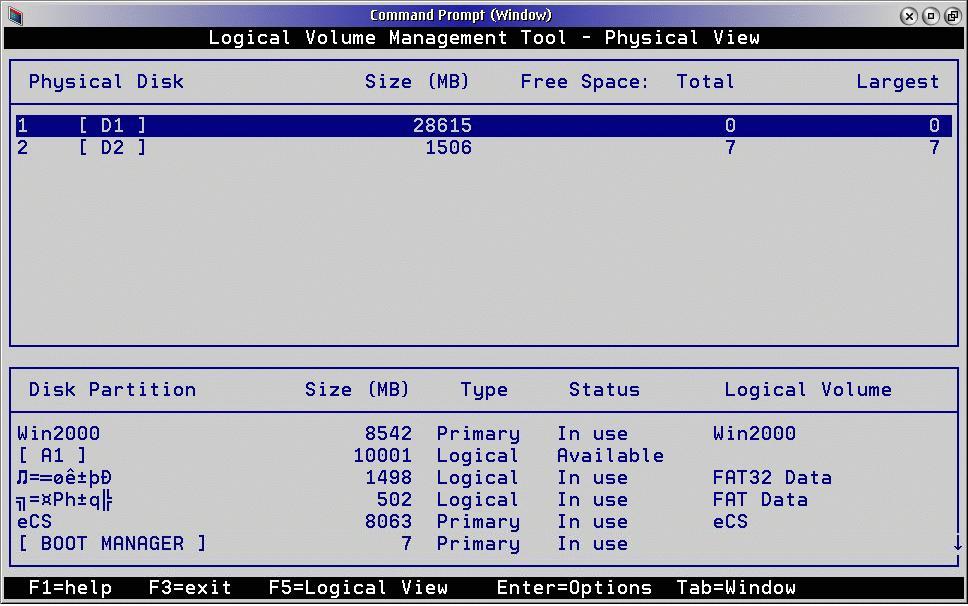
Figure 4. Logical Volume Manager display of final partitioning layout.
Note: Image has been edited to show Boot Manager entry. LVM displays five lines at a time only on logical view portion. Also, the FAT and FAT32 disk partition name get scrambled after booting into Windows, but appears to not cause any harm.
The D partition for NTFS data and the FAT32 partition were later formatted with Windows 2000.
After formatting, the actual installation can start. "Enter Registration" screen will come up after formatting the drive. You can enter the registration manually or by importing it from a disk. The registration must be entered to continue installation. The next screen allows setting of locale, time zone and daylight saving time enable/disable. The "Verify Hardware" screen is next. Under Display Driver (Scitech by default), Storage (Basic IDE/ATAPI set to Dani Enhanced Driver), Standard Devices (mouse, serial port, APM enabled) and USB Support (enabled) no changes to the defaults were necessary. Under Notebook & PCMCIA Support I selected Specify Driver and checked "SS2TICB.SYS (many modern controllers)". For PCMCIA Services, I chose to enable all services. How did I know to check SS2TICB.SYS as a driver? I actually had to do it by trial and error after the eCS installation. I could not find a matching chipset number in the provided PCMCIA driver list so I initially bypassed driver selection. It is also not possible to restart the new installer to just install PCMCIA drivers and services but this is still possible through the old OS/2-based selective install. That just shows how well thought out the new eCS installation process is by allowing this flexibility. After going through a few tries however, I did find a driver that installed properly and so far my PC Card hard disks works without any problems.
Next was the "Select Components" screen for system utilities, Java virtual machine version selection and tools & games. I accepted the defaults but added optional bitmaps to the list.
"Configure Network" is the next screen and under "Connection Type", I enabled Network Adapter and Modem Serial Communications. Under "Network Type" both options were selected by default and I kept it that way. When verifying network adapter, I chose the IBM NULL MAC Driver as my network card was not on the list provided. The good news is that Chuck Mckinnis' NICPAK Page (see below) lists the built-in network cards as a supported device.
In the subsequent screens I selected "Use dynamic DHCP" and entered a generic workstation ID and LAN Domain name in order to complete network configuration. As mentioned earlier, I didn't have an immediate need for networking but wanted to install network components for later use.
At this point, all user input for the installation is complete and accepting the configuration starts the actual file transfer to the hard disk. I took approximately 10 minutes and the installation process rebooted automatically to enter phase two. After 15 more minutes another reboot was initiated and phase three started. Two minutes later a final reboot completed the OS install. On that final reboot, the system appeared to stall, but after waiting long enough I found that DHCPStart time-out was set to 30 seconds and was causing the long delay.
After phase three, the system flashed up a message about a multimedia installation check and also proceeded to archive the desktop. A help panel showed up explaining the eCS Desktop and can be read as the multimedia check is running. The system then opened up an attractive series of panels to adjust certain built-in functions. The first one allowed me to adjust screen resolution and monitor type. I changed the default 800x600 to 1024x768. Next it provided a way to change the network user id which I bypassed. I then changed the DHCP wait time from 30 seconds to 10 seconds which sped up the boot time somewhat. The User Interface can now be customized through a bewildering amount of selections: WPS, eStyler, window themes and icon themes. The Clock options are next where you can set things like your city location, automatic time resync through the internet and more. The Multimedia panel is simply a confirmation that the base multimedia system has been installed and any sound drivers must be installed separately. Sound card installation has been left out of the new installation process for various reasons but nonetheless, eCS includes a number of sound drivers and other multimedia applications that can be installed very easily later on.
Printer installation is last and I had no problem finding a driver for my HP laser printer. If you changed screen resolution at this point, you must reboot for the changes to take effect.
Base OS installation is now complete meaning that most applications that were included with OS/2 Warp 4 are now installed. This includes IBM Web Browser, internet utilities, EPM and so on. If you purchased the eCS Entry edition, the second eCS disk contains a number of applications like the IBM bonus pack and drivers and most of them can be installed through a new, attractive program that lists each program and explains its functions and any pertinent information necessary to install it. If you bought the full version a third CD is included containing the Lotus Smartsuite office applications.
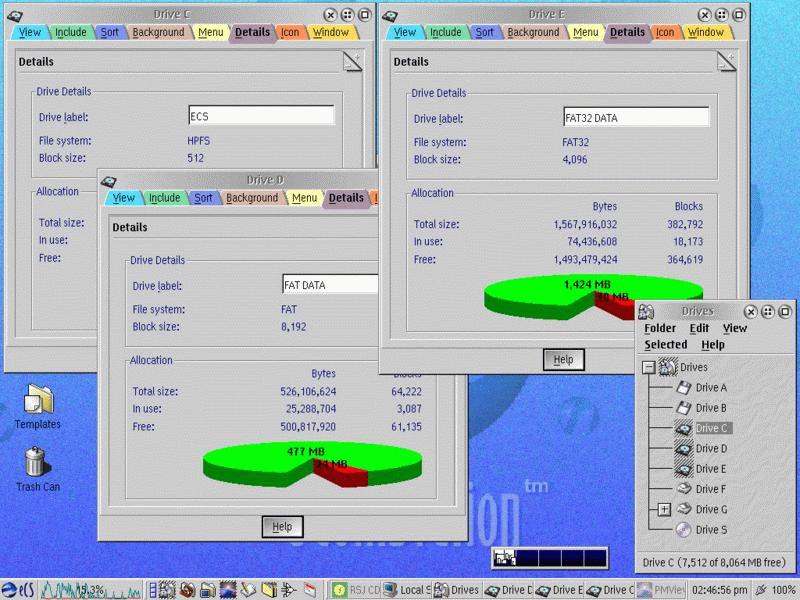 Figure 5. Success - eCS
running on a Dell Latitude showing all drive properties. Drives F: and G: are PC
Card hard disks plugged into the PCMCIA slots.
Figure 5. Success - eCS
running on a Dell Latitude showing all drive properties. Drives F: and G: are PC
Card hard disks plugged into the PCMCIA slots.
At the time of installation, I did not find a sound driver supporting the Dell laptop. The best hope for future support was provided by the UniAud project. Sure enough, a few weeks after OS installation, the uniaud20030821 release became available and it detected the sound card and installed without a problem. All sound worked on first try, with one exception: MIDI doesn't play. Installation was straight forward. Extract the files into a separate subdirectory and run install.cmd. Follow the minstall prompts, then reboot. The default installation settings detected the proper sound card automatically as the Hardware Manager screen shows below. Be sure to read the file readme.txt for more details about this project and provide feedback should this sound driver work for your system. The UniAud sound drivers support the IOCTL90 API mixer interface and I highly recommend using LBMix to control sound volume. Using the various volume controls of the multimedia programs did not always control the sound correctly. LBMix however works without any problem and now prominently occupies a spot on the eCenter tray. LBMix can be found on the eCS Applications CD or at the link provided below.
 Figure 6. eCS Hardware
Manager display of uniaud sound card support.
Figure 6. eCS Hardware
Manager display of uniaud sound card support.
After repeated searching, I found no OS/2 or eCS driver for the PCTel modem. Not a big problem as I could resort to either using an external serial modem, USB or PCMCIA modem. There are a number of these modems that are supported by OS/2 or eCS. I will tackle this subject in a later article about connecting this laptop to the internet along with some of the internet applications available for eCS and OS/2.
At this point, eCS was installed and up and running. The eCenter automatically put the power widget in the right corner and indication of line power or battery power and percent capacity worked without any intervention. Shutdown was not set to power the laptop off automatically. Opening the eStyler Preferences window revealed a number of APM supported modes and one specifically that powers off the laptop after shutdown. The shutdown dialog now includes a Power Off option after enabling it. eStyler also allows custom programs to be executed before shutdown, certainly a nice addition. You can find the eStyler Preferences under Local System - System Setup - Appearance - eStyler Preferences.
So far, eCS has been working flawlessly on my Dell Latitude. Windows 2000 and eCS data exchange has been trouble free. There appears to be an interference of Windows with the FAT and FAT32 disk partition names, but that has not caused any other problems. Connecting a USB mouse to this laptop proved to be problem free. It is detected automatically and works in parallel with the built-in glide-pad and stick control. Data exchange using USB thumb drives or PC Card hard disks worked right out of the box without any additional configuration.
When installing several of my favorite OS/2 programs, I found that the slowly disappearing floppy disk still proved useful for transferring registration keys and even small utilities from mostly older computers to this laptop. Yes, I could have used CDs, USB thumb drives or PC Card hard disks, but older systems generally don't support these devices. I found that eCS doesn't automatically detect the change of a floppy or CD-RW/DVD drive in the drive bay. A reboot is necessary for eCS to recognize the change in drives. If you need to transfer data repeatedly, look at using a network connection or Linkwiz over a serial or parallel port connection as a better alternative.
I was quite surprised how easy and uneventful the installation process went.
Not a single problem surfaced. My hat is off to Serenity and all the developers
for a well organized designed and simple process. Along with the included selection
of basic applications, utilities and tools, eCS represents a complete package and
will run on a large amount of popular hardware. Yes, there are the odd devices that
are not supported, but eCS is not the only operating system that suffers from that.
With the choices of interfaces available these days, chances are that in one way
or another a solution does exist for eCS or is in the works as my experiences have
shown regarding the sound card support. The lack of support for the built-in modem
was not immediately an issue for me but eventually I needed to find a solution.
Stay tuned for another article in the future about connecting this laptop to the
internet and using some of the internet and multimedia applications.
References:
|
[Feature Index]
editor@os2voice.org
[Previous Page] [Newsletter Index] [Next Page]
VOICE Home Page: http://www.os2voice.org