
VOICE Home Page: http://www.os2voice.org
Newsletter Index
< Previous Page | Next Page >
Feature Index
|
VOICE Home Page: http://www.os2voice.org |
February 2004
Newsletter Index
|
| By Walter F. Metcalf © February 2004 |
Note: This article was inspired by Melvin Strom's fine article "Setting Up Remote Printing: Connecting to a Remote Printer or Print Server" on the SCOUG web site.
Much of the visible output generated by applications on modern computers is displayed on the computer's monitor. In addition, more and more of the documentation provided with applications comes in the form of computer files instead of paper manuals.
However sometimes there is no substitute for an old-fashioned printed report or document. Consequently, almost all personal computers have a printer connected (directly or indirectly) to them. If the computer didn't come with a printer, sooner or later, the user is likely to buy one.
However, printers are still mechanical machines and are moderately-to-extremely expensive, especially for high-quality colour printers. If you need to print a relatively large quantity of such documents, the problem is even worse.
As a consequence of all this, it is only natural for people to look for ways to economize, especially in environments where there are several computers. In the Microsoft world, so-called "win-printers" are being sold at very low cost--so low, in fact, that the ink cartridges can sometimes exceed the cost of the printer! This saving comes at the price of an increased load on the computer's processor and operating system because they have to take on work that would otherwise be done by conventional printers. Moreover, such printers are incompatible with some operating systems--eCS-OS2, being prime examples-- and/or computer hardware. See the previous article in this series for more information.
However, if you are operating, or connected to, a LAN, there is a completely different opportunity for reducing printer costs that results in no increased burden on the computer or incompatibility--namely sharing a printer amongst the workstations on the LAN. How to effectively accomplish that sharing is the subject of this series. Begining with this article, we start looking at a class of hardware devices that is probably new to most people. These devices are called print servers.
A print server is a hardware device that connects a printer to a LAN, so that all the workstations send data and commands to the printer over the LAN, instead of through, for example, a parallel or USB port. Using a print server eliminates the need for a separate workstation dedicated to operating the printer.
When printing in this manner, print data is transmitted using the TCP/IP protocol instead of the traditional File and Print Sharing (aka NETBIOS or NETBEUI) protocols, as discussed in the first article in this series.
Moreover, since the data is sent to the Network Interface Controller (or NIC), parallel port driver (e.g. PRINT01.SYS) are not required. More will be said about this later.
There are many different types of print servers, but they can be grouped into two major categories--"dumb" and intelligent. For more information on this subject, see the previous article in this series.
This article is devoted to the "dumb" print server.
In the interest of accuracy, the remainder of this series will be based primarily on the hardware in my possession that I have tested and worked with over the past few months. However, I will refer to other devices or device types where appropriate.
By no means should the term "dumb" be thought of as applying to the SMC7004ABR, which is a very powerful and flexible router! However the print server it contains is "dumb" because it contains no separate microprocessor, and that is the essence of the definition of "dumb". (See the previous article in this series for more details.)
The SMC7004ABR is one in a series of routers made by SMC that contain a built-in print server.¹ (D-Link also manufactures similar devices.) Although these print servers are very basic, they are effective and reliable, and are probably the cheapest way to attach a printer to your LAN.
The SMC7004ABR (like all SMC routers I have used) has another big advantage: it is completely compatible with eCS-OS2! Unfortunately, SMC does not provide OS/2 drivers or instructions. However, IBM has provided the driver necessary to operate the print server, and the built-in web servers contained in the SMC routers work extremely well with Mozilla and the IBM Web Browser.
The term "web server" in this and similar contexts refers to one or more Java programs (aka applets) contained on a device's firmware that can be operated by almost any Java-capable browser. Web servers are becoming more and more popular as a means to make a device cross-platform compatible, as well as providing a simple means to access utilities and setting parameters within the device.
Hardware installation of the print server on this router is simplicity itself.
Install the router portion of the SMC7004ABR according to the instructions in the on-line and Getting Started hard-copy manuals. (Of course you'll have to replace the Windows instructions with the OS/2-eCS equivalents where necessary.)
Once the router portion and the LAN is functioning properly, then simply connect your printer to the parallel port on the rear of the SMC7004ABR, using any standard parallel cable. USB-only printers are not supported. "Win-printers" are also not supported. (See the discussion in the Introduction.)
Start the browser, and load the admin page of the router. (For the SMC routers this IP defaults to 192.168.2.1. Otherwise check your router manual to find the IP for your router.)
Enter your password, and then click on STATUS. In the Gateway column near the top of the page, you will see a list of items describing various conditions within the router. The last of these describes the state of the printer connected to the router. The state of the printer should say READY if the printer is properly connected to the parallel port of the router and if the printer is ready.
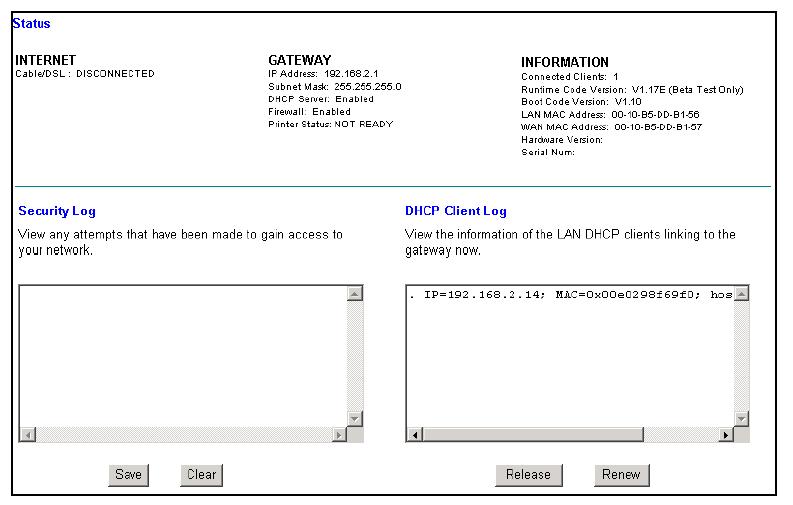
(Click on image to expand to full size.)
Since remote printing on a LAN is handled by TCP/IP (see Introduction), special TCP/IP-based software is required. If you have installed networking on your system, then eCS and OS/2 both have this software already installed, and it is configured via the TCP/IP Configuration object. If networking is not installed, you must add it now before you can continue.
For a number of reasons, the technique using this built-in software, which involves, among other things, loading and starting a special print daemon (LPD) every time the system is booted, is awkward and not very efficient.
Fortunately, IBM recently released a new program called Streaming Line Printer (SLPR). This program replaces LPD as described in Mel Strom's article, which was referred to earlier. It also replaces the parallel port driver (PRINT01.SYS) that is automatically configured in your system at install time. Here is IBM's description of this new port driver:
Streaming Line PRinter (SLPR.PDR) is a streaming port driver used to connect your computer to a printer or print server via a TCP/IP connection. The driver uses Line Printer Daemon (LPD) Protocol as specified in RFC 1179. This protocol is an almost universal way to send print data to printers and servers. It is meant to be used as a alternative to the \PIPE\LPD0 (henceforth LPD0) port driver which is shipped with OS/2. (From the readme file accompanying the SLPR driver. For the complete file, click here.)
Data can be sent to the printer as it received, instead of waiting until all the data is received before printing, as is the case with LPD. Here's the procedure for setting up the SLPR:
Download SLPR from IBM On-line Device Pak (SWC subscription not required) or eComStation web site, if you have eComStation.
Expand the archive into a temporary directory, and copy the files SLPR.PDR and SLPR.HLP into the x:\OS2\DLL directory, where x is the letter of your system drive. (You don't need to copy SLPR.SYM unless you will be involved in debugging the system or driver.) You should also at least skim the documentation.
Note: You may copy the SLPR files into a different directory, but then you will have to specify it later in Step vi below.
Make sure your printer is installed correctly and go to the printer object; right-click on it and then left-click on Properties.
Now click on the Output Port tab and then click on Install new port button near the bottom of the window. If you have installed SLPR correctly, you should see an icon called SLPR in the window, as follows: (Note that if you installed the SLPR files to different directory, you will not see the SLPR icon yet.)
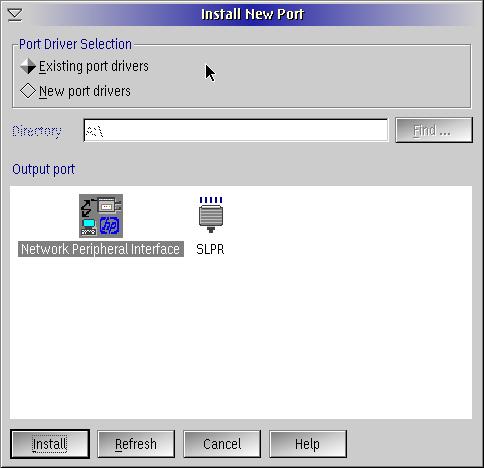
(Click on image to expand to full size.)
Do not be concerned with any other icons you may see in the Output Port window.
If you copied the SLPR files into a directory other than x:\OS2\DLL, then you should temporarily ignore the Output Port window. To access the SLPR files, you need to select the New port drivers radio button at the topic of the window, and enter the directory into which you copied the files. Now the icon should appear in the Output Port window. If it does not, check the directory you typed in.
Select the SLPR icon, and click on the Install button. (You can also double-click on the SLPR icon.)
You should now see a window entitled SLPR1 - Properties.
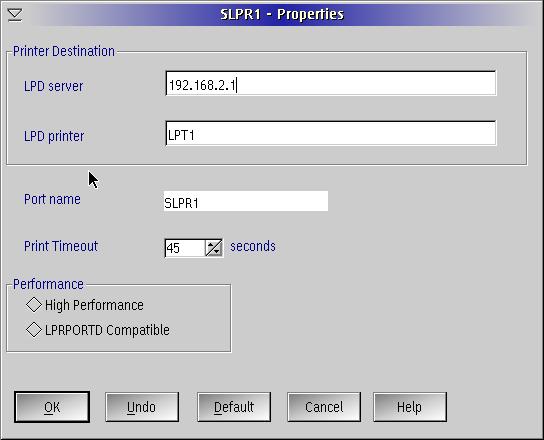
(Click on image to expand to larger view.)
Enter the IP address (four octets separated by periods) of your router in the field labelled LPD Server and LPT1 (without the colon) in the field labelled LPD Printer. For the SMC7004ABR the IP address is 192.168.2.1. If you are using a different router, check the documentation for its default IP address. If you have changed the default IP address for your router, then enter the new value. (The current router IP is always the one you use to access your router's logon screen.
You can also check the field labelled High Performance. This feature will considerably improve the speed of printing on your system. Unfortunately not all printers support this feature. Here is one way to find out if your printer supports it:
Leave it in the default (i.e. OFF) until you are sure everything is working properly.
Turn the High Performance feature ON and try printing a variety of documents (e.g. text, wordprocessor, html). If everything works properly, then your printer supports the feature, and you can leave it on.
However, if you have problems, especially if print jobs are missing, then turn it OFF, and see if that solves the problem. (To turn it off, click on the Default button.) This causes the print data to be held by the spooler until the whole job is complete, at which time it is sent to the printer.
Note that if you have the High Performance feature turned off, print jobs are sent to the Spooler file before being printed.
Warning: Spooler files can be very large, depending on the size and composition of the print job. By default, these files are sent to the system drive. If you are concerned this drive may not be big enough to hold them, you can easily change the directory. Here's how: first, make sure all print jobs are either finished or else delete them. Next, open the Printers folder and change the Print Status for each printer on the pop-up menu to Hold. Now double-click on the Spooler object, located in Local System|Tools, and enter the new directory in the Spool Path field. The new directory takes effect when the Spooler object is closed. Finally, reset the Print Status of each printer to Release.
Click on the OK button to exit.
You should now see an icon for the new port, along with the information you entered, in the Output Ports window.
Finally, right-click on the new port, and left-click on the arrow on the Open item to open the Bidi Setting window (see below). Now left-click on Bidi Setting and click on Autodetect. Then click on OK to exit.
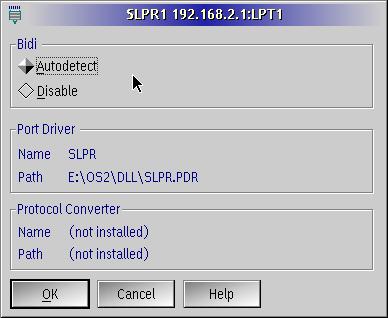
(Click on image to expand to larger
view.)
Now close the Properties window for your printer. (The following steps are critical, so if you have any doubts about which windows are currently open, then close every window associated the Printers folder as well the Printer folder itself.)
Now open the Printers folder if it isn't already open, select the icon of printer you want to use with the new port, right-click on it to display the pop-up menu, and click on Properties.
Select the Output ports tab and left-click on the new Port (SLPR1) icon. Immediately close this window by clicking on the Close icon in the title bar.
The Printer attaches to the port that is highlighted at the time the Properties window is closed. Therefore you have be careful here not to select something else before closing the window. (At least I do; as always, YMMV.)
You can verify that the printer is set up properly by opening the Properties window for the printer, going to the Output Ports tab, and checking that SLPR1 is highlighted.
You should now test your setup by trying to print several different types of documents (e.g. text, e-mails, and web pages).
This brings us to the end of Part 2 of this series on Remote Printing. Please plan to join me next time when we look at intelligent print servers.
¹At the time this was written, any SMC Barricade router that has an "A" immediately following the numeric portion of its model number contains a print server.
References:
|
Feature Index
editor@os2voice.org
< Previous Page | Newsletter Index | Next Page >
VOICE Home Page: http://www.os2voice.org