eCS 1.1 Installation Tips and Tricks
Introduction
I was part of the beta testing program of eCS 1.1 from very early on, and also
have three PC's and one Thinkpad at my disposal. Consequently I have been able to
do dozens of installs of eCS 1.1. Most of the problems I encountered, I submitted
to the BugTracker mechanism, and were promptly fixed. However, there were several
I didn't discover until the GA (General Availability version) was released. A few
others I didn't get time to submit to the BugTracker. (Needless to say, there were
a huge number that were fixed by other members of the development and beta teams
that they or others discovered!)
However, there are always a few issues left over when a product is finally released.
I wish to discuss a few of the more interesting of these in this article, along
with the solutions I have found to work around the problems.
-
CD-ROM Burning
-
As this is being written, there are CD-writers on the market that will burn CD's
at the rate of 24x (e.g. LG 52x24x52 drives). When creating CD's that are nearly
full, such as the eCS Installation Disk, it is tempting to take advantage of these
higher speeds to save time, especially if you are burning a large number of CD's
at once. Take my advice, and don't. CD's burnt at high speeds may work for
games, videos, or simple data storage, but they will not work for installing
eCS. I'm not sure of all that is involved, but one significant factor is undoubtedly
the fact that during an install, the complete operating system is not in place,
and therefore the error recovery in place is somewhat rudimentary.
-
What speed is best? The lower the better. In my experience, in no case should you
burn the installation CD at a speed higher than 10x, especially if your systems
contain CD-ROM drives of different vintage. 4x is even safer.
-
The symptoms of CD failure due to improper burning are errors (especially script
errors) or continuous seeking on the CD without ever finding anything. What makes
this class of errors easy to identify is that they usually are not repeatable. In
other words, each time you try to do the install, you'll get different errors.
-
Tip regarding Boot Drives
-
Here's a hint before you actually start installation. Like its predecessor OS/2,
eCS 1.1's installation is a multiphase operation, each separated by a reboot. Unfortunately,
the Installer isn't very clever about finding the partition it's working on. If
you have several bootable partitions for existing OS/2-eCS systems, it is likely
to reboot to one of them instead of the partition being installed to.
-
The only sure way to avoid this problem is to use LVM (Logical Volume Manager) or
mini-LVM to either hide all bootable OS/2-eCS partitions from OS/2 or to remove
them from the Boot Manager.
-
Once the install is over, it is a simple job to restore the bootable partitions.
My experience has shown this little extra effort pays off in both time and frustration
saved.
-
CD-ROM Drive Letter Organization
-
The installation programs of all previous client versionsnote 1 of OS/2 and eCS have had one limitation: they have hard-coded
the CD-drive letters into the Installer such that they could not be changed. (The
eCS 1.0 Installer did attempt to ease this restriction, but in fact if you did attempt
to change the default letters, it would cause the Installer to fail.)
-
While this may not seem like a big deal, the two chosen letters--R for the Reserved
Drive and S for the CD System drive--are incompatible with the way most people run
their system, incompatible with applications like the RSJ CD-writer software, and
to some extent, incompatible with the actual design of OS/2 itself. Consequently,
knowledgeable OS/2-eCS users have been forced to change their CONFIG.SYS to more
compatible letters such as X and Y or Y and Z after the install is complete.
What's more, this change is quite tricky to get right.
-
Finally, the eCS 1.1 Installer makes it possible to set up these drives the way
you want them before the Install actually begins!
-
Here is the procedure:
-
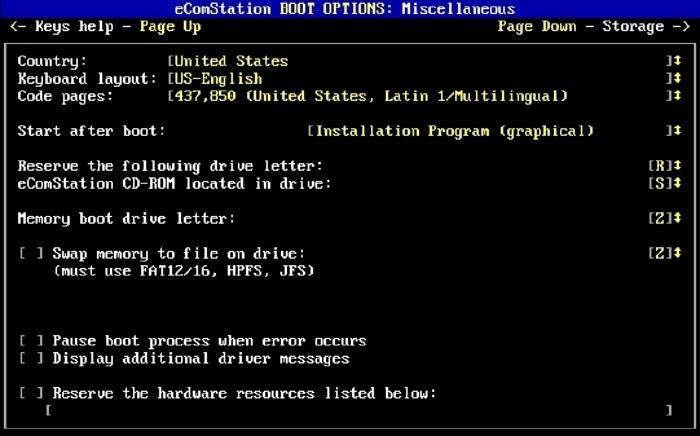
When you start the install use the "Boot from menu with own values" (on
the second screen of the install):
-
-
On the second screen, entitled "eComStation BOOT OPTIONS: Miscellaneous",
. the fifth and sixth lines are labelled: "Reserve the following drive letter"and
"eComstation CD-ROM located in drive" respectively.
-
Tab down to the fifth line, and use the Cursor Up or Cursor Down keys to select
the desired drive letter. Note that as you change the drive letter, the drive letter
on the sixth line changes in concert with it.
-
-
Multiple Drives
-
Experienced OS/2 users have long been accustomed to splitting their install over
multiple drives. The essential system goes on the system drive, and the more application-oriented
files, such as the browsers and Java, may be directed to another drive. It is here
that the eCS 1.1 Installer may raise an unexpected trap for the unwary.
-
If the system was not shut down properly prior to this install, as could easily
happen if the previous session was an install that failed or was interrupted, the
Installer displays the warning message, and gives you the opportunity to either
format it or CHKDSK it. So far, so good. Unfortunately, it only checks the bootable
drives. It performs no checks on other "data" drives.
-
Consequently, if you want to spread your install over drives C: and O:, for example,
where O: is an application, non-bootable drive, no checks will be formed on O:,
and if it is "dirty", it will not be available for you to install files
on, during the "Select Components" section of Phase 1, for example. Attempting
to select O: will cause a "Beep", indicating an error condition, and the
files will be installed on the system drive.
-
If you are using two or more drives, it is up to you to check that all non-system
drives are online and "clean" before the system attempts to use them.
The best time to do this is early on in the install process, for example, right
after the formatting of the system drive. Once the system "mounts" the
application drive, it is too late.
-
Communication Problems
-
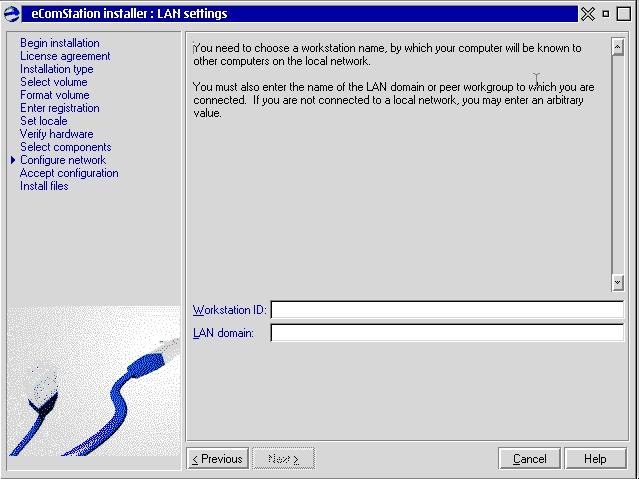
On a simple LAN consisting of a router and several peer workstations, the Installer
changes Hostname to "MyComputer", regardless of what you specify in the
Lan Settings page:
-
-
The name you type in the "Workstation ID" box becomes the Computer ID
in the IBMLAN.INI file.
-
You should change the Hostname in the TCPIP Config object so it will be changed
to the correct value in the CONFIG.SYS and HOSTS files.
-
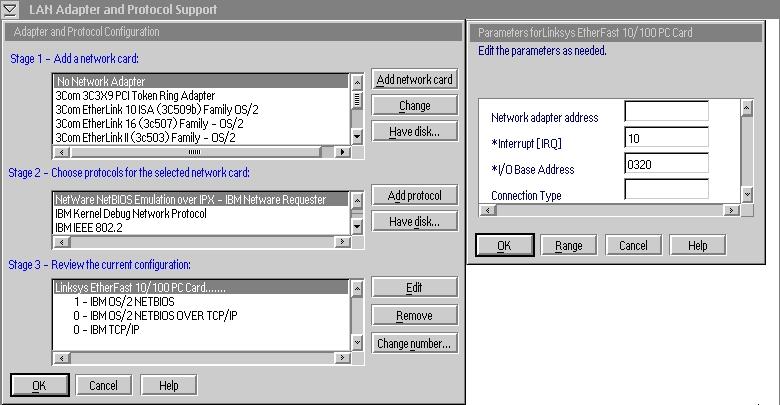
Another communication problem I have seen in some machines, especially IBM Thinkpads,
is that the Installer doesn't check before assigning an IRQ to the PCMCIA card to
see if the IRQ is already in use.
-
For example on my Thinkpad 390E, I have a Linksys PC 100 Etherfast card, which defaults
to an IRQ of 5, though it will operate properly on several others. The problem is
that the sound chip in my Thinkpad, which came as standard equipment, also uses
IRQ 5. The Installer doesn't check for this, and blindly accepts the default IRQ
for the Ethernet card, meaning my system is dead from the get-go as far as the Internet
and LAN are concerned.
-
The solution, of course, is to access the MPTS object (Local System | System Setup
| Network), and EDIT the settings for the Linksys card, changing the IRQ to another
number as shown below.
-
-
This isn't hard to do, but a new user can easily waste hours trying to figure out
why their new system can't connect to the Internet.
-
IBM Notebook PCMCIA Support
-
With certain IBM Notebooks (aka Thinkpads), the software selected by the hardware
and configuration section of Phase 1 is incorrect.
-
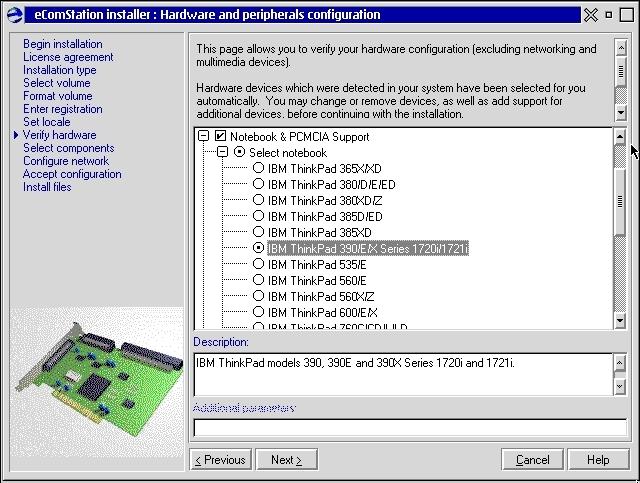
-
The telltale symptom of this problem is that on the final reboot of the system,
the system displays the messages:
DHCPSTRT: DHCP client did not get parameters. DHCPSTRT: Could not start DHCP
client.
DHCPSTRT: Continuing to try in background.
-
Before attempting to solve this problem, you should make sure you have corrected
any other communication problems that may have been left by the Installer, especially
those listed in the previous section of this article.
-
In addition to checking for the problems listed in the previous section, carefully
check the cables, connectors, and NIC (network interface card) between your notebook
and the router, hub, or modem.
-
The programs PMPing and RMVIEW (A command line program to display system hardware
detected) are especially helpful for diagnosing hardware-related problems.
-
When PING'ing between a workstation and another workstation or a router on a small,
wired LAN, you should usually get an average return time of 0 milliseconds for the
packets to return.
-
Occasionally, you may get a 10 ms return time, but if the time gets into the hundreds
or more, you probably have a bad NIC, cable, or cable connector.
-
Now that you have checked for other communication problems, it is time to address
this problem directly. Incidentally, the reason for checking for other problems
first is that they could mimic this problem or occur along with it. If this
happens, and you performed the following procedure first, you would have no way
of telling if it actually worked, because once you were done, you still might not
be able to access the Internet or the LAN!
-
Finally, here is the procedure to correct the problem where the Installer installs
the wrong files:
-
Access the IBM Thinkpad Support Web Site.
-
Scan down the list until you find your Thinkpad model.
-
Click on the model number of your Thinkpad.
-
You should see a matrix of Software and Devices Drivers. Carefully scan down this
matrix, and look for an entry entitled, "PC Card PCMCIA". (Note:
Do NOT use the table near the top of the web page. This will not take you to the
correct location.) Check to see if there is an OS/2 version.
-
If you find one, then click on it, and follow the on-screen instructions for downloading
and installing it.
-
While you are installing it on your notebook, you may see a message saying the file
you are about to copy to the hard drive already exists and has a newer date than
the source file. Click on "OK" to overwrite the file. This is important.
Repeat for each file that displays this message.
-
It's important to follow the installation instructions on the IBM web site precisely.
-
For those of you reading this article who have Thinkpads with model numbers 390,
390E, 390X or one of the i Series 172x machines, click ftp://ftp.software.ibm.com/pc/pccbbs/mobiles/pctpgos2.exe
to download the correct PCMCIA software directly: Note that I have tested that URL,
and can attest to its validity as I write this. Beware, however, that IBM has been
re-vamping its web sites of late, so I can't guarantee the URL will still work when
you read this.
-
LVM Problem
-
On several occasions, and on different systems, I discovered that immediately after
completing an install, when I started the Java version of the LVM utility by clicking
on System Settings | Logical Volume Manager, the LVM utility would start, but hang
before the complete screen was displayed, and eventually shut down (i.e. crash).
-
Unfortunately I have not been able to reproduce this problem "on demand".
Nevertheless I'm offering the workaround I discovered in case you get hit by this
mysterious gremlin.
-
The problem was recurring regularly enough for awhile to develop and test a fix.
Here is what I learned. The problem appears to be caused when the Java version of
the LVM utility (i.e. JVMGUI) loads Java modules from both version 1.3.1 and 1.1.8.
When this happens in certain combinations, the two versions conflict in some way,
so that JVMGUI and or Java cannot continue.
-
This often occurs when Java 1.3.1 directories occur before Java 1.1 directories
in the pathing.
-
So the solution is to go through all the PATH type statements, and make sure all
the Java 1.1 subdirectories appear before all the Java 1.3.1 subdirectories.
-
Although the fix says "all the PATH ... statements", the only ones that
are usually affected are LIBPATH and SET PATH.
-
Configuration Issues
-
Service Errors
-
If you encounter the message, "NET2114: The Server service is not started"
while in the "Sharing and Connecting" object, this probably means that
the PEER (note: not the server!) service has not been started before you started
"Sharing and Connecting".
-
Since the eCS Installer assumes you want a networking system, it should always make
sure the PEER service gets started during the boot-up process. Alas, this doesn't
always happen.
-
There are three ways by which the PEER service can be started at boot time:
-
The phrase "PEER," can be inserted ahead of the word "MESSENGER"
on the line "wrkservices=" in the file \IBMLAN\IBMLAN.INI, about half
way through the file. (This line tells the REQUESTER which services to start when
it is started.)
-
The command NET START PEER can be included in the STARTUP.CMD.
-
A shadow of the program object Start File and Print Client, located in the Local
Network | Network Utilities folder, can be dragged to the Startup Folder.
-
The last of these is the way the Installer usually does it; however for some reason
occasionally it doesn't, resulting in the "Server services error" described
above.
-
TIP: Change the Peer startup to one of the other two
methods. They are more permanent, and less likely to cause problems in the future.
My personal favourite is the first one: modifying the \IBMLAN\IBMLAN.INI file. Just
remember to delete the "Start File and Print Client" in the Startup folder
to avoid interference.
-
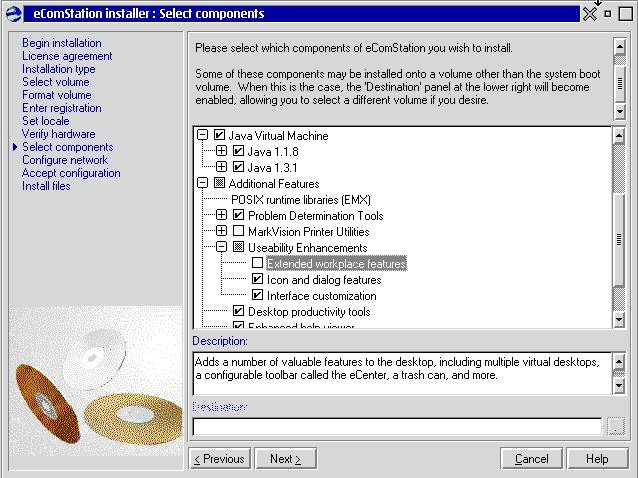
eWorkPlace and eStyler
Installed "out of the box", the Installer will include "lite"
versions of the very powerful utilities XWorkPlace and Styler/2. These are called
"eWorkPlace" and "eStyler", respectively. However, some "power"
users prefer to continue using the "professional" versions of these utilities.
This can be done; however, the method is not well-documented outside this article.
-
During the eCS installation process you will come to a screen titled "eComStation
Installer: Select components", which looks like this:
-
If you wish to exclude eWorkPlace from installation, simply deselect the box labelled
"extended workplace features", as indicated in the above screen-shot.
-
Note that excluding eWorkPlace will also remove both the ePage feature and eCenter.
-
ePage and eCenter are "lite" versions of corresponding features in xWorkPlace.
Consequently, once you install xWorkPlace, you will be able to install the "Pro"
versions of these features.
-
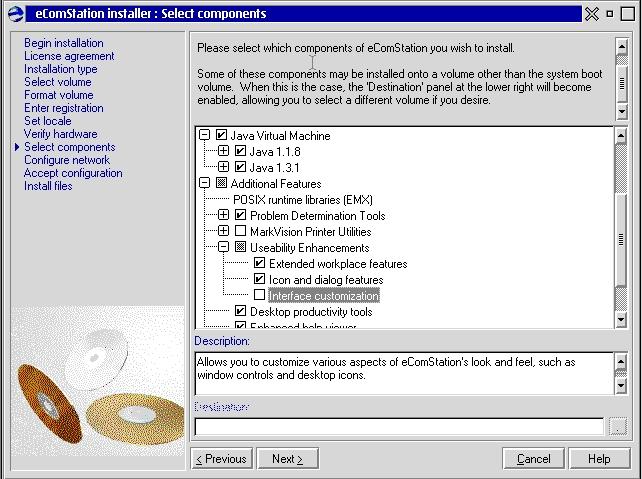
eStyler
-
Excluding eStyler is accomplished using essentially the same technique as above.
The only difference is that instead of deselecting "extended workplace features",
you need to deselect "interface customization" in the same screen, as
shown below:
-
eComCenter (formerly called WarpCenter)
Many users prefer to continue using the WarpCenter found in OS/2 Warp 4 instead
of eCenter. Here's how to do that:
-
Open the folder Programs | Utilities.
-
Locate the eComCenter icon and double-click on it to start the program. (Note that
it is necessary to start the program before creating a shadow will be possible.)
-
Drag a shadow of the eComCenter icon into the Startup folder.
Although not absolutely necessary, you'll probably want to get rid of eCenter if
it is running, since having two is redundant, and may actually conflict with each
other. Here's how:
-
Open the Local System | System Setup folder, and double-click on the Screen icon.
Select the Screen Borders tab, and
in the Screen corner/border box, select the position that represents the current
position of eCenter. When you see the eCenter icon appear in the Action box, select
the "Inactive" radio button. The icon should disappear.
-
Close the running eCenter if it is running by positioning the pointer over it, and
doing a "Right-Click" | Close eCenter .
-
Open the Local System | Startup folder and delete the eCenter icon.
This article has by its nature been somewhat negative towards eCS and the Installer
in particular. However, to balance the impression that may have been created, I
would like to point out that the Installer is a huge improvement over the eCS 1.0
version, and over its equivalent Windows Installer. What I like in particular is
that it is now possible to define your system during the first few minutes, and
then let the Installer take over. You can just walk away and let it do its job.
My purpose in writing this article is to help users get the most out of this
fine piece of software.
Walter F. Metcalf
NOTE 1: It's possible this statement is also true
for some or all of the OS/2 server packages. However, I have not had any packages
to test.
[Feature Index]
editor@os2voice.org
[Previous Page] [Newsletter Index] [Next Page]
VOICE Home Page: http://www.os2voice.org