VOICE Home Page: http://www.os2voice.org
Newsletter Index
< Previous Page | Next Page >
Feature Index
|
VOICE Home Page: http://www.os2voice.org |
May 2004
Newsletter Index
|
| By Chris Clayton © May 2004 |
It all started when I decided to upgrade my 1995 vintage Gateway Pentium computer that I used for application development and other experimental activities with a modern ASUS motherboard. Since very few components could be reused from the old Gateway, including the case, I actually ended up with two computers. So, I decided to use the Gateway as a file archive. In addition, the laptop (a Thinkpad i Series 1721) I was using as a 'production' system for all my personal accounting, was no longer truly portable, because it had so much equipment hanging off of it. Besides, I was continually using the sneaker net to transfer files between the various computers. It was time for a real home network. My wife had already declared that she was going to bury me with my wires and I didn't want to hurry the process along. So, I chose to implement a wireless network that, initially, connected to the wide area network (WAN) through a dialup connection, but with the capability of a future broadband WAN connection.
There are many places to go to on the Web to get information on OS/2 networking. I have listed a few of them in the references. In addition, I am quite used to getting OS/2 networking functioning properly, having the last remaining OS/2 computer on my work's local area network (LAN) surrounded by an ocean of Windows and a LAN Help Desk that is no help. Besides implementing Peer networking, being a little old-fashioned, I wanted to use many 'outdated' communication methods like telnet. So I needed to make sure that they were easy to use on my home network. I also believe in the KISS, 'keep it simple stupid,' principle. The printers were going to be in one place, but accessible to all. Instead of moving physically between the computers to use them, I needed the ability to control them remotely over the network.
The network I created is straightforward and quite versatile. In the following sections I will describe my hardware arrangement; my network configuration, including internet protocol addressing and routing; the various connectivity applications I use; network performance; security; and a few unresolved issues.
The Gateway desktop computer, running OS/2 Warp 4.0 client at Fix Pak 15, but turned into a server, is attached to a LAN port on a D-Link-614+ wireless broadband router. A modem connection is used to reach the internet. It now sits in a closet with two printers attached to it. The Desktop ASUS computer with a Realtek network card is connected to a D-Link-900+ access point that is configured to be a wireless client. This particular model requires the use of a crossover network cable for the wireless client mode. There are several brands of wireless router and bridges available, but it is important to keep in mind that while they all support 802.11b, they are not all compatible with each other. Usually, any brand's wireless PC card adapter will work with another brand of router. However, bridges and routers may not be compatible, so I chose a D-Link model for both units. The D-Links are configured using a web browser. I found that it was better to use the IBM Web Browser rather than Netscape 4.61. Some operations did not complete properly when Netscape was used. Both D-Link models have a 'Setup Wizard' (figure 1) takes you through the configuration steps. (Click on the image below to view the full size screen.)
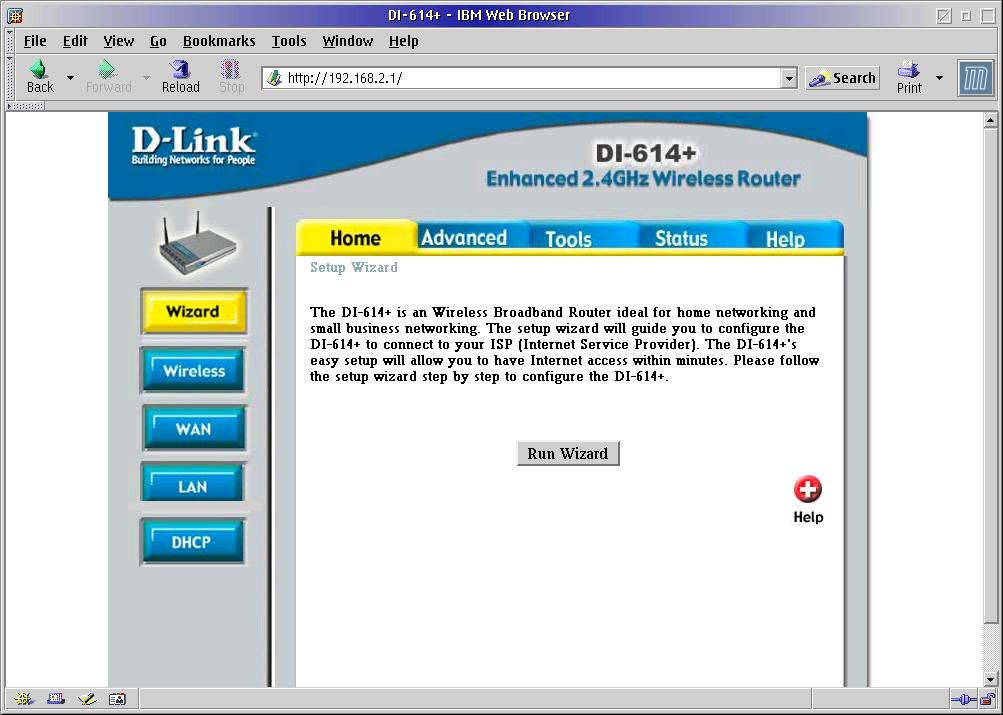
Figure 1. The D-Link 614+ router Setup Wizard page.
I used the Wizard to set the time zone, the wireless settings, and encryption. The D-Link 900AP+ needed one additional step. It needed to be converted to a Wireless Client. In the Mode section of the Advanced page, I selected the Wireless Client radiobutton and entered the MAC address of the D-Link 614+ router, see figure 2. I did come back later and manually change a few other settings that I will discuss in the Security section.
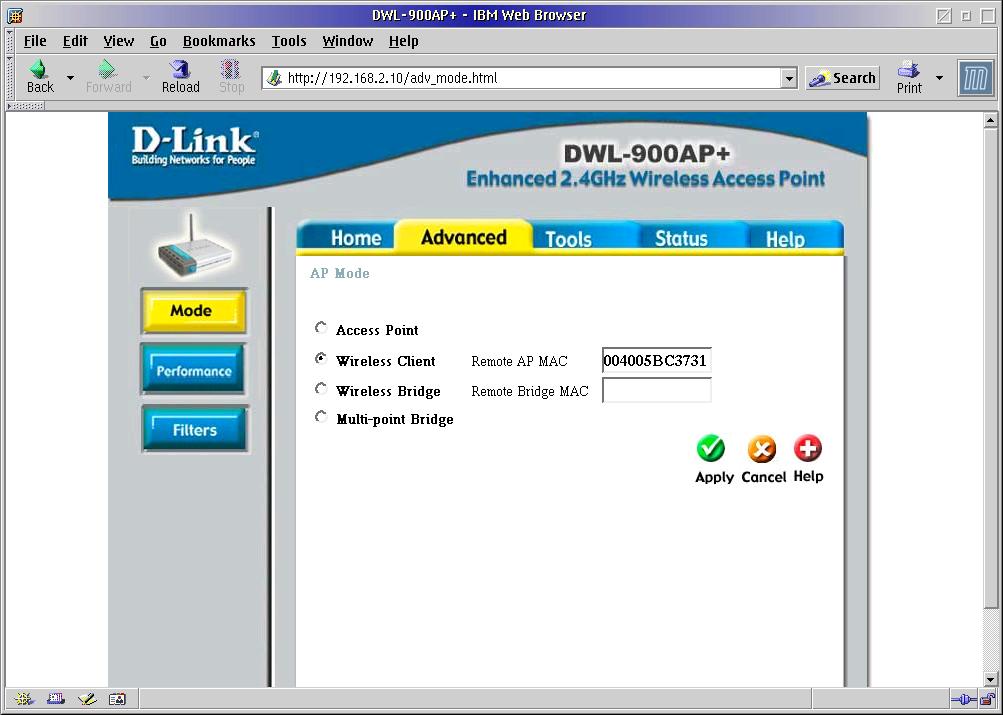
Figure 2. The D-Link 900AP+ mode setting dialog. Click for full size.
I now have two IBM Thinkpad computers outfitted with the IBM High Rate Wireless PC Card. The driver for this card is available on the eComStation download page. The IBM High Rate card has unfortunately been discontinued. However, I did manage to pick up an extra one on eBay. An alternative, the Jacaranda Blue wireless card, is still available from Mensys. This card uses the Artem driver, which is shipped with eComStation 1.1.
I'm almost ashamed to admit this, but I do use one computer with Microsoft ® Windows ® XP Home Edition on it. This is a Toshiba Satellite 1135 laptop, and it has a D-Link 650+ wireless PC Card in it.
I am going to assume that TCP/IP and Peer networking have been successfully installed, since eComStation (eCS) 1.1 does a very good job of doing this for us. What I will discuss is the type of network I set up.
The D-Link router actually has two subnets on it, one for the wired side and another for the wireless side. I'm not sure, but I suppose most of the wireless routers are set up this way. This makes the home network a routed LAN if one has computers connected to both the wired and wireless sides. In this case, to be able to use Peer, the NetBIOS over TCP/IP protocol must be installed. Using the unrouted NetBIOS is redundant, so I removed this protocol when I installed networking. Post installation, this change can be made using the Multi-Protocol Transport Services (MPTS) utility in the System Setup folder | Network folder. Figure 3 shows my typical adapter and protocol arrangement.
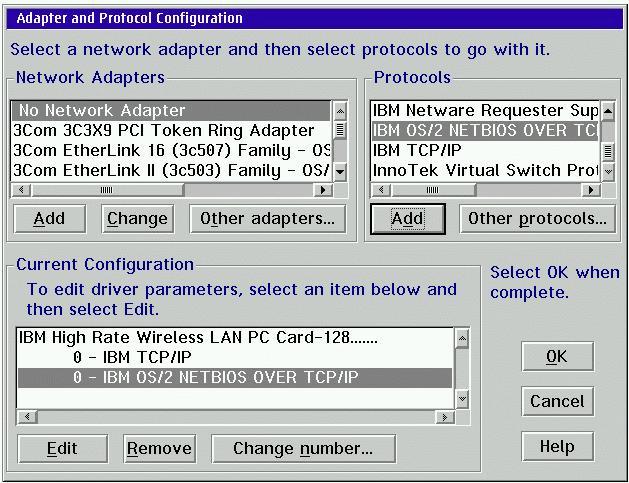
Figure 3. MPTS configuration.
At this point I will digress. In a few of the references I cite there are instructions to use both the NetBIOS and NetBIOS over TCP/IP protocols. This is not really needed. To understand why not, one must look at the way the two protocols resolve names. Plain NetBIOS resolves names by broadcasting messages to the subnet that asks a computer in the Workgroup with the a name that matches the request to respond with its address. If a response is returned within a given time the connection is made, otherwise an error message is generated. A problem is that many routers will not forward these broadcast messages, thus the reason this protocol is considered nonroutable.
The NetBIOS protocol generates a fair amount of network traffic, reducing capacity in large networks, and its use has largely been discontinued in commercial applications. NetBIOS over TCP/IP has several name resolution modes, the primary ones being b-node and p-node. b-node is the familiar broadcast mode used by NetBIOS but quite often is implemented with an interesting twist called modified b-node that is supported on routed networks. The modified version resolves names by searching a file on the client computer for the server name and address. In OS/2 this file is d:\ibmcom\rfcnames.lst and in Windows ® it is lmhosts. If the server name is not found, then messages are broadcast. In p-node, point-to-point mode, a NetBIOS name server is used to resolve names. Microsoft ® Networking calls the NetBIOS name server a WINS server. As with TCP/IP name resolution, there are primary and backup NetBIOS name servers because if the servers are not on line, then no peer connections can be made. There is a third mode, h-node, that attempts to get around this problem by using p-node first and then b-node (usually enhanced) if the NetBIOS server did not provide address resolution. Nowadays, with the enhanced b-node available, using both NetBIOS and NetBIOS over TCP/IP is redundant and can bog down the network. Also, using only one NetBIOS protocol makes the network much simpler to manage, but there are security concerns. I will discuss this issue below. In short the only protocols that are installed on my network are IBM TCP/IP and IBM OS/2 NetBIOS over TCP/IP.
I configured NetBIOS over TCP/IP by highlighting the protocol in the MPTS configuration's Stage 3 list box and pressing Edit. This brings up a dialog (figure 4) with three options. On my home network I left all of the Driver parameters option at their default values. For eCS, the default is to use b-node and the remaining parameters are tuned for this mode. At work, I select h-node and enter the addresses for the WINS servers into the NetBIOS Name Server and Backup NetBIOS Name Server entry fields.
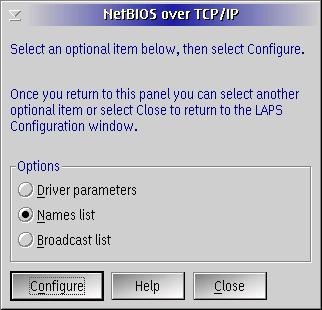
Figure 4. TCP/IP over NetBIOS configuration dialog.
To enable the use of enhanced b-node, I selected, in turn, the Names list (figure 5), and the Broadcast list (figure 6) radiobuttons. I used the Add button to enter the IP addresses and NetBIOS names for the various systems that attach to my home network, including the Virtual PC sessions.
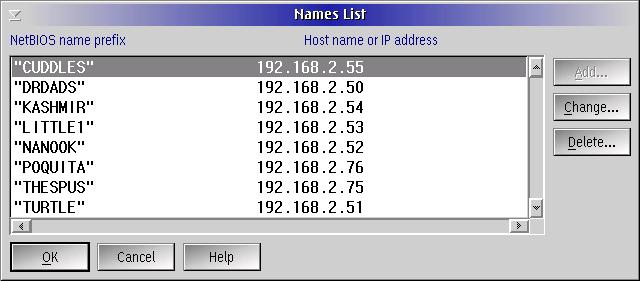
Figure 5. Names list entry dialog.
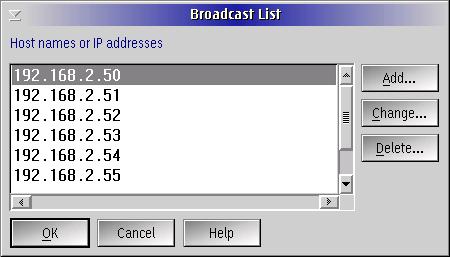
Figure 6. Broadcast list entry dialog.
On my network I use fixed internet protocol (IP) addresses. The D-Link router does have the capability to issue IP addresses via the Dynamic Host Control Protocol (DHCP) and it works very well with eComStation, but this method of getting IP addresses causes routing problems for me. The D-Link router makes itself the default router when it issues an IP address via DHCP. In order to use the Gateway computer's dialup connection to access the internet, the Gateway computer needs to be the router. I will expand on this issue later, along with how the use of fixed IP addresses makes possible a number of other convenient features for a versatile network.
The d:\mptn\bin\setup.cmd file may be manually edited, but the TCP/IP Configuration notebook in the System Setup folder | Networkfolder | TCP/IP folder is the easiest way to change the IP and routing settings. On the Network page, I made sure that LAN interface 0 was enabled and the Manually, Using radio button was selected in the corresponding Configurations Options - LAN interface 0 group box. Then I filled in the static IP Address and Subnet Mask fields with the appropriate values for my network as in figure 7.
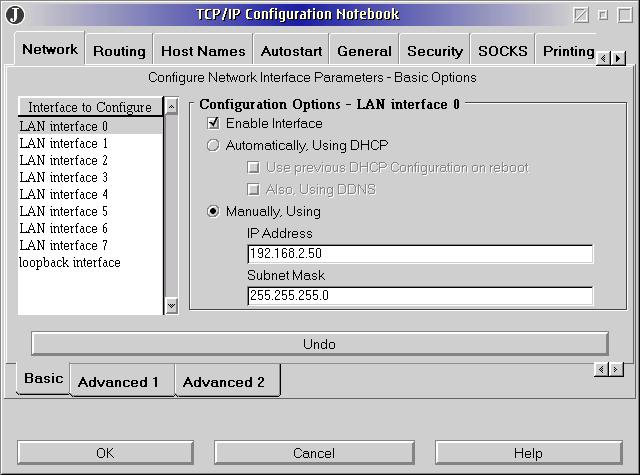
Figure 7. Network page in the TCP/IP Configuration notebook.
On the Routing page (figure 8), I made sure that the IP address for the Gateway server is listed as the default route. The TCP/IP Configuration notebook is also used to setup the servers to be run on the Gateway computer.
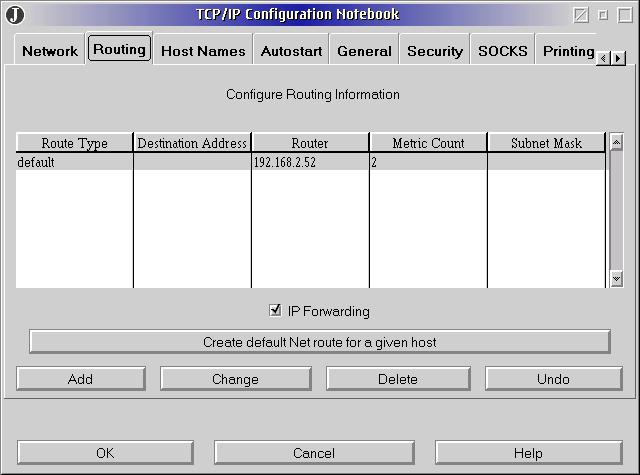
Figure 8. Routing page in the TCP/IP Configuration notebook.
The following services are automatically started on the Gateway server when OS/2 boots:
In eCS, I highlight in turn each of the desired servers in the Autostarted Services list box, check the Autostart Service box, select the Foreground Session radiobutton, and check Minimized. For lpd (figure 9), I enter into the Parameters field: -b -c These options suppress the printing of the unnecessary banner and control file pages.
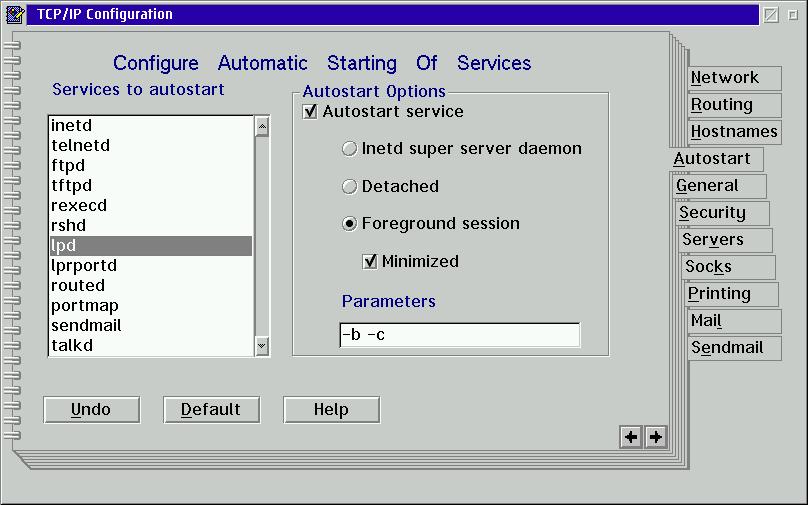
Figure 9. Autostart page in the TCP/IP Configuration notebook showing
the lpd server settings.
Next user access needs to be enabled. On the Security Page, I add myself as a user and configure access to the FTP and TELNET servers. For the ftp server, I check both the Enable read ... and Enable write ... boxes without entering any directories into the associated entry fields. This gave me full read/write access to all of the server drives.
In OS/2 Warp the same four TCP/IP servers are also automatically started. The difference is that I also automatically start the inetd server and select the Inetd super server daemon option for ftpd and telnetd. Things are not as secure with Warp 4 when users are enabled. On the Security page, a single password for telnet is entered into the Telnet password field. The contents are obscured here, but the password shows up as plain text in the config.sys file. For FTP access, the d:\mptn\trusers file needs to be created. This is done by adding users to the 'File Access Protection (TRUSERS)' list box. The process allows one to set user access privileges. The trusers file is in plain text also, but at least the hidden file attribute can be set.
Kai Uwe Rommel created an alternative to the default Warp 4 telnet login process that uses an encrypted password file and allows multiple user access. This alternate telnet server is available on Hobbes. http://hobbes.nmsu.edu/os2/apps/internet/telnet/server/tnlogin.zip I unzipped the archive and followed the clear directions in the readme file.
Peer is automatically started on the Gateway by shadowing the Start File and Print Client icon in the Connections folder | Network folder | Logons folder to the OS/2 System folder | Startup folder. In eComStation, the corresponding folders are Local Networkfolder | Network Utilitiesfolder and Local Systemfolder | Startupfolder, respectively.
The httpd and time servers will be described in ensuing paragraphs.
As I previously mentioned, the Gateway server sits in a closet. It does have a monitor attached to it, but it is rarely turned on; usually when I do the monthly backup and I temporarily turn off the servers. All other access is done over the net using Desktop-On-Call. This application is included with eCS. For eCS 1.0 it is on CD 3 and for eCS 1.1 it is on CD 2. Desktop-On-Call version 4 may also be purchased from IBM. http://www-132.ibm.com/webapp/wcs/stores/servlet/CategoryDisplay?categoryId=1826745&storeId=1&catalogId=-840&langId=-1 I have not actually tried to install the latest version since, several years ago, I purchased version 2.5 from IBM, so I will not go through the installation steps.
There are two issues with Desktop-on-Call. The first is that the IBM Web Browser does not work with it very well, if at all. I use Netscape 4.61 and enter the IP address for the Gateway computer into 'Location:' box. The second issue is more problematic and its resolution is not obvious, or, apparently, documented. The Desktop takes up to 2 minutes to appear on a home network. It seems that Netscape is trying to resolve the location via a nonexistent name server, even though an actual IP address was specified. The solution is elegant: create d:\mpts\etc\hosts and add the following line to config.sys:
set use_hosts_first=1
The usual format for the hosts file is:
ip.address name.internet.domain alias1 alias2 ... #comment
A home network does not have a true internet domain name, so I replace name.domain with just name and repeat it for alias1:
192.168.2.52 nanook nanook #gateway
These entries can be made by manually editing the hosts file or by using the TCP/IP configuration notebook as in figure 10.
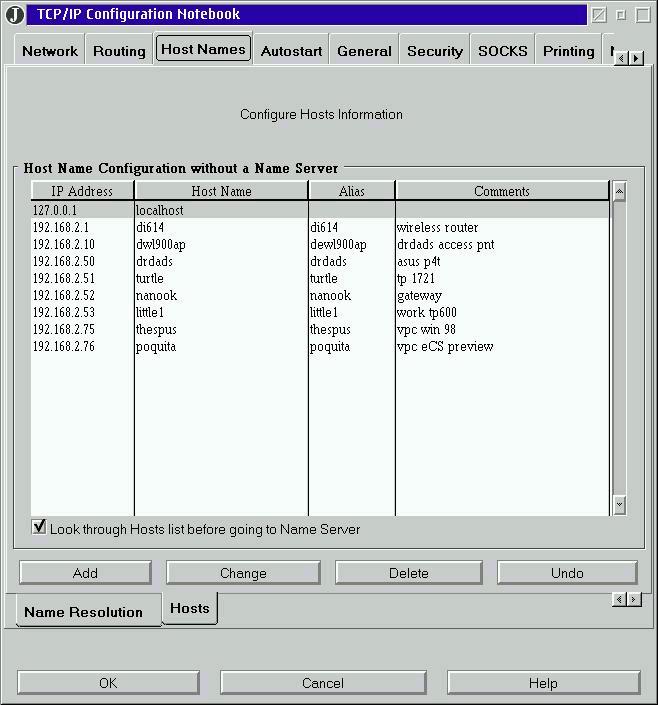
Figure 10. Hosts page in the TCP/IP Configuration notebook.
A bonus side effect of having the host file set up like this is that I can enter telnet nanook at a command prompt and be connected. In practise, I put all of the IP addresses and names for the computers attached to my home network into the hosts file. This way, I can temporarily run ftpd or telnetd on one of the client computers and connect to it from another client computer. Thus, I need to share only a few folders and still have a way to access all of the drives when needed.
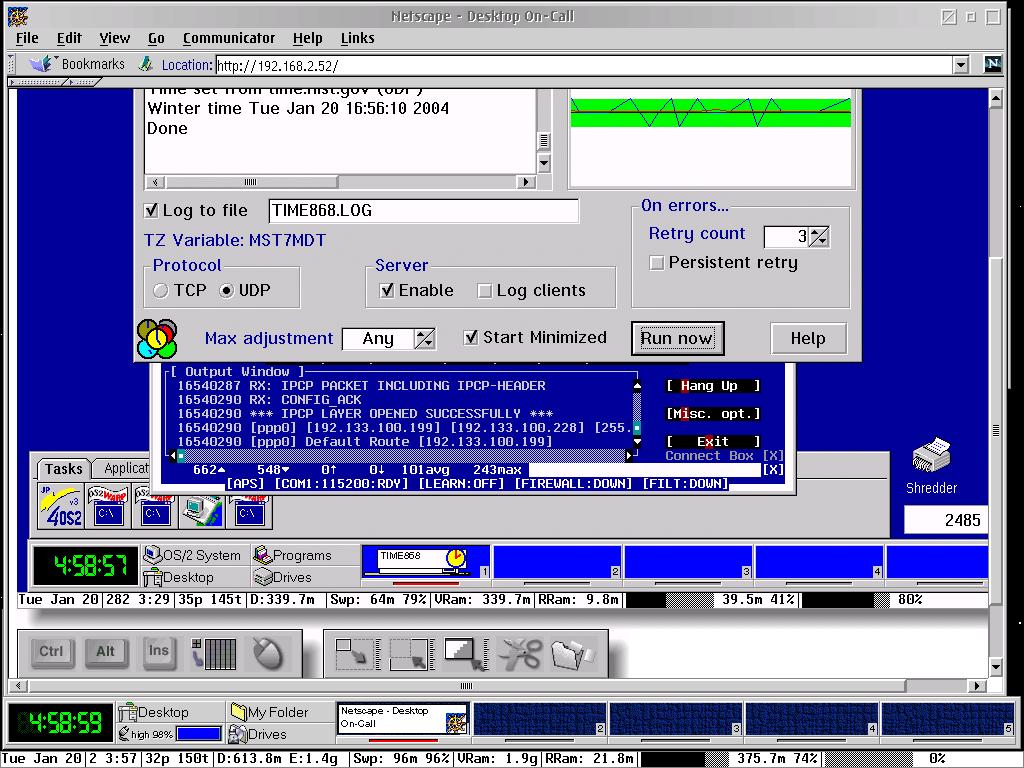
To help keep my network time synchronized I run a time server on the Gateway server. The application I use is Norbet Day's Time868 which is available on Hobbes. http://hobbes.nmsu.edu/pub/os2/apps/internet/time/time868f.zip This application can retrieve the time via the TCP or UDP protocol. Unfortunately the server option only works with the UDP protocol, limiting the resolution to 1 second. This shortfall is not a problem for my home network. To set up Time868 as a server, I selected NIST, Boulder CO, USA in the Well-known sites dropdown listbox, selected the UDP radiobutton, and checked the Enable box in the Server groupbox as shown in figure 11. The application is always running on the Gateway server and periodically, when I'm connected to the internet, I press the Run now button to update the time. The Gateway has a very stable system clock and does not require frequent updates. I have gone as long as three months between updates and have been off by only a few seconds.
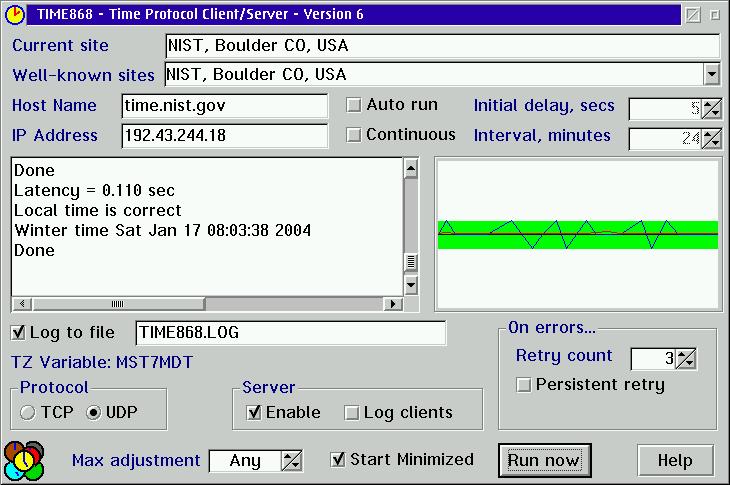
Figure 11. Time868 running as a server.
I set up Time868 as a client on the rest of my networked OS/2 computers. At the bottom of the Well-known sites dropdown listbox there are two entries that can be customized. Selecting one of them, I entered the name and IP address of the Gateway server into the Host Name and IP Address fields, respectively. On the ASUS desktop computer, I enable both the Auto run and Continuous options. Unlike the Gateway, the ASUS computer has a poor system clock, it can easily be off by a few seconds within hours, so I set the update interval to 30 minutes as shown in figure 12. I like to suspend my laptop computers when I am not using them. The wireless PC card needs to be powered off and removed before a suspend can be initiated. So, I do not enable the Continuous option on them.
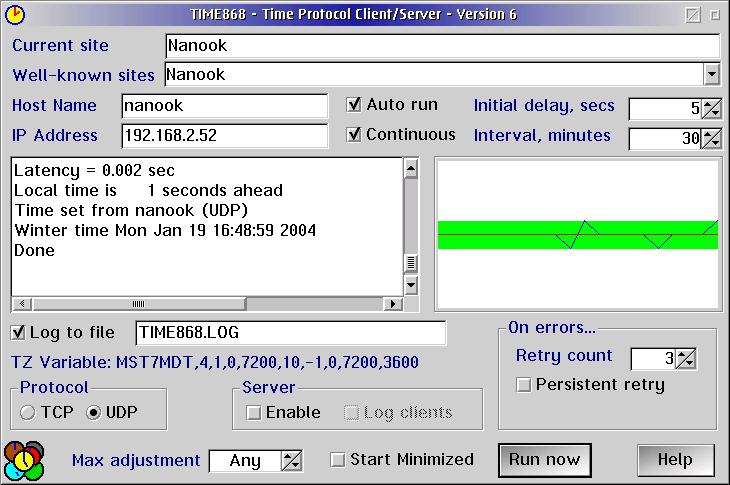
Figure 12. Figure 12. Time868 running as a client.
For Windows ® systems there is a nice 'CareWare' application called AboutTime. Written by Paul Lutus it is available from his web site. www.arachnoid.com. It comes in two flavours, I picked the version that does not require Microsoft Internet Explorer 4.0+ ®. It functions very well with the Time868 server and is easy to configure. On the Time Hosts page of the properties notebook, I pressed the Add button, entered the coordinates for the Gateway server and selected the Time/UDP protocol. On the Options page, I checked the Start hidden and Put icon on system tray boxes. Finally, I placed a shortcut to AboutTime in the Startup folder.
There are three ways in eCS to print over the network. The first is to use Peer and share the printer objects on the server computer. I do have my printer objects shared on the Gateway server. I print to these shared resources from my Windows ® XP computer and any Virtual PC Windows ® sessions I run. This method is faster than the next option but not as fast as the last option.
The second option is the LPD client that is installed by eCS automatically. To be able to submit print jobs, two daemons must be running: the line printer port daemon (lprportd) on the client computer, and line printer server daemon (lpd) on server computer. It easy to configure: select the \pipe\lpd0 port in the printer object's properties notebook, double click, enter the LPD server and LPD printer data (see below) into the Print destination groupbox fields, and enter the local machine name and your name into the Print source groupbox fields. Of the three options, this method is the slowest.
The streaming line printer port (slpr) driver is the method I use on all of my eCS clients. The port driver is available from the eComStation download site. Installation is straightforward. I extracted the archive into a temporary folder then opened the printer object's properties notebook. On the Output Port page, I pressed Install new port ... and selected the New port drivers radiobutton. Then I entered the location of the temporary folder into the Directory entry field and pressed Refresh. Selecting the SLPR icon, I pressed Install. The properties page for the SLPR1 port appeared. I entered the IP address for the Gateway server into the LPD server entry field and the name of the printer queue into the LPD printer entry field. I found the printer queue names by looking at the directory names in the Spool folder on the Gateway server's boot drive. Another way is to open the printer object's properties notebook and look at the View page. Not wanting to experiment, I left the remaining fields at their default values. Installing additional SLPR ports is merely a matter of selecting Existing port drivers radiobutton in the Install new port page, re-selecting SLPR and repeating the configuration steps. To be able to print, the lpd daemon needs to be running on the server.
Printing over the network from WinOS2 sessions is possible. First I made sure that the WinOS2 printers were connected to LPTn.OS2 ports. Then, back in eCS, I opened up the Spooler object in System Setup folder and selected the Redirection page. There, I selected the LPT port(s) used by WinOS2 in the Redirected port drop down listbox and highlighted the appropriate printer queue(s) in the Printer list box.
To be able to have all of the machines access the internet through a dialup connection on the server, three items need to be set up: The server must be the network router, the server must have IP forwarding enabled and the dialer must have the capability to provide network address translation (NAT). The Gateway is already the network router, as I mentioned above. IP forwarding was enabled by checking the appropriate box on the Routing page of the TCP/IP Configuration notebook. This can also be done manually by issuing the command ipgate on. I use the extended version of the F/X Communications Injoy dialer. This version provides NAT for up to four computers at a time. It is easy to configure. First, I enabled NAT by checking the Firewall/NAT box on the PPP[SLIP] Setup page (figure 13), and then I pressed ... Firewall Setup.
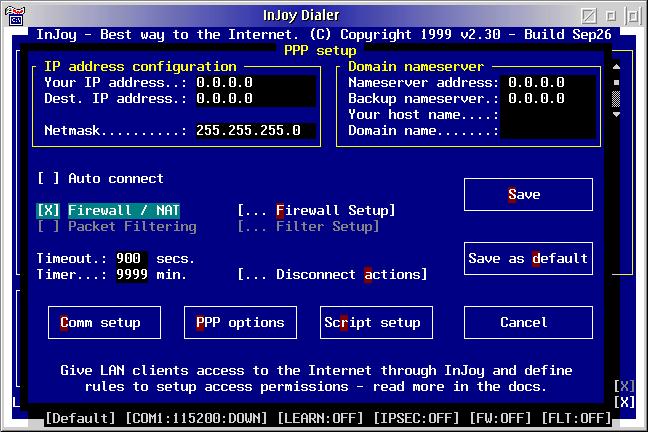
Figure 13. Enabling NAT in the Injoy dialer.
On the Firewall Options page, I checked the Network Address Translation and the Disable NAT for Injoy PC boxes. Everything else was either left unchecked or at the default value. My settings are depicted in figure 14. After saving the changes, the internet is available to any system on the home network, even to an unmentionable operating system running in a Virtual PC session.
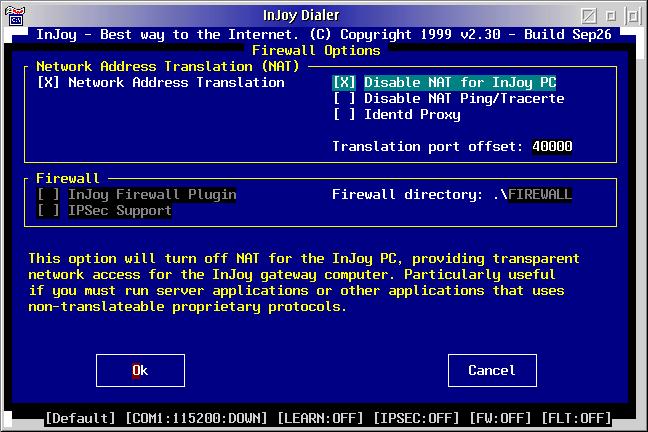
Figure 14. The Injoy Firewall options page.
When I need to use the internet from one of the networked computers, I start Netscape 4.61, and browse to the Gateway server where Desktop On-Call displays the desktop. On the Gateway, I start an Injoy session, select my ISP and press Dial. Within a few moments, I am connected and surfing the WEB using the IBM Web Browser. While I am online, I usually maximize the Time868 application and update the system time. A typical session is shown in figure 15.
Occasionally I connect to the internet using a modem in a client computer. I just start Injoy, locally, and dial in. I still have access to the other computers and services on the home network, but the other computers do have access to the internet. Handy when I'm in a hurry and don't want someone else using my limited bandwidth.
Coexistence between OS/2 and Windows ® computers on the same network is not difficult to achieve. It's just that Bill Gates has not made it straightforward. In the following discussion, I will assume that TCP/IP has been configured with the appropriate addresses and routing. Windows ® 95/98 and NT 4.0 should work right out of the box. They usually have 'Microsoft ® Networking' enabled by default. 'Microsoft ® Networking' is nothing more than NetBIOS over TCP/IP. In general, Windows ® uses b-node unless WINS servers are specified, then h-node is used. I make sure that I am not trying to log onto a NT domain, the workgroup name is the same as my home network's NetBIOS name, the WINS entries are blank and sharing is enabled. I access these options using the Network notebook in the Control Panel folder.
I have not used NT/2000 at home, but I do have it at work (setup by the networking folks and not viewable by me). I have been able to get my work OS/2 system to peacefully coexist with a Windows ® dominated LAN using the h-node mode for NetBIOS over TCP/IP as described above. The network administrator needed to enable access to the WINS servers. Sometimes, network resources are not available to the OS/2 computer. This is usually caused by an incorrect setting on the Windows ® side. In these cases, one really needs a network administrator who is willing to try to correct the problem.
Windows ® XP home edition was a little more problematic. I did get it to work but, unfortunately, have lost my notes on what I actually did so I am relying on my sketchy memory for the following. The first thing I did was make sure that File and Printer Sharing for Microsoft ® Networks was installed and active. Then I enabled NetBIOS over TCP/IP. This was done by opening up the Internet Protocol (TCP/IP) Properties page in Start | Settings | Network Connections | Local Area or Wireless Network Connection Properties. I pressed the Advanced... button and turned to the WINS page. There, I select the Enable NetBIOS over TCP/IP radiobutton. Finally, I enabled sharing. I believe I did this using the Network Setup Wizard in Network Connections, though there could have been another option available that went away when sharing was working. I do remember that when I got to the page that discusses sharing, I let XP take the recommended Let me set up sharing ... path. Big mistake! Sharing was enabled, but I ended up with a mess of 'bridges' and no connectivity. It took several hours of deleting and reinstalling network configurations to recover. I should have gone for the Just enable sharing option.
A versatile home network is useless without some security measures being taken to attempt to keep out unwanted users. The wireless network needs to be protected, and access from the WAN needs to be limited. Unfortunately, the current level of protection offered in 802.11b wireless systems is weak. The things I implemented will keep out the novice and prevent inadvertent access, but will not prevent a persistent expert from getting in. First, I implemented WEP with 128 bit encryption. I am surprised how many people do not implement WEP. When I was visiting my daughter in Phoenix and using her network, there were four wireless networks to pick from in the neighborhood. Only one was encrypted. Great way to be an unknowing internet access provider! Next, I changed the wireless network ID (SSID) from the supplied default value. This has more esthetic value than protection, since the SSID is always broadcast unencrypted. The use of fixed IP address, not implementing DHCP, and using a different subnet IP sequence than the out of the box value helps a little. Finally, I implemented MAC address filtering. On the D-Link router, this is enabled on the Advanced setup page (figure 16).
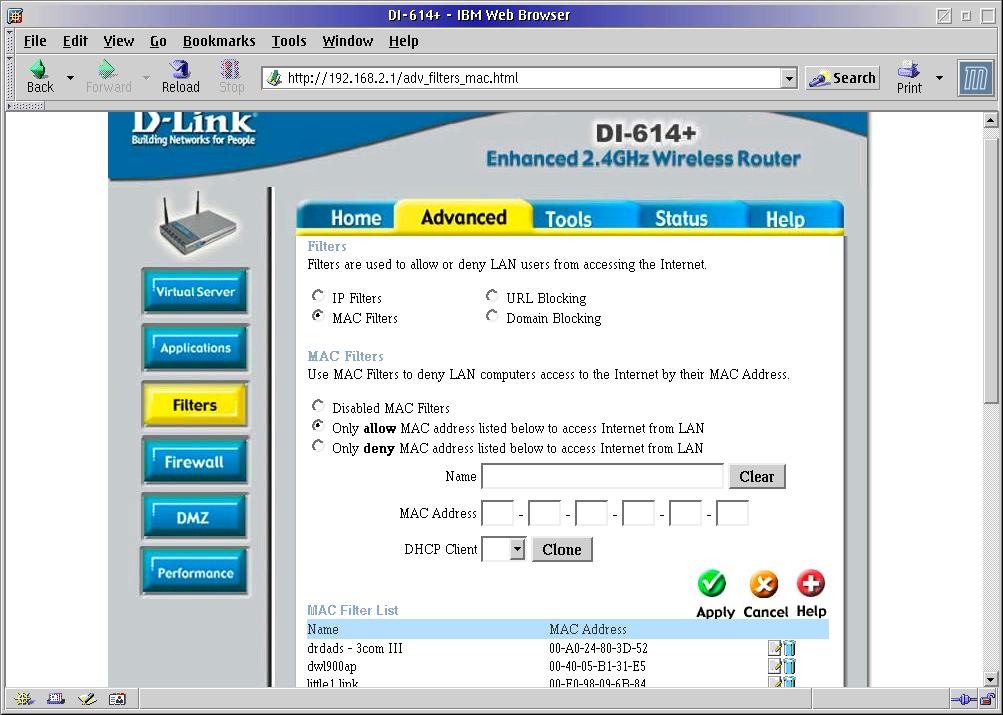
Figure 16. The D-Link 614+ router MAC address filter page. Click here
for full size image.
In my mind, MAC address protection should be quite a bit more protective than it is. First, on the D-Link, it doesn't prevent someone from connecting to the wireless network, it just does not allow access to the router. Second, the MAC addresses are transmitted unencrypted. Perhaps the best protection I use is my frequent checking of the router's status logs. These include a list of the machines connected to the wireless net. I haven't spotted any unknown computers yet, but, if I do, I will immediately change the WEP password.
My extended version of the Injoy dialer does not come with the firewall plugin. Luckily, my ISP has a very good firewall installed and, by default, Peer sharing is not possible over a dialup connection. Periodic checks of my network activity logs have not revealed any problems. However, I will eventually need to install firewall protection when I can no longer use the current ISP or I opt to convert to broadband service. For the latter, the wireless router has a built-in firewall. As a minimum, the ports associated with the servers I run will need to be blocked. The way I find out the ports to block is by executing the command netstat -s from an OS/2 command prompt. This command displays a list of the open ports. A partial listing of the results on the Gateway server is:
292 DGRAM  0 time..37 0.0.0.0 UDP
306 STREAM 0 25345 0.0.0.0 LISTEN
305 STREAM 0 25346 0.0.0.0 LISTEN
304 STREAM 0 www-http..80 0.0.0.0 LISTEN
 18 STREAM 0 printer..515 0.0.0.0 LISTEN
 17 STREAM 0 ftp..21 0.0.0.0 LISTEN
 16 STREAM 0 telnet..23 0.0.0.0 LISTEN
 11 DGRAM  0 emfis-data..140 0.0.0.0 UDP
 10 STREAM 0 netbios-ssn..139 0.0.0.0 LISTEN
  9 DGRAM  0 netbios-ns..137 0.0.0.0 UDP
  8 DGRAM  0 netbios-dgm..138 0.0.0.0 UDP
Anything that is marked LISTEN; or UDP will need to be blocked. Windows ® is a little more problematic. There are a lot more things running and the counterpart to the OS/2 command does not reveal all of the port numbers that are open. Many are given a name but not a number. My preferred course of action is to disconnect the WAN when the XP computer is up. This will not always be possible, so I have disabled as many of the auto update and notification services as I can. But, there are still several insecure 'features' left. These I plan to detect using tools available on the Gibson Research Corporation web site. This site has a wealth of information on the vulnerabilities of Microsoft's ® 'features' and ways to disable them.
The network link performance was assessed by using Kai Uwe Rommel's NetIO utility. http://hobbes.nmsu.edu/pub/os2/util/network/netio113.zip I ran tests between two systems that were on the wired side of the LAN that runs at 100 Mbps, a wired system and a system on the wireless side of the LAN, and two wireless systems. The wireless links come in two flavors: the standard 11 Mbps 802.11b and the enhanced D-Link version at a claimed 22 Mbps. Two sets of tests were run. One where the remote machine was the server (download) and another where the local machine was the server (upload). A single test measures the transfer rate for packet sizes of 1KB, 2KB, 4KB, 8KB, 16KB and 32KB. For the four types of connections, I performed ten repetitions and averaged all of the measurements to produce a single result for each connection type and transfer direction. The results that are presented in Table 1 are from the TCP/IP protocol link tests. I did run a few tests using the NetBIOS protocol, but not enough to have decent statistics. However, the NetBIOS performance trend was approximately one-half the TCP/IP protocol rate.
Table 1. Network performance (Kb/s)

Connection type        Download    Upload
100 Mbps    LAN           11318     11556
 22 Mbps   WLAN to LAN      728       766
 11 Mbps   WLAN to LAN      441       531
 22 Mbps   WLAN             243       322
 11 Mbps   WLAN             206       208
The wireless LAN performance is acceptable until large transfers are needed, then the wired LAN is definitely preferable. The enhanced D-Link wireless link is faster, but not the claimed 100% improvement.
It seems that computers are like a tin of sardines, there is always a little bit left over that cannot be reached. In my case there are two unresolved issues that I need to use workarounds for. The first is that Object Desktop's Object Netscan feature locks up the Workplace Shell if left running for an extended time. It is usable for short periods of time, but I have ended up not enabling it at all. The second is that for extended, high-speed transfers, performance is erratic and, occasionally, the connection is stops working. This problem seems to be restricted to transfers that involve a wireless connection; as I have never seen it occur when transferring files between two wired systems. Also, if I cycle the power on the wireless router the network comes back. This problem may be because these are consumer products that are not designed to do any heavy duty work or it may be related to the fact that I route using the Gateway server rather than the D-Link router. My workaround for this issue is to continually ping between the two systems that are involved with the transfer and the Gateway server. I start the pings before initiating the transfer and continue pinging until the transfer completes. Any thoughts on resolving these issues will be greatly appreciated.
In this article I have discussed how I set up an extremely versatile home network. The architecture is based on wireless connectivity with a central server that has several useful network services running. Internet access is provided though a dialup connection on the server, and an upgrade to a broadband connection is possible. While I am not a networking guru with formal training, I have found solutions to several issues that arose during the setup process which I hope will be of use to all. Of course, there are a few remaining issues left over for the OS/2 community to work on.
References:
|
Feature Index
editor@os2voice.org
< Previous Page | Newsletter Index | Next Page >
VOICE Home Page: http://www.os2voice.org