
VOICE Home Page: http://www.os2voice.org
Newsletter Index
< Previous Page | Next Page >
Feature Index
|
VOICE Home Page: http://www.os2voice.org |
May 2004
Newsletter Index
|
| By Walter F. Metcalf © May 2004 |
In the previous articles in this series, we have looked at the simpler ways to share printers on a network. (By definition, Remote Printing is printing on a printer not directly connected to your workstation (e.g. using parallel or USB port).) As we have seen, Remote Printing usually requires a network. In this series we are focusing on the LAN. With a LAN, several workstations can share a single or multiple printers.
Using remote/shared printing has the following advantages:
Since good printers are relatively expensive, one big benefit is lower equipment cost.
A second advantage is freedom from the maximum lengths imposed by parallel or USB cables. Even in a wired network, network distances can be much longer than is permitted on a parallel or USB cable. The maximum length of the standard Category 5 cable is about 100 meters. If even that is insufficient, you can install repeaters or hubs that will effectively increase the maximum distance. Of course, if you're using a wireless network, there are no cables. You are limited only by the power and sensitivity of your equipment.
A third --and very important-- advantage of using remote/shared printing, especially a setup with print servers, is its built-in support for multiple platforms. Each user accesses a printer simply by specifying its name, as defined by whatever operating system he or she is currently using. In addition most print servers on the market are configured using browsers, adding another level of cross-platform compatibility.
Finally, one side benefit of using a print server (either "dumb" or "smart") is that neither NetBios nor NetBeui (aka File and Print Services) is needed in your workstation. You need one of those system components only if you intend to share files. If memory space is at a premium, this could be an important advantage.
In the previous articles, we have looked at File and Print Services, and at routers equipped with a "dumb" print server, such as the SMC 7004ABR. Since such print servers are essentially a specialized port on the same IP address as the router, they do not have any frills. If you want a print server that will allow you to modify its IP address, monitor the usage of printer toner and cartridges, and maintain an error log, you must look to the independent (or stand-alone) print servers.
Before we proceed further, it is appropriate to consider the advantages and disadvantages of each method of printing. The table below lists most of the pro's and con's of each method.
| File and Print Sharing | "Dumb" Print Server | "Smart" Print Server | |||
|---|---|---|---|---|---|
| Pros | Cons | Pros | Cons | Pros | Cons |
| Little or no cost | Ties up a workstation | Relatively Inexpensive | Little or no flexibility | Maximum Stability | Some units are fairly expensive. |
| Unstable and/or unreliable unless using a dedicated workstation. | No dedicated workstation required. | Limits choice of routers | Maximum flexibility | Can be tricky to set up. | |
| File and Print Sharing is not needed. | No dedicated workstation required | No dedicated workstation required. | |||
| Many units allow control of multiple printers. | |||||
| File and Print Sharing is not needed | |||||
As suggested by the title of this section, print servers come in two basic models: internal and external. Unlike modems, where the choice of internal or external is largely a matter of personal taste and cost, when it comes to print servers, the choice is somewhat more important.
Internal print servers are small printed circuit cards that plug into a special slot inside the printer. Unlike the case with internal modems, there is no industry standard for this slot. As a result, a Hewlett Packard internal print server uses a HP-proprietary slot called EIO, which is compatible only with HP printers, and the Epson print server uses an Epson-proprietary standard called EpsonNet, which is compatible only with Epson printers.
However, the situation is even worse than that. Printers from the same manufacturer may have units on the market with different standards for these slots. For example, many of the older Epson printers do not have a slot at all. The latter type of printer could not be connected to any type of internal unit. For these printers, the only solution is an external print server.
Many external print servers come with multiple ports, so that they can support more than one printer. The HP 300x-J3296A and LinkSys EPSX3 are two such units. With this type of device you can control a number of printers simultaneously. These printers can differ from each other in manufacturer, technology, and age. External print servers use parallel or USP port(s) to connect to the printer(s), and since those ports do have industry standards, an external print server will control any standard printer¹, no matter how small or large and regardless of manufacturer. For example, I have used my HP 300x (J3263A) external print server with a tiny Canon portable dot-matrix, an Epson inkjet printer with no network slot, and my HP colour LaserJet 2500, and it has performed flawlessly in each case. According to the specifications, this same 300x is also able to handle high-end printers such as the HP colour LaserJet 9500, and the monster HP monochrome LaserJet 9000 which is capable of printing almost 1 page per second! I can confidently expect to use this device for many years, however much I may upgrade.
For my money, the flexibility of the external print server alone makes it the right choice. However, external print servers may be faster (probably because of the parallel cable), and even cheaper than the internal ones.² More flexible, faster, and cheaper: that's what I call a no-brainer.
In the following discussion I focus primarily on the HP 300x (J3263A), since that is the one I am most familiar with.
Initial Setup
Install the hardware as specified by your device's documentation. This involves three steps:
Connecting your device to a power supply (preferably one backed up by a UPS).
Connecting your device to your network using a standard RJ45 cable (preferably Category 5 specification).
Finally, connecting the printer(s) to your device.
Software Installation
Install and run the utilities provided that came with your print server as specified by the manual and other documentation. (It is not necessary, however, to run the Windows utilities to configure the print server. As will be shown later, this can be done either with older OS/2 software or simply with a browser.)
NOTE: If you are unable to locate OS/2 software for your print server, you can use the Streaming Line Printer (SLPR) exactly as I described its use with the "dumb" print server in the previous article. Just be sure that the IP address you specify for the SLPRx driver is the current one as shown by the server's configuration page.
In the previous article in this series, I introduced the idea of the embedded web server. This is a program, typically consisting of Java applets, that is stored in the firmware of the device. The program is designed in such a way that the applets will respond to standard Java-enabled browser commands. Embedded web servers have a number of advantages including cross-platform compatibility and upgrade capability.
The HP 300x series of print servers have an embedded web server, allowing them to be accessed and configured using any OS/2 browser that is equipped with the proper version of Java. I use IBM Web Browser v. 2.0.2 with the Innotek Java software (currently Java 1.4.2_02) and that combination works very well indeed. In addition, I have used both Netscape for OS/2 (with Java 1.3) and Mozilla successfully.
To access these print servers, you simply type the print server's IP into the location box of your Java-enabled browser.
Determining the Print Server's IP address.
There are two basic ways to determine the address of a print server:
The print server configuration document.
Make sure the printer, print server, and network are connected properly. Preferably they should be connected the way you intend to use them. (If you are using a server with several parallel ports, make sure there is a printer connected to Port 1.
Then press the button labledTest on the top of the HP300x for a second or two, and release it. After a minute or so, the printer will print a two-page configuration document. (In the case of a multiple-port server, the printer connected to Port 1 will print the document.) Go to the second page and look for TCP/IP Status. The current IP address is the one next to that heading. Use that address to initially access your print server with a browser.
Discovery Utility
Most print server software (other than browsers) contains a built-in Discovery utility.
HP has dropped OS/2 support for JetAdmin, the earlier print server software which contained OS/2 versions. The new software, WebAdmin, only supports Windows and the Macintosh--naturally. However you may be able to get JetAdmin software on eBay. In fact, if you can get the JetAdmin CD for the older JetDirect EX Plus series of print servers, you will find it works with the HP 300x servers as well.²
JetAdmin installs in much the same manner as the SLPR port driver. This is described in the previous article of this series. Once installed, the port page of the printer object looks like this:
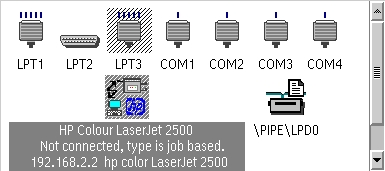
Figure 1: Printer Ports View
(LPT3 is being used by FaxWorks.) The amount of detail displayed by the HP 300x port driver can be controlled with JetAdmin settings.
Let's look at some of the JetAdmin windows.
Double-click on the JetAdmin port driver object.
Click on the "Printers" tab.
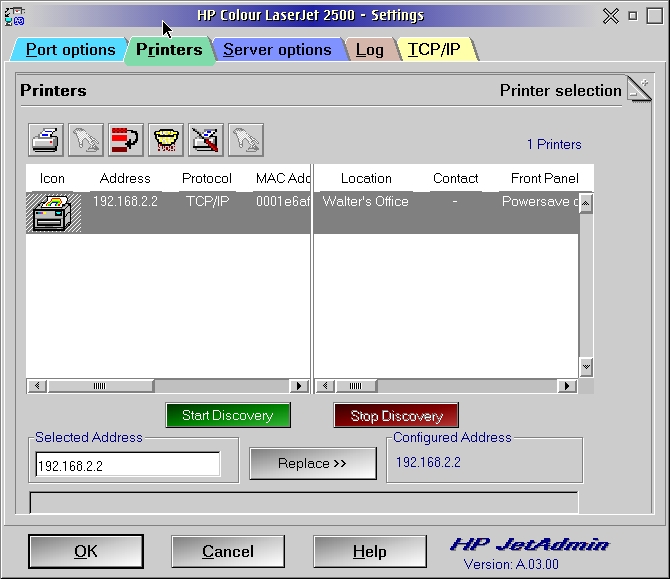
Figure 2: JetAdmin Port Driver Notebook: Printers tab.
Note the green button labelled "Start Discovery". Generally the discovery process will be running or already complete by the time you see this screen. However, the first time you visit this page, it may be educational to rerun the Discovery process by pressing this button.
Whether you rerun the Discovery process or not, you must select one of the printers listed in the top window, and press the "Replace" button near the bottom. Failure to do so may prevent your printer from printing. Note that if you have multiple printers connected to your print server, you will see one line for each printer connected. However each IP address will have a :x appended to it, where the x represents the port on the server to which it is connected.
Click on "Port options" tabs.
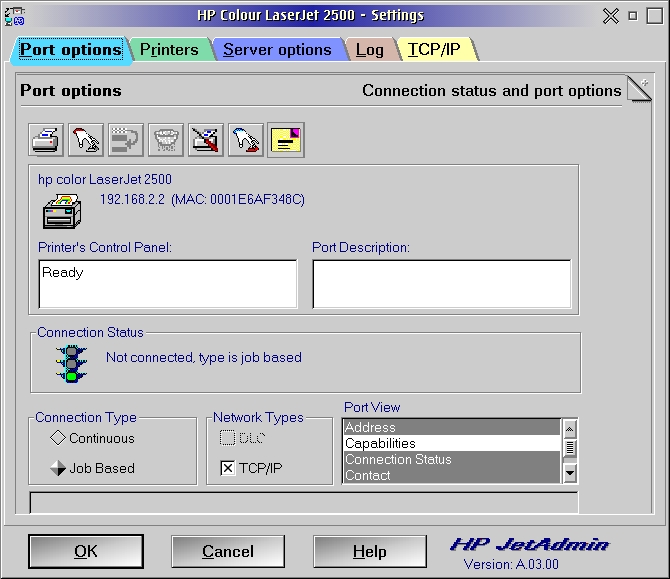
Figure 3: JetAdmin Port Driver Notebook: Port options
tab.
Although the HP 300x supports both TCP/IP and DLC, I have found that TCP/IP is
by far the best.
Under Port View, anything unselected does NOT appear in the text below the port
in the print server.
The most important setting in the whole JetAdmin notebook is the one below the Printer Description under the Toolbar: namely, the IP address: in my case 192.168.2.2 . Whenever the JetAdmin notebook is opened, it automatically runs its built-in discovery utility,
Installation Tips
TIP #1: With the printer controlled by the print server (port 1) selected, open the printer's "Properties" notebook, and select the "Output Port" tab. Making sure the JetAdmin port driver object is selected, right-click on the LPT1 port. Then click on Redirection, and select the JetAdmin port. Then close the Redirection window. You need to do this so that command line printer statements like:
COPY config.sys LPT1:
will work.
In addition some programs (e.g. eBayWatch/2) print by referencing LPT1, and will not work unless you perform this step.
TIP #2: If at all possible, set the IP address of your Print Server to a fixed (i.e. static) value. I have found several places in which it is necessary to enter a fixed address for the print server. If you are using a hardware DHCP server (e.g. one built into your router), check the DHCP options on the server. Several router models provide the option of restricting the DHCP server to a range of IP addresses. If this is the case with yours, choose a range that leaves some addresses available for static IP's. Then use one of these values for your print server. For example, I use the value 192.168.2.2 (which is outside the DHCP range I defined on my router). See the screen shot above.
Accessing the embedded web server:
I suggested in the previous section that you use a static IP address with your print server. This will most likely require changing your print server's configuration from the default it was shipped with. To do this you must access the server's embedded web server.
To do so, start your browser, and go to the current IP address of the print server. (Review the paragraph "The print server configuration document" in the previous section if you've forgotten how to do this.)
This will bring up a screen with a number of grey areas. (You may find that moving your mouse pointer across one the boundaries between the grey areas will expedite loading the data.) After a few minutes, you will see the following screen:
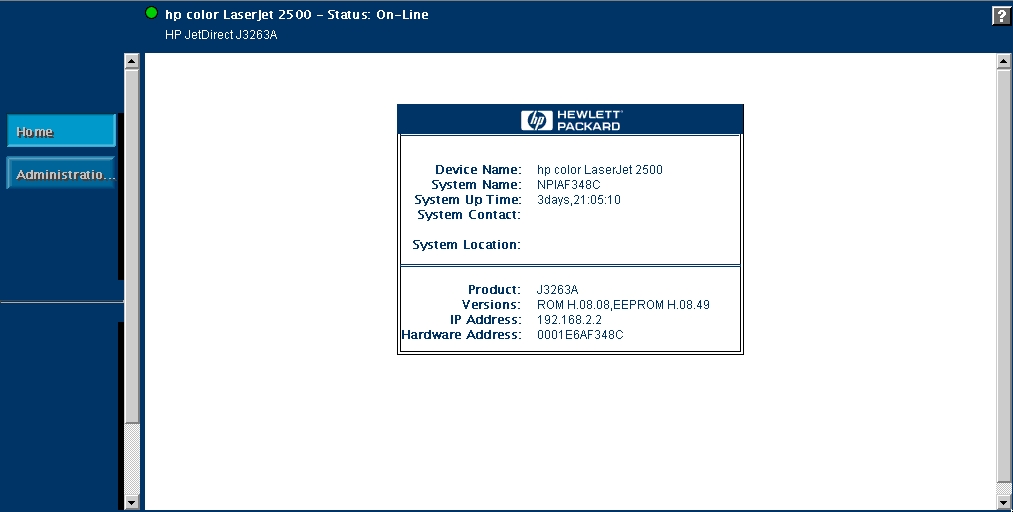
Figure 4: JetDirect Opening Page
When you see this screen, click on the "Administration" button on the left. After a minute or two, you will see a row of tabs across the top. Click on the "Configuration Tab". You will then see the following screen:
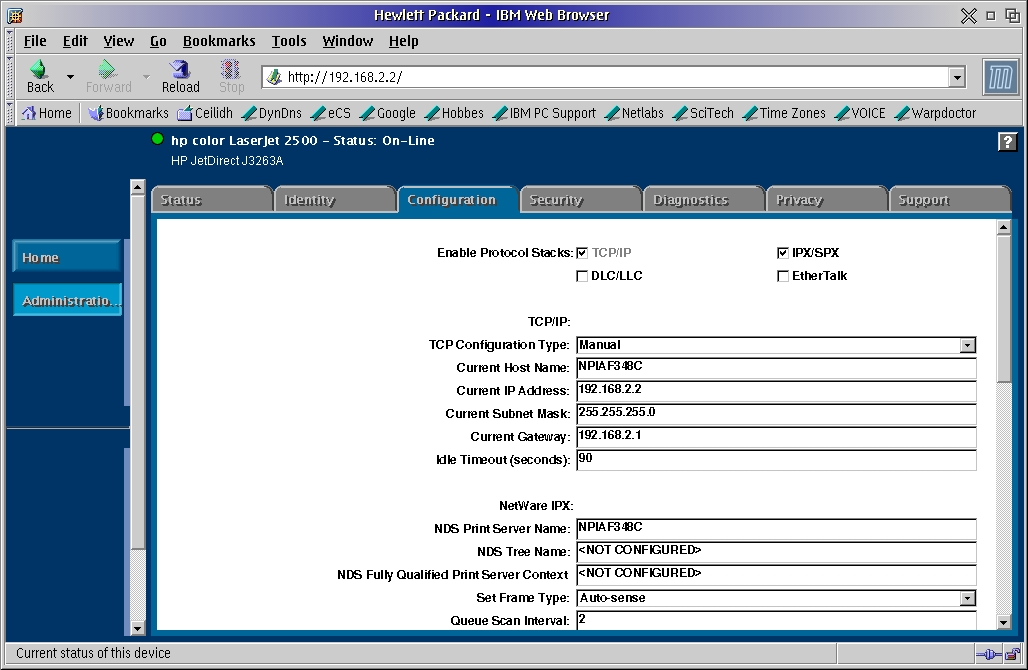
Figure 5a: JetDirect Configuration Page - top half
Configuring the print server
Set "TCP Configuration Type" to "Manual".
Set "Current IP Address" to the static value you have selected.
Check that "Current Gateway" contains the IP address of your router.
On the bottom half of the screen (see below)

Figure 5b: JetDirect Configuration - bottom half
Check the settings "Preferred Parallel Mode" and "Configuration Page Language".
I have found my print server works best when these are set to "Bidirectional" and "Auto-Sense". However your experience may differ.
If you have previously set either a Community name and/or a Password, enter them now. Click on "Apply" and close your browser.
NOTE: You may find the browser will become unresponsive after you enter the new IP address and before you get a chance to click on "Apply". If that happens, simply close the browser, and restart it, specifying the new IP address in the location box.
Start the JetAdmin (or SLPR) port driver, and make sure your printer's IP is up-to-date. Run the discovery utility if necessary.
This concludes the series on Remote Printing. I hope you have learned something about the various options for remote printing available, and are now in a better position to find the technique that best suits your requirements and your situation.
¹This excludes the so-called "Win-printers" discussed in the
previous articles in this series.
²This is indeed the case with the HP 300x and its HP cousins.
³You can also download the JetAdmin port driver from here.
Feature Index
editor@os2voice.org
< Previous Page | Newsletter Index | Next Page >
VOICE Home Page: http://www.os2voice.org