
VOICE Home Page: http://www.os2voice.org
[Newsletter Index]
[Previous Page] [Next Page]
[Feature Index]
|
VOICE Home Page: http://www.os2voice.org |
June 2002
[Newsletter Index]
|
| By Georg Neckel © June 2002, Translation: Christian Hennecke |
After the reviews of different MP3 encoders and decoders we have seen in the previous VOICE Newsletters, I am going to deal with a topic which is probably interesting for our middle-aged to older readers mostly, as they are the ones who presumably still have some kind of a relationship to the good, old vinyl long-player.
If you would like to copy music from vinyl to CD or save it in MP3 format, you will first need a record player and a phono preamplifier that then are connected to the »Line In« input of your soundcard. Most of the time an adaptor-cable (Cinch to 3.5mm stereo jack) is required. Connect the earth cable, which exists separately with most record players, to the ground of the phono preamplifier to avoid hum. At least this worked for me. As an alternative you can use an amplifier with a phono input, whose tape output then has to be connected to the soundcard. That is the solution I used first. My main amplifier has a very bad signal-to-noise ratio though, which lead to much noise in my recordings. The usage of the separate preamplifier improved the situation. You may want to try both options.
I am using the freeware tools Playrec and Copywave by Carsten Arnold to get the music on my hard disk. These are two small, but very useful command line tools that produce some pseudo-graphics when invoked in an OS/2 window. Reading the term "command line" many will move on to the next article. Since I am not a friend of command line tools either, I did the same until I had a closer look at those programs and printed their parameter list from the included README file. As you are likely to use the same parameters most of the time, including them into the command is helpful. Furthermore the titles, which have to be entered individually, can be prompted for by using square brackets in the options line. That makes things a bit more convenient. Entering the parameters into the properties notebook of Playrec looks like figure 1.
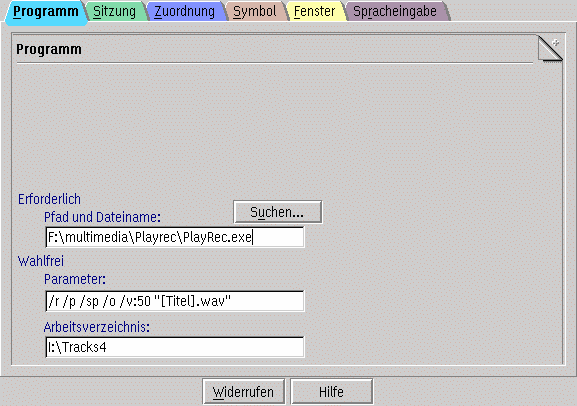
The example parameters have the following meaning:
Now only the title prompt is missing, which is implemented by specifying Title in square brackets here. In this example, the suffix .wav is added automatically. The quotes are required to be able to use spaces in the title.
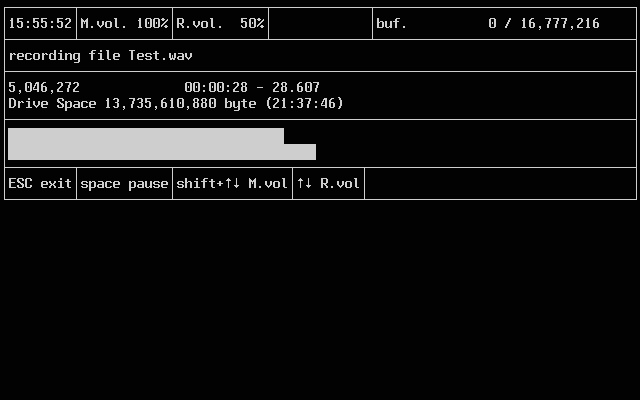
Since Playrec can be used for both recording and playback, it makes sense to create program objects for each feature with the required parameters. Enter a meaningful name on the Icon tab of the properties notebook. You can also define your own icon there. Of course, you have to enter the path to playrec in the Path and filename field. As Working directory you should specify the folder which the recorded pieces are to reside in. One small hint: I always save my recordings to the same directory and move them to a folder with the album's name later. Both folders should reside on the same partition to speed up the process of moving the files. For playback other parameters are required which I will talk about later on. First we have to record the music. We do this by double-clicking on the newly created program object. First we are prompted for the filename or the song. After we have entered the title, a window as in figure 2 is displayed. The title is called "test" there.

Here we can see that the program is in pause mode. Recording is started and stopped by pressing the space bar. The file is not closed until the operation is cancelled by pressing <ESC> though. If required, you can still adapt the recording level (R.vol) with the arrow keys. Unfortunately, the recording level is not displayed by the beam display in pause mode. Thus you cannot see if the recording level is correct until recording starts.
During recording the OS/2 window looks like in figure 3.
The sound file's size is only restricted by the available hard disk space.
As I already mentioned, sound files can also be played with Playrec. To do so
it does not have to time-consumingly load the complete file into memory first as
e.g. Ceres Soundstudio has. Playback of the sound file is started with the following
command:
playrec titel.wav
There is a very convenient solution for this operation with its own program object, too.
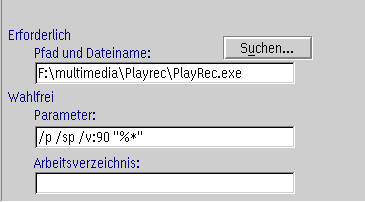
Using the parameters from figure 4 it is possible to start playback simply by dragging and dropping the sound file onto the program object. Then the program starts immediately using the dropped file. Basically this is done with the "%*" parameter. The other parameters have the same meaning as in recording mode. You won't need to specify a working directory here. Using this feature you can listen to a sound file that has just been recorded very quickly. It is possible to quickly navigate within the files with the <up arrow> and <down arrow>, or <page up> and <page down> keys.
Now it becomes clear why we needed two program objects, one for recording and one for playback.
You can also drag these objects for recording and playback to the WarpCenter. There drag and drop works well for playback, too. And you are able to quickly start recording without the need to change directories.
But what do we do, if we have to handle records where songs merge without a pause? This is not only the case with live recordings. Just think of albums as Oxygene and Equinoxe by Jean Michel Jarre, for instance. But you can also find such albums in other genres.
Of course you want to be able to select each track from the CD later. But upon listening the transition from one track to another must not be heard, i.e. there must not be a gap between them.
This can be achieved with another tool by Carsten Arnold. Copywave is a small program for copying parts from large sound files accurately to the second (or even accurately to the tenth of a second). As you have already guessed, one has to pass certain parameters to Copywave. You can have several ones prompted for one after the other.
To achieve this, the Parameters field of the properties notebook of Copywave
should include the following, for instance:
"[sourcefile].wav" /st:[starttime] /et:[endtime] "[targetfile].wav"
If you invoke the object, it successively asks for the following:
Note the use of quotes to be able to use titles with spaces here, too. To make things work you have to ensure that the correct working directory (that the sound files reside in) is specified.
Times can be entered either in seconds or in hh:mm:ss.ms format. You can get those values either from playing the file with Playrec or from the album cover (note that these values are not always correct). As starting time for the second title you can enter the exact ending time of the first title you copied in seconds. The files you get that way then only have to be written to CD in the correct order using DAO (disk at once). The DAO feature is mandatory, as the writing program will insert gaps between the tracks otherwise. To write CDs with OS/2 in DAO mode you can use CDRDAO or RSJ. For RSJ you first have to open the recorder with CDView (after inserting an empty CD-R, of course). After you have dragged and dropped the *.WAV files from the recording directory to the CDView window, you can start writing with DAO.
That way you won't be able to hear the transition from the first track to the second. Only the CD player's display will tell you when the second track begins.
Looking closer at the parameter list of Copywave it becomes clear that it can be also used to trim tracks, if the next track's beginning can already be heard at their end. You don't have to re-record a track then, instead you can simply shorten the file to the appropriate length.
It is even possible to compose one file from several other WAVE files. The corresponding
parameter string is:
{[Source file 1].wav /st:[Starting time] /et:[Ending time]} + {[Source file 2].wav /st:[Starting time] /et:[Ending time]} [Target file].wav
This adds two files (with starting and ending times specified) to one.
I admit that the string is pretty long, but you will have to enter it only once for a suitable program object (or you can copy it from this page and paste it), which you then use again and again.
If you now have assembled some program objects, each with a suitable name, you can drag them to an own tray in the WarpCenter for quick access. It is also possible to cut recordings from the first side of an album while the second is still recorded. This reduces the time you need for recording. In general, recordings can be done in the background without causing any faults.
Once you have digitized a few long-players that way, you will hardly miss a graphical user-interface.
These examples are intended as a tutorial for the most important procedures when recording music with a computer. Once you have dealt with the topic a bit more, you are probably going to quickly set up your own individual studio without much hassle.
References:
Playrec, Copywave |
[Feature Index]
editor@os2voice.org
[Previous Page] [Newsletter Index] [Next Page]
VOICE Home Page: http://www.os2voice.org