
VOICE Home Page: http://www.os2voice.org
[Newsletter Index]
[Previous Page] [Next Page]
[Feature Index]
|
VOICE Home Page: http://www.os2voice.org |
August 2003
[Newsletter Index]
|
| By Keith Merrington © August 2003 |
Having spent many years first with Warp3 and then with Warp4 I had started to run into problems with driver availability and was getting a little frustrated. Yes drivers were available, but I did not have a Software Choice subscription from IBM. I was still undecided whether to go for a choice subscription or to try eComStation. However when I heard that a new version of eComStation would be released and that it was now unbundled, reducing the price effectively by half, I decided to take the plunge and raided the piggy bank.
So here are my impressions both positive and negative of using eComStation 1.1instead of Warp4
PC configuration used in this installation:
Processor AMD Athlon 1.2. GHz
Memory 256Kb pc133
SCSI Controller Adaptec AHA - 2940UW bios 1.25
Disk Drives
D1 Quantum XP34550W Hard Drive 4Gb
D2 Quantum Atlas_V__9_WLS Hard Drive 9Gb
D3 IBM DDYS-t18350N Hard Drive 18Gb
Display Adapter nVIDIA GForce2 MX200 32mb
Network 3COM 3C905B Fast Ethernet Adapter 10/100Mbs - PCI
Realtek 8139 Fast Ethernet Adapter 10/100Mbs -PCI
Sound Sound Blaster Live 128
Peripherals Toshiba DVD-ROM SD-M1401 (SCSI)
Philips DVDRW228 DVD Writer 1.29 (Primary Master IDE)
Philips 170S2 LCD Display
HP LaserJet 4L Printer
HP 35470A DAT SCSI Tape Streamer
Logitech Keyboard PS/2
Logitech Wingman Extreme Digital 3D Joystick - USB
Sweex PS/2 Optical Wireless Mouse
Obviously for the installation it was great to be able to boot directly from a CD and get rid of boot floppies which I had updated to resolve the Large IDE Disk problem in the past. The speed of the start up was refreshing. Instead of the text based first phase of a warp installation a graphical display is shown. After the license agreement page, which for me was new, the installation continued with the installation options of "easy" or "advanced" instillation. I selected advance installation, as I do not like not knowing what is assumed. Next I selected the drive to install eComStation 1.1 on. Here I ran into problem.
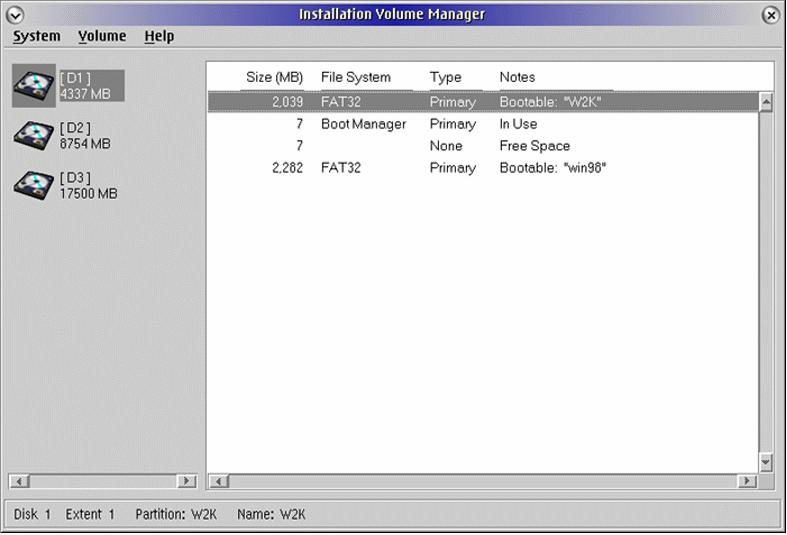
Fig 1 - MinLVM
LVM reported that the drive 0 partition table was corrupt. A small typographical error, drive 0 and D1 were one and the same. This error was most disconcerting but not disastrous as I had previously backed up my drive. Before doing anything else I rebooted back to Warp. No errors! I used FDISK to examine the partitions on drive 0 and again no errors reported. Strange! I restarted my installation of eComStation. At exactly the same place the same error was again reported. At least it was consistent. Okay maybe just writing a new MBR would cure the problem.
Normally I would use FDISK /NEWMBR to do this but FDISK was replaced by LVM. I ran through all the options on the screen without success hoping to see how I could rewrite the MBR. I remembered seeing a third option on the previous page of the installation which would start the Management console.
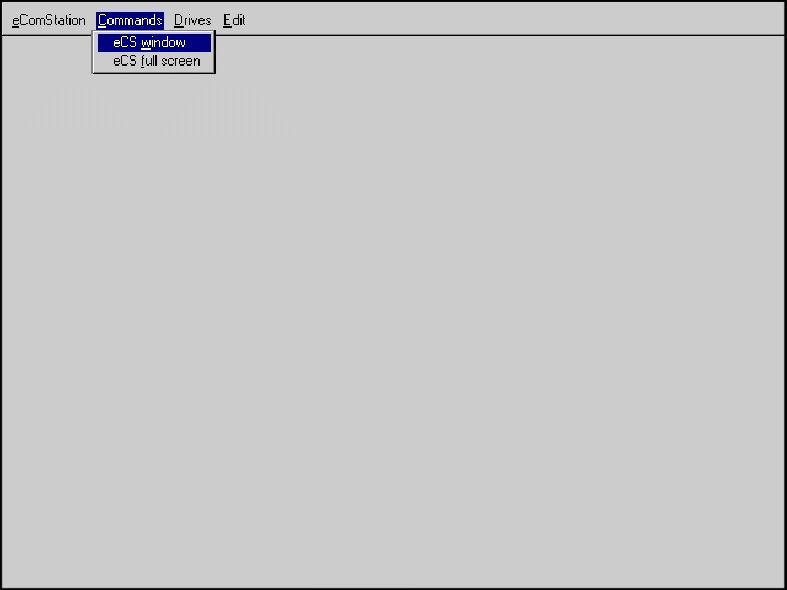
Fig 2 - Management Console
So I backed out to the previous page and started up the management console. Here I found that I could restart the installation, run a program, shutdown, start an eCS window or full screen session, even start one of two editors. Using the eCS window I typed in HELP LVM and was rewarded with the command reference page relating to the LVM. I was in luck. There was an option to rewrite the MBR using the same syntax as FDISK. Apparently the problem was not related to the MBR, as rewriting the MBR made no difference. I again went to the LVM and tried to delete the partitions on the "defective" disk. Most frustratingly however, no matter what I tried I could not delete the partitions. Every time I tried to commit my changes I was presented with the corrupt partition table message. Eventually I removed all the partitions on drive 0 and recreated them again using FDISK having booted from my old Warp4 boot diskettes. Once again I started the installation and this time no disk error messages! Although on this occasion the web console had not helped me, this feature nevertheless impressed me. Until now I always had an emergency web partition with a few tools. With this feature directly avialable from a bootable CD I might just dispense with my emergency maintenance partition.
After selecting my eCS partition and formatting it - no choice is now given as to either FAT or HPFS, its just HPFS - the most formidable screen appears. I am asked to type in my registration name, which is12 characters, and an enormous 128-character key. Typing never being my forte, I had a number of attempts before getting it right. It was just after the last attempt that I noticed the button Import registration data.As I was not sure what options I would install and to save myself trouble with future installations I decided to put the data on a floppy and load it that way. I pressed the button, selected the floppy, selected the file with my data and of course it didn't work. Obviously the data needed some format that I wasn't using. I contacted Mensys and they emailed me within minutes, my data with the correct format to put directly onto a floppy. If you have already registered your copy of eComStation 1.1 you can download your registration information to disk with the correct format from the eComStation web site after logging in.That's what I call service!
If you are in the chicken and egg stage and haven't yet registered because your system is not yet up and running then you can create your own file with the following format:
The filename is unimportant and the data is plain text.
After entering the codes the installation continued. A few screens later the network setup starts. Here the defaults (NetBIOS over TCP/IP instead of netbios) are different to Warp. This makes things easier since I have windows machines on the network. Also both my network cards are installed at the same time so I don't have to run MPTS after the installation to add the second card. Nice!
After a couple of boots I am confronted with an "end of installation screen". The eCS welcome screen comes up and allows me among other things, to set the screen resolution. This only takes effect after a reboot. So after selecting a suitable resolution and colour depth, I reboot.
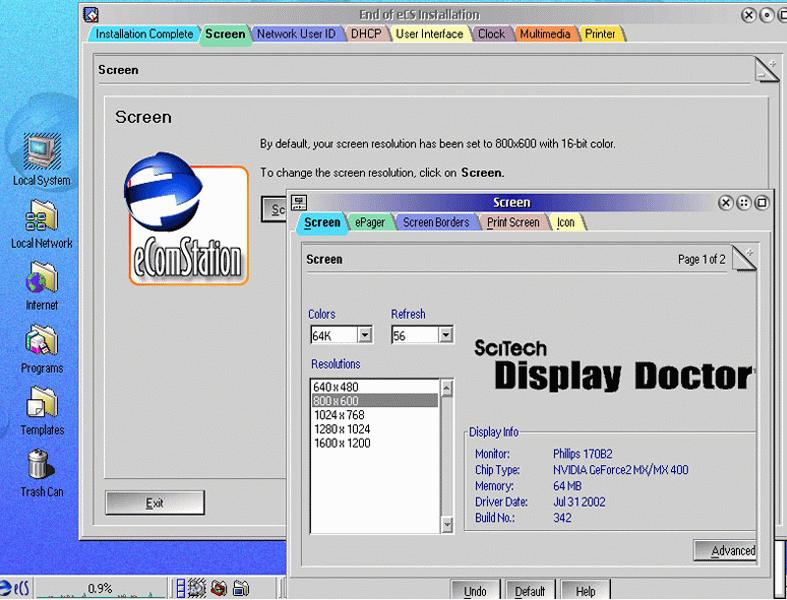
Fig 3 - Screen Setup
The display driver supplied with eComStation 1.1 is a special version from SciTech of the Display Doctor. Now I boot various operating systems and depending on which system I boot each screen driver seems to reposition the screen slightly. Normally with a normal monitor I can get around this problem while still using the same resolution just by selecting a different refresh rate for each operating system. I then "teach" the monitor size, position etc. for each screen resolution and refresh rate. However I had recently purchased a LCD display which remembers only the settings for each resolution but not those for a refresh rate. As I had used the commercial available version of the SciTech Display Doctor I knew that it was possible to center the screen using one of the SciTech utilities. This can be accessed via "System Setup" on the tab "Screen" page 1. Here using the Advanced button is a utility that allows, among other things, one to run interactive tests and to centre the screen. As I was already in this dialog, from the "end of installation screen", I press theAdvanced button. Nothing happens at all, except the button greys out. I don't know if this means that it has been activated or that the function is not available.
I know that the program, which is called via this button in the stand alone package is GACTRL.EXE. This program is normally located in the SciTech Program Folder on the desktop in Warp4. This folder is non-existent on the eComStation 1.1 desktop, but I find the utility in the SDD directory of the boot drive. Executing this program directly results in a black screen for 4 seconds and then the desktop reappears again. If I execute GACTRL.EXE from my Warp4 desktop (that is with the version supplied with the commercial package), I am rewarded with the test and adjustment screen. Using option 1 (Centering and Refresh Control) allows me to centre my screen and can continue with the set up. Even after replacing the eComStation version of GACTRL.EXE with my Warp4 version, the Advanced button still refuses to do anything different!
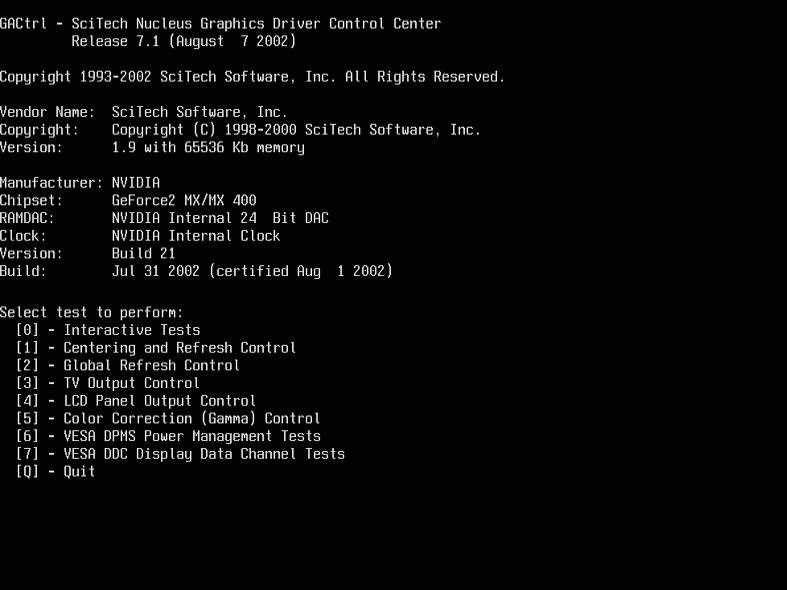
Fig 4 - Scitech Graphics Control Centre
Despite the above bug and despite the availability of fewer resolutions to choose from (5 instead of 9), this version of the SDD functions just as well as the commercial version and it's included in the price!
I now install my printer, which is now done as the last part of the installation instead of earlier as with Warp. The printer list is now phenomenal. The main disadvantage is that it takes longer to find my printer, but so what, having this much choice is great.
I now open an OS/2 window and see that its been renamed to eCS but that's a very minor detail. I try to set the size of the window, by changing the default font size, so that it doesn't take up half of my desktop. But when I try to move the window, dialog boxes start to open left right and center. It appears than when holding down my left mouse button (an optical wireless PS/2 mouse) this action is incorrectly interpreted. Although I can click with both buttons and use the scroll wheel correctly trying to move or resize anything is impossible. As this was the first time I had used SIO2K.SYS, and as I have not had this problem with Warp4, I switch to COM.SYS instead. I even tried using the Warp4 COM.SYS and MOUSE.SYS drivers. Needless to say the problem remained. I try three different mice but that doesn't help. The last mouse I tried was a USB mouse.This mouse didn't work properly either but the symptoms were quite different. The mouse pointer shifts after about a second to the top left-hand corner. This points me in the direction of the USB bus. The only other device I have, since Warp4 did not support USB devices, is a USB joystick to play games under win98. I find out that if I remove this joystick the mouse works perfectly! With the joystick reconnected and with my original PS/2 mouse, I notice that if I move the joystick the mouse pointer moves! There is some interaction between the two devices that I can't believe is intentional. Not wanting to connect and disconnect the joystick every time I boot a different OS I look for another solution. When I scrutinise CONFIG.SYS I find that a USB mouse driver is present. I was not aware that I had selected a USB mouse during the installation. The part of CONFIG.SYS relating to the USB bus is as follows:
BASEDEV=USBUHCD.SYS              (USB port controller)
BASEDEV=USBMSD.ADD               (USB mass storage devices)
BASEDEV=USBCDROM.ADD             (USB CDROM device drivers)
DEVICE=D:\OS2\BOOT\USBKBD.SYS    (USB Keyboard device driver)
DEVICE=D:\OS2\BOOT\USBMOUSE.SYS  (USB Mouse device driver)
DEVICE=D:\OS2\BOOT\USBCOM.SYS    (USB Serial device driver)
Looking back at the installation the USB host controllers had been correctly detected, and the support had automatically been enabled. I was not aware that this also enabled various USB devices such as a non-existant mouse. During the installation it was only possible to enable or disable the various types of USB controllers, USB CDROMS, Disk Drives or Modem, but looking at CONFIG.SYS it would seem this support is added anyway. Nowhere is the USB keyboard or mouse selected.
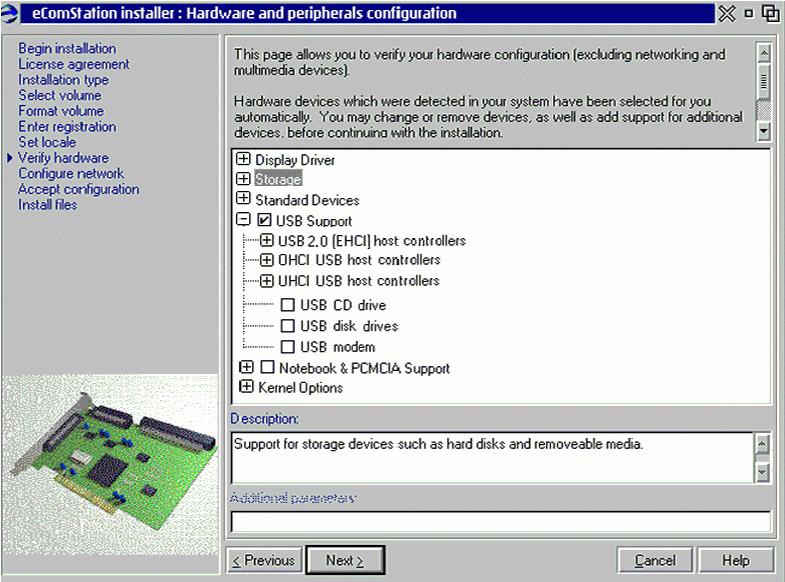
Fig 5 - USB Installation SCREEN
The options under each of the USB host controllers only served to enable or disable the various instances of each type of controllers.
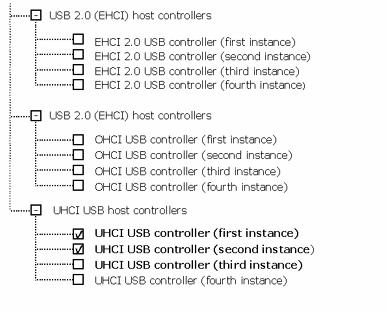
As can be seen here above there is no direct enabling or disabling of any devices themselves. I have tried the joystick (a Logitech Wingman Extreme Digital 3D) on another PC and can reproduce exactly the same result. With the same hardware but different operating systems (W2k, Win98, Linux) no problems or interference between the mouse and joystick occur. Even after incorporating the latest fixpack (Corrective Service XR_C003) the problem remains. Strangely this fixpack is not bundled on either CD, although it was first released as long ago as 21/10/2002. It is however available from the eComStation web site and can be download and installed using the maintenance tool.
As an aside I found a new program in the System Setup folder (but its only there if USB support was selected during the installation) called the "USB Resource Manager". I had hoped this utility would allow me to manage my USB resources and disable my offending joystick. Well the name is a misnomer, as it's an information program. It identifies and lists the devices connected to the USB subsystem. The program (USBRES.EXE) is a freeware utility, which has been added to the eComStation 1.1 distribution. It is still a beta program with version number 0.9.7. It was last updated as far as I can ascertain back in 2001. There is a small readme about this program (not on the CD), which is in the zip file distribution of the utility. This file can be found at the Netlabs web site Netlabs web site . The vendor/device data it uses is more recent (v 1.104 2002/04/13) and is stored in the file USB.IDS. The version on the CD is 1.104 dated 2002/04/13. The latest version of this file is 1.123 dated 2003/06/20 (at the time of writing this document). It is updated regularly and maintained by the Linux world. It can be found on the Linux USB Project web site. This file already contains about 40% more device id's than the file supplied with eComStation 1.1.
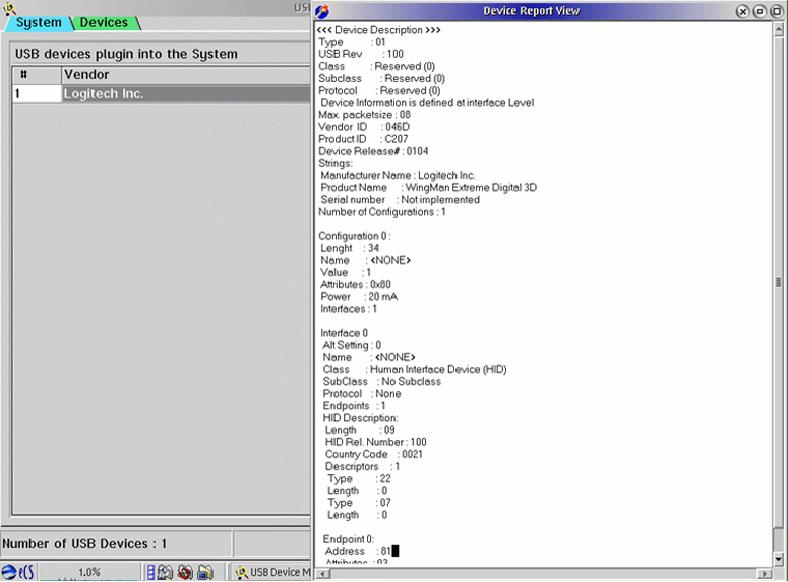
Fig 6 - USB Resource Manager
After starting the USB Resource Manager, two tabs are displayed, one showing the USB devices connected, the other a comprehensive list of all the various vendors and products that can be identified. Not all of these products are supported by eComStation! A double right click with the mouse on a connected device brings up a small tag. "View Device Report". By using Enter or the left mouse button a detailed list is displayed (See Fig 6). After I loaded the latest version of USB.IDS this became a bit buggy and the report was not always shown until after a number of attempts.
Next I wanted to add sound, so I needed to find a driver for my SB-Live Card. I had already a driver running with Warp4, so I know that my soundcard should work. Rather than finding my old driver I decide to see how eComStation handles this. From the documentation I knew that there is a host of software, including multimedia drivers, on the second eComStation CD. To start the installer from the second CD, it is only necessary to run the INSTALL.CMD from this root directory of the CD. After which the "Application Installer" is started. The first time this program is run, a backup of the MMOS/2.INI files are automatically made. When the "Application Installer" opens, a notebook is displayed with a large number of tabs. One of these tabs is "Multimedia/Drivers", that's the one that I need.
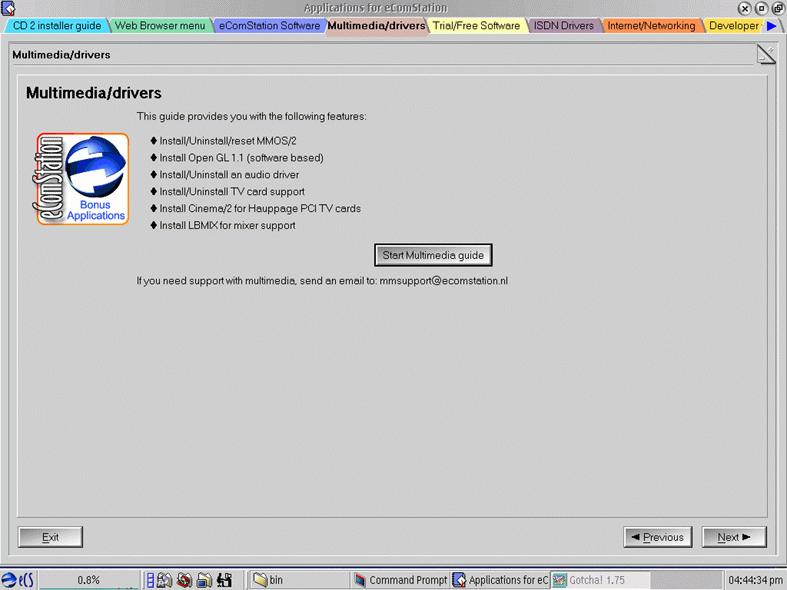
Fig 7 - Application Installer, multemedia
tab.
Pressing the "Start Multimedia Guide" brings up the next notebook with tabs for installing, re-installing and resetting MMOS/2, plus Open GL, TV Support, LBMIX & Cinema/2, and yes a Soundcard tab. Via yet another button the next notebook guide is opened with 15 tabs this time. The first two tabs give some general information on the way the notebook is organised and how to install and uninstall an audio driver. A good idea especially if you're a little unsure or haven't done this for a long time. Running through the remaining tabs I find the appropriate Sound Blaster driver under the tab Creative/Ensoniq and half way down the page a button to install my audio card. From this button the good old IBM MMOS/2 installer, which I am used to from using Warp, is started. One reboot later, and after switching on my speaker set, I am rewarded with the familiar start-up melody.
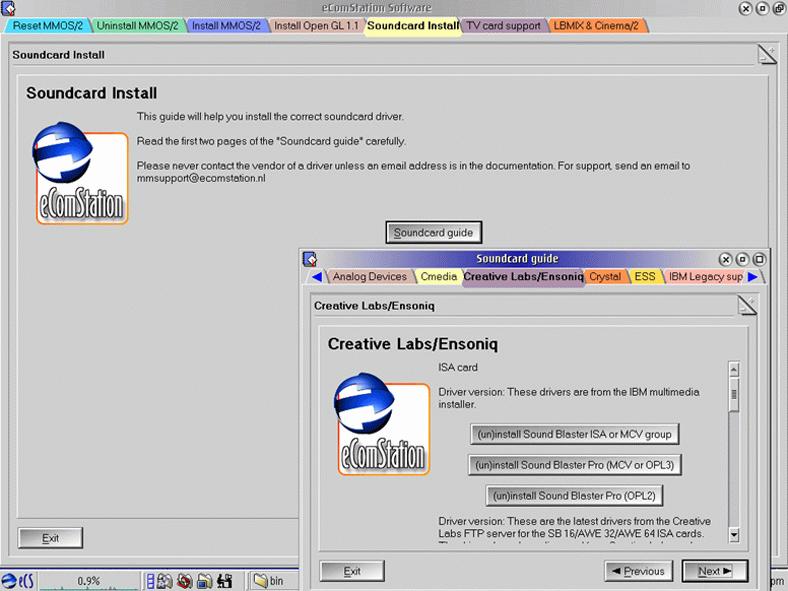
Fig 8 - Soundcard Install
I have a simple two-computer network connected via a SMC router (SMC7004ABR) which includes a one port print server. This allows me to share Internet and have a network printer available 24 hours a day. I had selected dynamic addressing (DHCP) instead of static IP addressing for my PC during phase one of the installation as my router has a built in DHCP server. Theoretically I should now be able to logon to the network and see my other computer. The login name and password is set during the final part of the installation in the "end of installation screen" notebook, tab "Network user ID" (see Fig 3). If you had forgotten to change the values during the installation like me, you can find this notebook back again via the following route. From the desktop, "Local System", "Install/Remove", "eComStation setup".
On this tab, apart from entering your user id and password, you can also select the automatic starting of Peer Services and making your computer visible on the network. Once this was done I logged on to the network without a hitch. Using the "File Print and Resource Browser" I could look at my other computer and shared directories. I had hoped that the problem of browsing FAT32 partitions when running w2k would have been resolved, but as with Warp 4 I cannot see any files or subdirectories on partitions formatted as FAT32 via the PM browser. The new option "Folder Actions" -> show tree size (see Fig 9) - in the popup menu which is brought up by right clicking on the desktop - does however show that these files are accessible. I can also read and write to this network drive but not from the browser. A utility such as FM/2 and REXX can access the files. This is a problem to be looked into at a later date.
Well my Internet connection is the next thing to get going, especially if I want to access the web without using my other PC or rebooting back to Warp. I start up Mozilla and immediately I am welcomed to the IBM web site. I have a cable connection and I didn't have to touch a thing. The installation of my email client (MR2/ICE) also went without a hitch, so I am again connected to the outside world and can catch up with my posts, which was just beautiful.
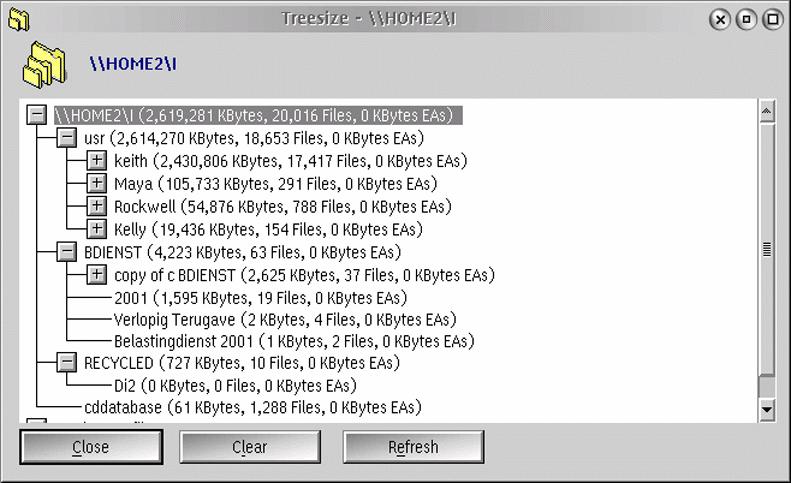
Fig 9 - Treesize
To connect my network printer I use the somewhat newer SLPR protocol. This driver is supplied on CD2 (but a newer version is available from the eComStation download page), together with an excellent step by step account of what to do after installing it, plus a reference to a more detailed resource on the CD. This is attention to detail which I really like!
Basically the steps are simple. First install your network printer as a local printer on a local port, i.e. LPT2. Then after installing SLPR select the printer properties and then the tab "Output Port", "Install new port..." add one of the new port drivers (SLPR1, SLPR2, or SLPR3), select this port for your printer and all should work. It did for me. An article covering this subject in more detail can be found in Voice Newsletter 09/2002 - Faster Network Printing.
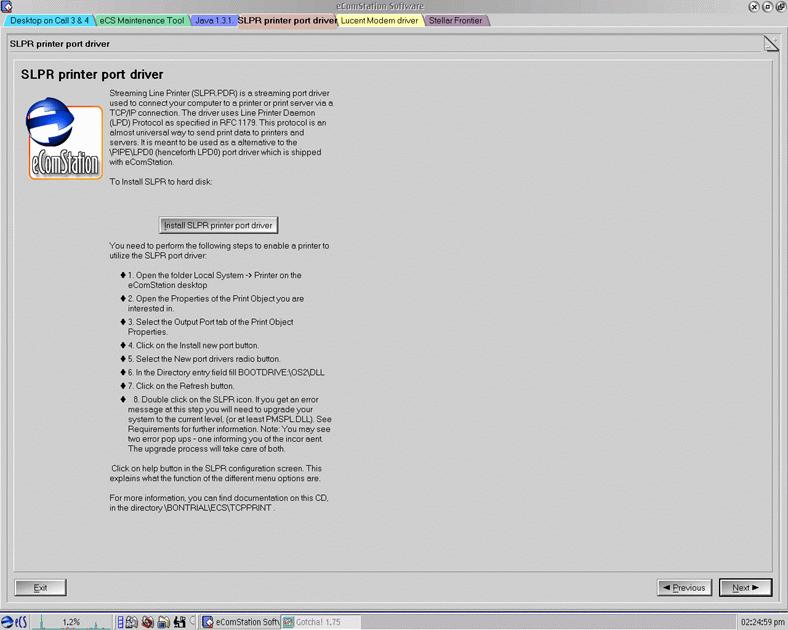
Fig 10. - SLPR Install
Apart from some general utilities, I also want to install Object Desktop and Fastback Plus. Fastback Plus is a backup program which I use with my old 2gig HP DAT tape drive.
Although Object Desktop has become somewhat buggy over the years, mainly with the Navigator (disk manager) I still wanted to try it out. The installation of Object Desktop Professional is straightforward. Only one minor glitch occurs but it's really nothing.
The installer program tries to find the old IBM browser but doesn't succeed. Installation then continues without any further errors and after a reboot, loads without any protest. The Navigator seemed less buggy, but this could be wishful thinking. It is however more responsive.
Fig 11 - Object desktop install error
As a number of features in eComStation, which were not part and parcel of Warp 4, were supplied by Object Desktop, some problems may occur. One of which is: Where is a function enabled and disabled. Take the function "full screen drag" for example. This is available both in eComStation and Object Desktop. The selection of this function from two places works as a logical or. If either check box (for eComStation this is in the tab "User Interface" in the Workplace Shell notebook which can be found in the System Setup folder and for Object Desktop it is in the tab "Window controls" in the Object Desktops Master setup's notebook) is enabled then the function works. In both places the checkbox must be disabled to disable the function. The obvious drawback to this is, first to know that the function is enabled in more than one place and secondly to find out where to disable it. This effect means that I will have to be careful with some utilities.
A minor bug in the Object Navigator (the disk manager of Object Desktop) is that the delete function is not a true delete. Any object selected for deletion, be it via the Del key, the shredder button, or via a popup menu, is moved to the trashcan. Using the shift key in combination with delete (in eComStation this results in a permanent deletion), does not work.
The only function that I have found that does not work correctly in Object Desktop under eComStation is the text view of an archive! If I open a zip archive, by double clicking on it (when Object Desktop is installed), then strangely the first character of each file or directory in the zip archive is missing. Opening a file by double clicking on it results in an error message being given! Via the diagnoses button it is obvious that Object Desktop passes the incorrect filename to the text viewer. If the archive has a subdirectory then I can open it, but again cannot view any files as now the first letter of the pathname is missing. One work around is to do an auto extract and then view the files, but this is messy, as I need to delete the folder afterwards to clean up.
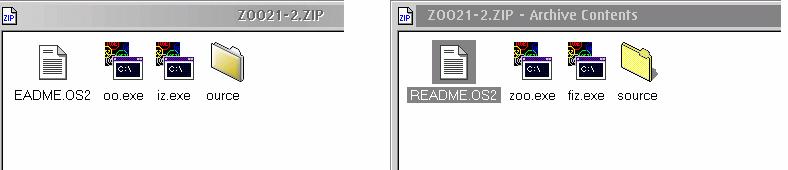
Fig 12 Zip file view with ComStation(left) Warp 4 (right)
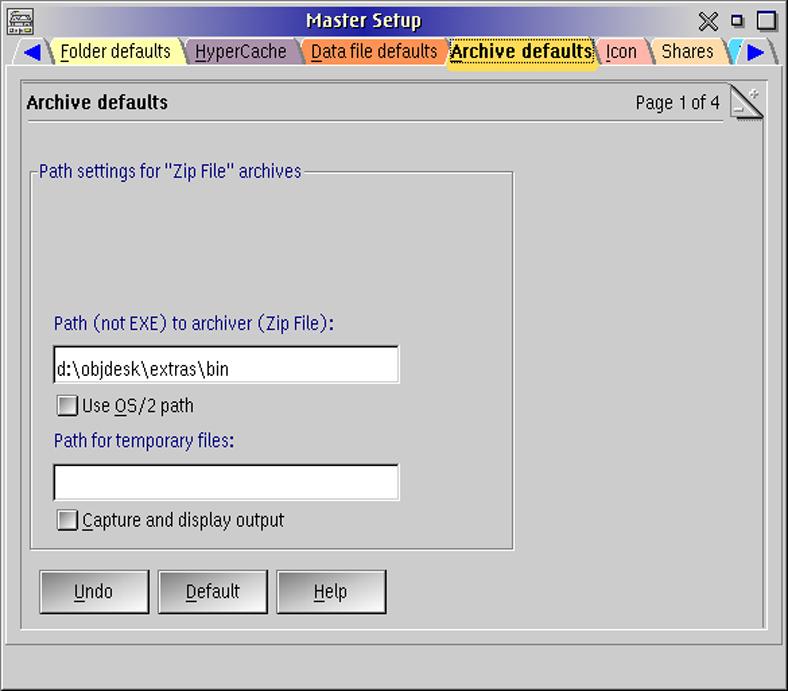
The problem is caused by an incompatibility of the Object Desktop graphical interface with the zip executable version supplied with eComStation. During the installation of Object Desktop the location of the zip executable is appended to the PATH statement in CONFIG.SYS. However since there is an earlier reference to the eComStation's version of ZIP.EXE in the PATH statement, this version is always selected. Obviously rearranging the order in the PATH statement would cure this for Object Desktop, but might create a problem for eComStation. An elegant solution to this problem however exists. From the desktop folder "Object Desktop Professional" the "Master Setup" notebook can be opened. In the "Archive Defaults" tab page 1, it is possible to direct Object Desktop to use a different path than the one supplied by CONFIG.SYS. Similar options are available in the next three pages for ARC, ZOO, and LHA archivers. After changing this path I can now access my zip files as before. I also removed the reference to Object Desktop's zip file from CONFIG.SYS PATH statement to keep things tidy.
I was really worried about how my backup program Fastback Plus would fair under eComStation. Not only because it is rather dated, but also because when warp 3 was introduced in 1995 an update was required to get it to work properly. As the installation of the program had been slightly temperamental in the past I was therefore not unduly surprised that during the first reboot after installing the program an error occurred. During the execution of CONFIG.SYS, a message was given stating that the fastback SCSI driver, FBSCSI.SYS, could not be loaded. Fortunately I remembered that I had only recently replaced my CD drive which was positioned next to my tape drive. The loose cable was quickly found. I could have kicked myself for not noticing this earlier as with every boot the list of SCSI devices is displayed and the HP tape drive was missing from the list. With the cable securely inserted the error disappeared and Fastback Plus was again working as perfectly as it ever had. To be on the safe side and before proceeding further I made a backup of my boot drive both to tape and the network.
One thing, which didn't work properly, was the creation of the emergency recovery diskettes. The creation itself works, the disks are written, but when rebooting with them the recovery program does not. Looks like I will have to make them by hand.
Apart from the fact that the system is more responsive and I didn't have to modify CONFIG.SYS to suppress open windows reopening on the next boot, I bumped into a number of pleasant surprises when wandering across the desktop. The first was that my scroll mouse's scroll wheel worked well. Extended popup menu with additional menu items gives easy access to things such as a command prompt, or a tree listing.
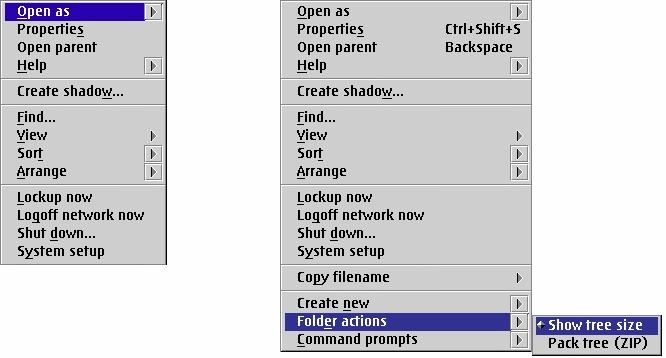
Fig 13 - Warp 4 popup menu (left )
eComStation popup menu (right)
The command line command "open" results in a window opening of the current directory. The addition of some shortcut keys such as: F5 to refresh a window, Ctrl C, Ctrl V, Ctrl X in addition to the classical OS/2 Ctrl Ins, Shift Ins, Shift Del for Copy, Paste and Cut; also new is a trashcan, instead of the old command line undelete; a built in zip function; the world clock, to synchronise my PC's clock via an Internet time server; a task scheduler ("Task planner"); the the new INF file viewer ("newview") which even has a function to search across all help files even if it is somewhat buggy. Most of these functions I had added to Warp4 using various freely available utilities, but having them installed with the base OS removes any hassle of installing them afterwards.
There is also the Maintenance Tool to download updates/fixpacks, to commit them
and even to remove them at the click of a button.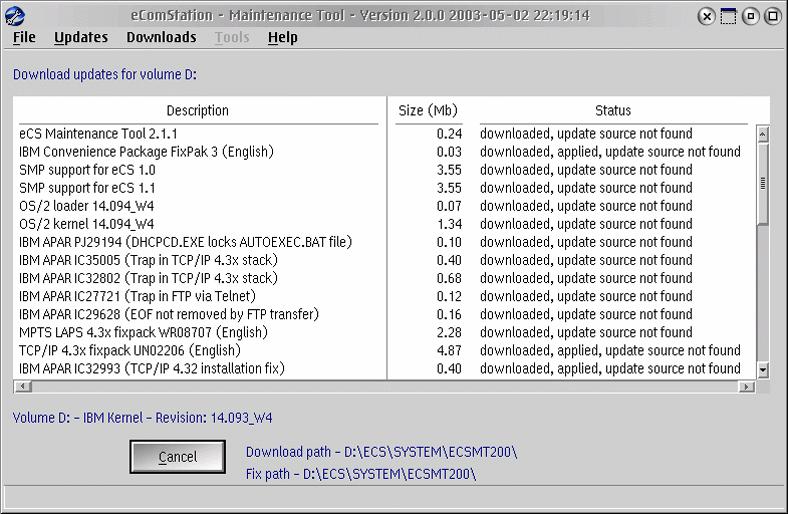
Fig 14 - eComStation Maintenance
Tool
Funny enough one of my biggest irritations with Warp, was always that I had to
wait to switch off the computer after shutting down. Now I don't. I can select power
off and walk away. This together with a reboot function (supplied as a command line
command in Warp4 setboot) to start a different OS is great.
Are there things I dislike? Yes the graphical LVM, which is slow, missing functions and is prone to traps. LVM itself is somewhat cumbersome. For example to create one volume requires 10 actions:
Create a new volume -> Create a volume that does not need to be made bootable -> Create a compatibility volume -> Drive letter selection -> enter name for Volume -> Choose a disk -> allocate from free space -> select free space -> Enter name for partition -> Enter Size for partition ->
It does however via the Esc key allow you to go back one item at a time instead of starting from the very beginning. Also like FDISK (Warp4) the changes are not "committed" until you exit and save.
In eComStation there is no built in File manager like the Navigator in Object Desktop. The zip archive viewer only allows showing a list of the zip files contents but does not support looking into a file in an archive.
Well the million dollar question is, if I knew all that I know now, would I switch to eComStation; or would I advise other Warp4 users to do so? Yes! It's as simple as that. If I consider all the enhancements, and improved performance, these outweigh in my mind any and all of the problems I have encountered, with either the system or with some of my programs. You might decide otherwise, but for the price of the upgrade its definitely worth trying!
References:
|
[Feature Index]
editor@os2voice.org
[Previous Page] [Newsletter Index] [Next Page]
VOICE Home Page: http://www.os2voice.org