 VOICE Home Page: http://www.os2voice.org |
[Previous Page] [Next Page] [Features Index] |
|
VOICE Home Page: http://www.os2voice.org |
[Previous Page] [Next Page] [Features Index] |
By: Chris
Backas ©November 2000Virtual PC: http://www.connectix.com/products/vpc3.html |
On my recent trip to Warpstock, I finally got a chance to put faces to
some names I've seen around the community over the years. I also got a chance to
talk to some great people from Serenity Systems, meet Kendall Bennett of SciTech
fame, and was introduced to a really nice Java RAD tool called Simplicity for Java.
As with most places I go, I had my Apple iBook in tow - a fact which garnered more
attention than I expected. No, it wasn't just because I had a blue and white laptop,
most people seemed fascinated that I had OS/2 running on the screen! (One person
even thought that I must have replaced the innards of the machine with PC Hardware)
Because of all the interest there seems to be in doing this (my WarpCast post generated
over 5 dozen responses!) I decided to write this step-by-step guide to installing
OS/2 on a Macintosh.
1. The first step is to buy the required software. This is not a magical
process. To run OS/2 you will need to buy VirtualPC
from Connectix. All versions of VirtualPC
(or VPC for short) are the same program, the only difference is the OS that they
come with a license for. So, unless you wish to buy a Windows license, I recommend
buying VirtualPC for PC-DOS. There are many retailers on the Internet who carry
it. The DOS version is around $75, or $50 if you already own a prior version.
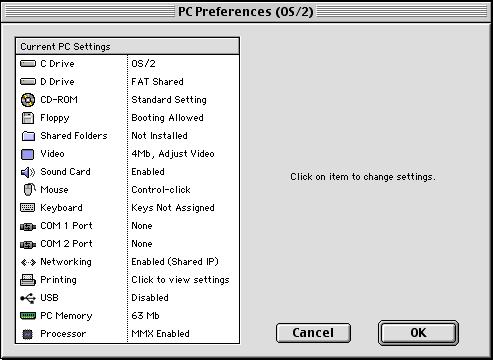
Virtual PC can mount HD images as drives on your Mac's Desktop when you double
click them. The problem with this is that it only understands the FAT file format
(and only simple partitioning schemes for that matter) For this reason, I recommend
creating a D drive that's only FAT. (See screen shot below for this and the following
settings.) This will allow you to have a drive that you can use as a shared area
between the MacOS and OS/2 - and plays an important part during the install process.
Again, zero the drive when you create it, the drive's size can be very small though.
On my iBook it's only 20MB.
Leave the CD-ROM set to "Standard". The alternate is only used for
SCO Unix.
Make sure the Floppy is set to "Booting Allowed", otherwise we won't
get very far into installation.
Leave Shared Folders set to "Not Installed" - this feature only works
in Win98.
Set the video to "4Mb, Adjust Video"
The Sound Card should be enabled.
The mouse setting is where you define which key is the modifier for Right-Clicking.
I highly recommend using Control-Click - Shift Click doesn't work very well in OS/2,
and Control-Click has another advantage. Multi-button mice on the Mac send Right-Click
to MacOS as Control-Click. Therefore, by keeping this setting here, if you have
a multi-button mouse the right click will work exactly like you expect.
The Keyboard setting lets you assign some buttons to act as the Windows Keys.
I don't use this feature, but you can if you'd like.
I don't have any Serial Ports on my Macs, so I leave the COM port settings turned
off, and have no idea if they work or not. If you have a need for them, you can
give it a shot though. Let me know if it works!
Set Networking to "Enabled (Shared IP)"
I've never tried printing before, but VPC will emulate either an Epson EQL2500
printer or a generic Postscript on LPT1. I think it should be possible to setup
the plain Postscript under OS/2 - I've just never tried. In any case, VPC would
map this to your default MacOS printer.
VPC's USB support is emulated as an OHCI controller. OS/2 doesn't support this,
so leave this turned off. Don't worry, you will still be able to use USB mice -
VPC will take care of it and OS/2 will think it's PS/2.
The PC Memory Setting cannot be modified here. See the next step.
The Processor setting allows you to turn MMX on or off. Connectix says that having
MMX on will slow down the emulator. I've never seen a difference, and just leave
it on.
Now that you've got all these settings done, click "Ok". In a moment
you should get a new screen with a message like "Missing Operating System".
At this point press Command-Q and select "Quit"
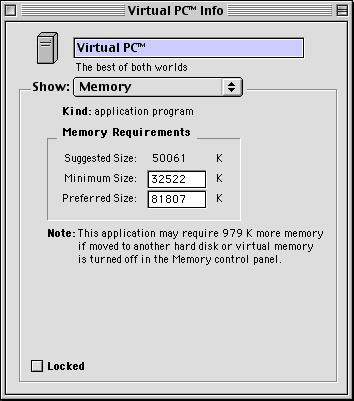
The MacOS has a primitive method for giving memory to applications, as illustrated
here. Virtual PC will use a variable amount of RAM for its own internal caches (such
as, a CPU instruction cache) based on the Preferred Size you allocate. The remainder
will be used as virtual RAM for the OS. Unfortunately, there's no effective way
to calculate what the remainder will be, and OS/2 REALLY dislikes certain odd sizes.
The number in the screen shot below will give OS/2 roughly 64MB (I think it's really
63), but requires 81MB of RAM from your Mac. You will need a lot of physical RAM
in your Mac for this to be reasonable. You *can* use less, but the performance of
OS/2 will suffer a lot. It's your call, but remember that using un-verified sizes
can make virtualized OS/2 highly unstable. If you have the RAM to spare, use my
setting.
The goal is to get images into Uncompressed Apple Image Format. This is the only
way I've found to do this without having a floppy drive on a Mac. (It requires a
Linux machine with a floppy drive). First, from OS/2 make all 3 install disks if
you don't already have them. Then, take them to you friendly neighborhood Linux
machine, and do the following to each:
Now, move the three image files to your Mac (over the network most likely). This
next step requires a Apple DiskCopy. Using disk copy, have it mount the image as
a drive on your desktop, Then go back to DiskCopy and Select "Create Image
from Disk" *NOT* from Folder. You must create the image without compression
- you might need to edit DiskCopy's preferences to do this. Make sure it's set to
make a 1.4 Read/Write image. Do this for all three disks, and you're done.
You should have the OS/2 Warp 4 CD in the drive at this point, and proceed normally
with installation. To switch floppies, eject them first by clicking the Floppy's
button on the bottom of the window, and insert the next one. (Either by dragging
in the next image, or inserting the next disk)
Here's some notes you might need to know to install properly:
BASEDEV=IBM1S506.ADD and change it to read:This change makes sure that Busmastering is disabled. We're about to apply a fixpack, and the default setting for busmastering changes afterwards. The busmaster feature causes a lot of trouble under the emulator, and aside from that, it wouldn't really improve performance anyway. Remember all disk I/O is emulated, so your bottleneck is the translation between OS/2's request and where the data lives on the Mac.
BASEDEV=IBM1S506.ADD /A:0 /!BM /A:1 /!BM
Alternatively you can use OS/2's command line FTP if you chose not to make a
shared disk. Emulated OS/2 is very flakey without any fixpacks though, so I don't
recommend this method.
After OS/2 boots, install the Fixpack as you normally would. You can install
Netscape for OS/2 using the same method as you used to get the Fixpack files, or
download it at the same time as the fixpack files if your shared disk has enough
space.
There are several reasons that you need to install a fixpack. First, it improves
the stability a lot (and of course fixes many OS/2 bugs) But most importantly, it
allows you to run SciTech display doctor. SciTech is the only driver that works
well enough under VPC to give you full color. The normal S3 driver works alright,
but causes a Trap whenever you close any program. (That's a bad thing.)
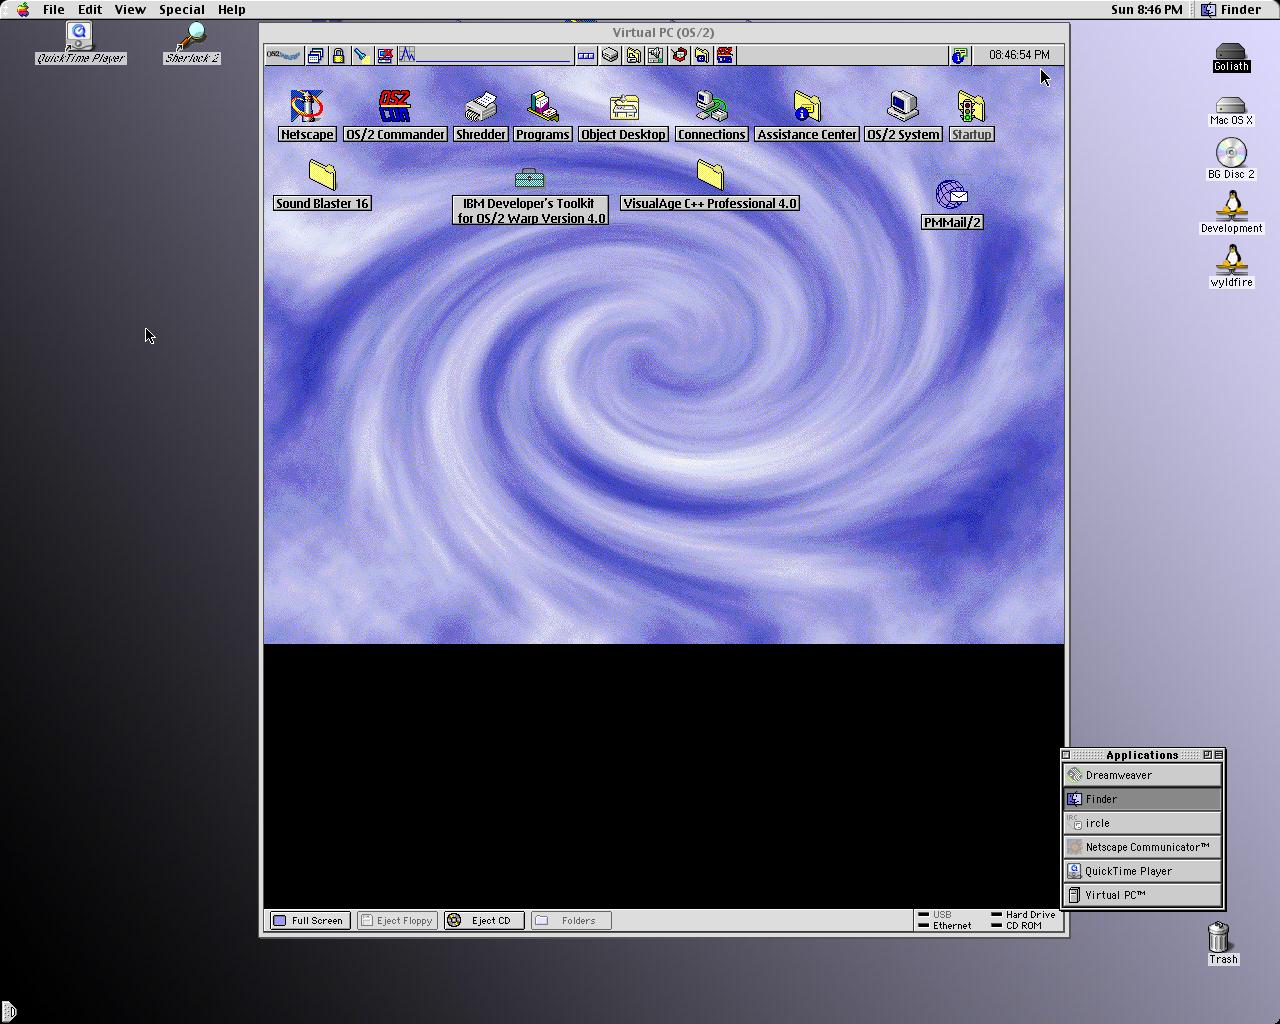
You will notice a large black 'tumor' underneath the screen image. Unfortunately,
this is a side effect of something that SciTech does and I've not found a solution
to it. This 'tumor' prevents you from entering full screen mode unless your Mac's
resolution is large enough to hold the entire thing. In other words, OS/2 at 800x600
on an iBook should be able to fit fullscreen, but due to this tumor, it won't be
able to. If someone can find a way around this, I'd love to know.
And, that's it! You should be able to install any software you want. I've got
VisualAge C++ v4, and Object Desktop v2.0 installed, among other things. Here is
a screenshot of the final result, (Tumor not edited out).