
VOICE Home Page: http://www.os2voice.org
Newsletter Index
< Previous Page | Next Page >
Feature Index
|
VOICE Home Page: http://www.os2voice.org |
March 2004
Newsletter Index
|
| By Chris Clayton © March 2004 |
 The
Notebook/2 site is very out of date but has recently been taken over by the OS/2
and eCS Hardware Web site, so things should improve as people provide new input.
There I found Andres E Mukk's notebook review for the Thinkpad
T40. [Editor note: This review first appeared in the July
2003 VOICE Newsletter.] I have always been partial to IBM's Thinkpad line because
they are aimed at the traveling commercial customer: solid strong construction,
good performance, lightweight, and, so far, some OS/2 support. The IBM systems are
a little pricey, but one gets what one pays for: I have experienced the 'joy' of
having a low bidder brand fall apart in the middle of a long airline flight when
I needed it the most. The TP T40 line has recently been replaced by the T41 series.
However, the TP
T41, DHU model I ended up ordering differs very little from the TP T40, U19
model reviewed in the article: 1.4 GHz vs 1.3 GHz Intel Pentium M processor, and
a 40 GB vs 30 GB ATA-100 disk. The price for the "economy" version customized
to 512MB ram was $1904.00, including shipping within the United States and state
sales tax.
The
Notebook/2 site is very out of date but has recently been taken over by the OS/2
and eCS Hardware Web site, so things should improve as people provide new input.
There I found Andres E Mukk's notebook review for the Thinkpad
T40. [Editor note: This review first appeared in the July
2003 VOICE Newsletter.] I have always been partial to IBM's Thinkpad line because
they are aimed at the traveling commercial customer: solid strong construction,
good performance, lightweight, and, so far, some OS/2 support. The IBM systems are
a little pricey, but one gets what one pays for: I have experienced the 'joy' of
having a low bidder brand fall apart in the middle of a long airline flight when
I needed it the most. The TP T40 line has recently been replaced by the T41 series.
However, the TP
T41, DHU model I ended up ordering differs very little from the TP T40, U19
model reviewed in the article: 1.4 GHz vs 1.3 GHz Intel Pentium M processor, and
a 40 GB vs 30 GB ATA-100 disk. The price for the "economy" version customized
to 512MB ram was $1904.00, including shipping within the United States and state
sales tax.
As was the case with Andres, the TP T41 arrived from Hong Kong one week after I ordered it. It is a good thing that it came quickly, because the TP i1721's display died the next day! The USB floppy drive I ordered at the same time took two weeks to come from Mexico!
I did boot to the installed Microsoft Window XP partition the day the computer arrived. But that was to register the system with IBM and to verify that all of the hardware was working. The one thing I didn't remember to do was save the web browser based User's Manual elsewhere because the unit does not come with a hardcopy. Bright and early the next day, Saturday, I removed the "Designed for Microsoft Windows XP" sticker, cleaned off the residual "permanent" sticker glue, and started to install eComStation 1.1. By noon, I was up and running though I did need to wait for the USB floppy to arrive to be able to apply the finishing touches.
In this article I will briefly describe the eCS installation process I went through and how I updated eCS to the latest available level. Then I will discuss installing drivers and creating an versatile network capability. Next are some tips on migrating applications and using power management. I wrap up with a hardware and network link performance evaluation, and a summary.
After selecting the eCS partition for installation and formatting it, I came to the first snafu: entering the registration code! The hard disk had been completely reworked so anything previously on it was gone and no floppy drive was available. The options were to manually type in the keys, or use a CD on which the keys have been previously saved. Luckily, I routinely make up a System CD containing all the drivers, updates and applications I use, along with the associated registration keys. Removing the eCS Installation CD, putting in the System CD, pressing the 'Import registration data' button, browsing the S: drive to the appropriate location, and selecting the appropriate file did the trick. I did remember to put the eCS Installation CD back in before continuing.
On the Hardware & peripherals page I selected the Scitech Display Doctor drivers, Daniela Engert's IDE drivers, and the IBM COM drivers. I also enabled USB floppy support. Now for the second snafu: I opted to install PCMCIA support using IBM's 'universal' Thinkpad PCMCIA driver, IBM2SS14.SYS, supplied on the eCS Installation disk. Wrong move. This driver does not work with the TP T40 and T41. Just like the newer 'universal' driver, also named IBM2SS14.SYS, for the TP T4x does not work with my older TP i1721. I should have waited to install the newer cardbus support as described later.
After selecting the components to install we get to the Configure Network pages and the third snafu. The internal network adapter is an Intel Pro/1000 PCI, but the correct driver is not the Intel (R) Pro PCI Adapter I added from the Add adapter ... list. I should have picked the Intel (R) 8254X Based Network Connection. (An obvious choice!). Since my home wifi and wired network is routed, I kept the IBM TCP/IP and IBM NetBIOS over TCP/IP protocols and removed the IBM NetBIOS protocol.
I use static IP addressing, so this is the option I selected on the TCP/IP settings page. I entered the appropriate values for my network. However, later, I did check that the DHCP option worked correctly. When I enabled the DHCP server on my router, the TP T41 was automatically assigned an IP address.
Next is the LAN Settings page and the fourth snafu. I could not use the mouse to select the Workstation ID and LAN domain entry fields! In the numerous times I have installed eCS, this was a first. No matter what I did, including go back to previous pages and restarting, the fields were always greyed out. Even the Next button to continue the installation was greyed out because the fields were not filled in yet! Finally I noticed the that there was a blinking cursor in the page's instruction text. Pressing [Tab] moved the cursor to the Workstation ID field and I was able to enter the appropriate data. I pressed the now active Next button and less than 30 minutes later I was wrapping up the final phase of the installation and ready to go on.
Next log into the eComStation web site, http://www.ecomstation.com, select the Download option and choose the appropriate eCS MT basic code option in the eComStation Maintenance Tool section. Download three files: the latest version of eCSMT, the required functions, and the auxiliary functions. Create an eCSMT directory and place the downloaded files into it, and execute ecsmtxxxx.exe (the xxxx's refer to the version number). Do this while you are still online as eCSMT checks to see if ftp.ecomstation.com is available and if there is a newer version of eCSMT available. This check can take quite a while to time out, if you are not connected to the internet. The first time a download is requested, eCSMT presents a download status window for you to enter in your eComStation id and password. Using these, eCSMT then determines your FTP id and password, or you can fill them in yourself if you already know them (they are displayed on the download page for eCSMT).
When eCSMT is sure it is at the latest level it will scan your system and suggest the updates to be applied and, if requested, will download them for you. This is quite convenient for the smaller files. But if you have a dialup connection only, like I do, getting the larger files can be quite time consuming. Another approach is to find a facility with direct internet access, download the files you need and transfer them to the eCSMT Download directory. Many public libraries have this type of access for the general public, I used my connection at work. The trick is to find the correct files and their location on the eComStation FTP site. In the eCSMT directory there is an archive file ecscntlxxx.zip. Extract the file ecsmt.lst from the archive and open it in a text editor. Search ecsmt.lst for the update descriptions presented by eCSMT and you will find the coordinates for the needed files.
Following eCSMT's suggestions, I installed Fix Pak 4 (which also updates the kernel and a few other eComStation features), the TCP/IP fixes, the latest disk drivers, the single mouse driver (replaces the Thinkpad Trackpoint driver), and the USB drivers. I also updated to IBM Web Browser 2.02 and Java 1.1.18. The only time I was required to reboot was after the Fix Pak installation. While I was in eCSMT, I installed a few of the offered features: "IBM Java 1.3.1 Runtime", "Innotek OS/2 Kit for Acrobat Reader 4.05r2", and "Innotek Macromedia Flash Player for OS/2 - 5.0". Since several changes had been made to the eComStation configuration files, I enabled Create archive at each system startup option in the Desktop properties dialog, rebooted, and, after checking that the archive really was created, I disabled the option.
I never did discover how to disable the check for ftp.ecomstation.com that eCSMT performs every time it starts and after each update is applied. The help files says there is an option on the download page, but I couldn't find it. But even with the long time outs because I had disconnected the dialup connection (I don't have unlimited access), this update process took less than two hours.
The audio driver for the Analog Systems' SoundMAX AD1981B AC97 codec is available from IBM. However this is the fifth snafu, it is packaged as a floppy disk image. Instead, I downloaded the SoundMax driver, version 3.1.7, from Hobbes. Installation was the simple process of expanding the archive and running install.cmd. As was the case with the reviewed TP T40, MIDI is not available on the TP T41.
The latest version of drivers for PCMCIA is Cardbus 8 which is available from the eComStation download site. This however, brings us to the sixth snafu: The Cardbus 8 package breaks power management support. The actual issue and its resolution I will discuss later. I executed cardbus -di -ov to extract the files. Browsed to the newly created Cardbus folder, and opened the subfolder for my language, and ran PCMINST2.EXE.
With eCS installed properly and ECSMT updated the USB drivers and a small change to the mass storage driver parameters, I was able to use a keyboard or floppy and seamlessly change between a 256 MB Smartdrive, a 1 GB Smartdrive, a Castlewood 2.2 GB Orb drive, and a Iomega Zip 250 drive. The appropriate statements in config.sys are:
My USB 2.0 to IDE adapter with an 8.4 GB hard drive required the use of Chris Wohlgemuth's alternate USB mass storage driver that is available from the OS/2 and eCS Hardware web site.
To enable Chris' driver, I replaced IBM's USBMSD.SYS driver line with the following:
BASEDEV=CWUSBMSD.ADD /FLOPPIES:1 /REMOVABLES:1 /FIXED_DISKS:1 /FORCE_TO_REMOVABLE
Many thanks Chris. Since Chris' driver was specifically written to address a particular shortcoming of the IBM driver and is based on the early USB support coding that IBM has released in the Device Drivers Developers Pak I found that it has a few issues of its own: It does not properly recognize the 256 MB Smartdrive I use for a day-to-day working file backup and it has problems with seamlessly going back and forth between the various drive types I use. Nothing is fatal and it is very worthwhile having the capability to use USB 2.0 hard drives, but it is not convenient for a production system to continually change drivers. So I opted to revert to the IBM driver on the TP T41 and use Chris' driver for the USB 2.0 disk on another system.
The final driver topic I will mention is enabling the trackpoint features of the single mouse driver. The TP T41 comes with both a trackpoint and a touchpad. When both are enabled the single mouse driver recognizes the pair as a simple mouse and none of the trackpoint features are available. To be able to enable the press-to-select option and change the trackpoint sensitivity, the BIOS setting for the touchpad needs to be set to Disable.
I wanted to go one step further in flexibility. The wireless network is great for portability and everyday activity. However, once a month I do a complete backup of my computer systems. Each system is backup up to a single file on the hard disk. These files are then copied via FTP to my server and its mirrors (i.e each computer contains not only a copy of its own backup file but also the files from the other computers). In addition, I also copy the files to removable media. Needless to say, with that many backups lying around I have never had a fatal disk crash! With over 16 GB of data to transfer, the FTP process over the wireless network is slow to say the least. It would be nice to be able to switch back and forth between the wired and wireless link without having change configuration files and rebooting each time. Luckily, thanks to a hint from Neil Waldhauser that was posted on 4 August 2003 to ecomstation.support.networking by Orest Skrypuch this is possible. Search for: "How to: setup & toggle between a wireless and wired TCP/IP interface on a laptop."
That posting doesn't really go through the steps required to have full TCP/IP and NetBIOS capability when switched between network cards, so I will give you the details here.
The first step is to add the second adapter. Run MPTS and in the configuration dialog highlight the Intel (R) 8254X Based Network Connection list box entry (I've assumed the change has already been made to the wireless PC Card) and press Add network card. Next select the added adapter in the Stage 3 box and add the appropriate protocols from the Stage 2 box. Once again I added IBM TCP/IP and IBM OS/2 NetBIOS over TCP/IP. Finally, in turn, highlight each of the added protocols in the Stage 3 box and press Change number..., select 1, and press change. When you are finished the MPTS configuration dialog should look like figure 1.
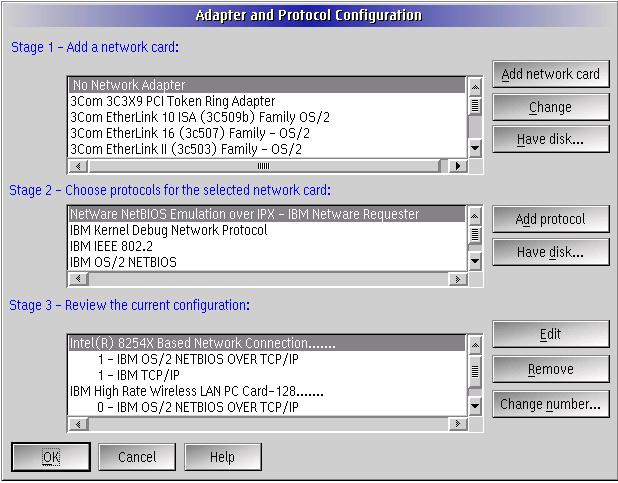
Figure 1. MPTS configuration dialog showing two adapters being enabled.
Save the changes and exit MPTS. The config.sys and the protocol.ini files will be appropriately updated. But before rebooting to activate the changes, more needs to be done
The TCP/IP configuration program (System Setup|Network|TCP/IP|TCP/IP Configuration) needs to be run to enable the adapters and assign addresses. On the Network page, LAN interface 0 should have already been enabled during the eCS installation process and the configuration option selected, either as Automatically, Using DHCP or Manually, Using. My configuration is manual, but figure 2 shows how a DHCP setup would like
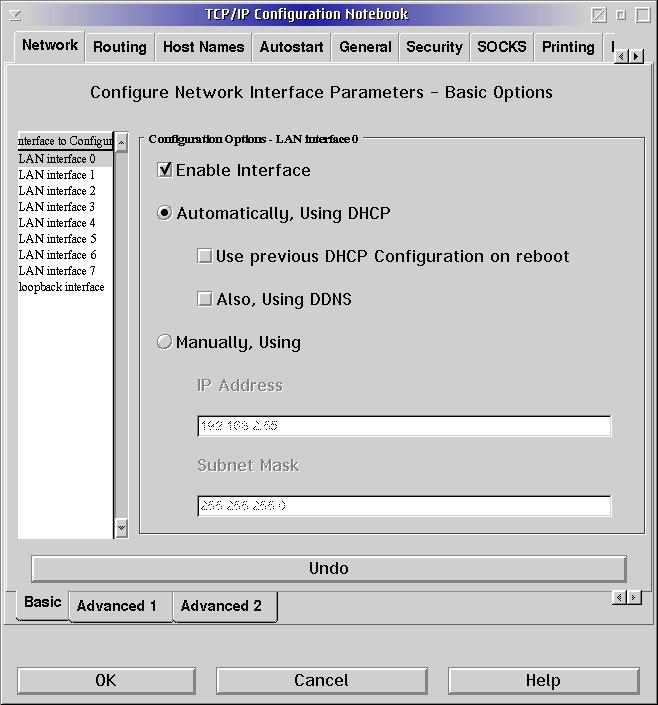
Figure 2. TCP/IP network configuration for LAN interface 0
Next select the LAN interface 1 entry in the Interface to configure list box. Check the Enable interface box and select the Manually, Using radio-button. In the IP Address entry field insert an unreachable IP address. I.e. one that is not on your LAN subnet. In figure 3, I have entered 192.168.1.55 because my regular LAN uses 192.169.2.xxx. Entering 255.255.255.0 into the subnet mask field ensures that the two subnets cannot communicate:
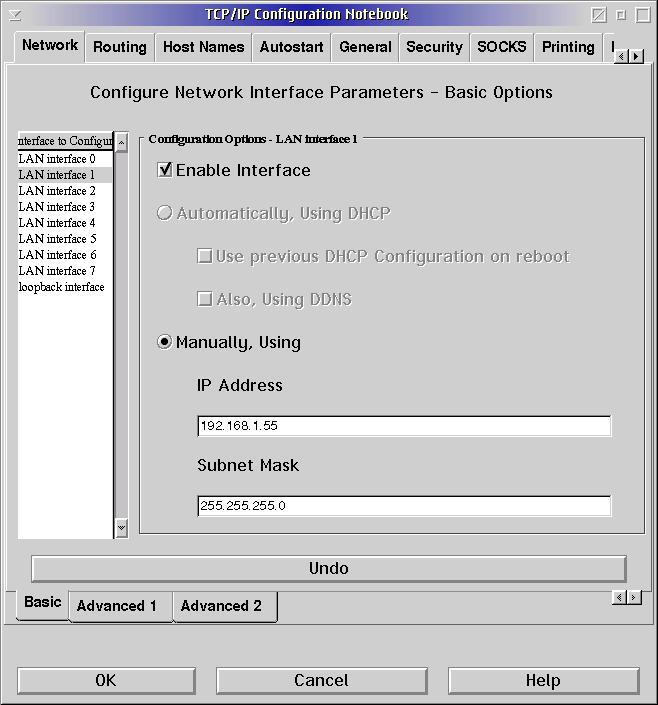
Figure 3. TCP/IP network configuration for LAN interface 1
Press OK to save the changes and exit. The TCP/IP protocol is now configured, but one more set of changes need to be done for the NetBIOS protocol to work correctly.
The text file d:\ibmlan\ibmlan.ini, where d: is the boot drive, files needs to be modified so that LAN Requester can run in a two LAN configuration, even though one of the LANs is unreachable. This should have been done for us by MPTS, but unfortunately is not. First make a backup copy of the existing ibmlan.ini file, then using a text-only editor make the following changes:
net2 = TCPBEUI$,0,LM10,34,100,14
wrknets = net1,net2
srvnets = net1,net2
To make the changeover to the wired subnet (LAN1) it is the simple matter of making sure Requester is not running; shutting down and deleting the adapter subnet configurations; flushing the routing tables; and configuring the wired adapter with an IP address for the real subnet and the wifi adapter with an unreachable IP address. Sounds complicated, but it is not. I created the script, wired.cmd, to automate the process:
the above example is for fixed ip addressing, the DHCP counterpart is:
The wired subnet is now active while the wireless subnet is unreachable and Requester can be safely started and used.
To revert back to wireless subnet being active merely reverse the lan configuration statements as in the following DHCP version of to_wifi.cmd:
There were a few applications that needed a fresh installed. RSJ CD Writer is one. This is because several system files are involved in the installation process. Three applications I use have convenient WPS recovery options built into their installers: Gamma Tech utilities, Mesa/2 and Unimaint. So after the USB floppy drive arrived, I used these installers to complete the migration process.
In addition to copying over the Program drive, I also mapped to the TP i1721 Maintenance drive and copied the entire contents to the TP 41 Maintenance drive using XCOPY:
where k: is the letter of the mapped drive on the TP i1721
This partition has OS/2 Warp 4.0 with Fixpak 15 and Device Drive Pack 2 installed. To my surprise, I was actually able to boot to the Maintenance partition, C: on the first try. Though I was only able to see the C: drive. The rest of the disk was shown as free space. Copying over the disk drivers updated by eCSMT from the eComStation drive to the Maintenance drive solved this issue.
With the TP T41, the Speedstep Technology driver that was installed earlier does a nice job of maximizing battery life and does allow the system to be suspended. Though suspension is not a pretty sight, as I will discuss later. Without the wireless PC Card inserted, I was able to get exactly 3 hours out of the battery. The processor varied its speed, the disk did stop when not used, the screen blanked out if I left the laptop alone for more than the preset 5 minutes, and the system did suspend properly when the battery was drained. This, of course, is with a new battery, but it is still very good for a Thinkpad considering that I was using the system almost continually and OS/2 is a resource intensive system. The rub is with hibernation.
Hibernation for the TP T41 in OS/2 is possible, but it might as well be nonexistent. The IBM ThinkPad - Software and device drivers web page, provides a link to a DOS based "Hibernation Utility Diskette II for Standalone Boot" for the TP T41 that can be used to enable hibernation for OS/2. The following is quoted from the installation instruction text:
The utility comes as a floppy disk image and one must boot to DOS using the USB floppy drive. The instructions for the hibernation utility for my TP i1721 also said that it couldn't be enabled for OS/2, but I was still able to set up a save-to-disk partition. However, given the dire warnings for the TP T41 utility, I haven't even tried to do it.
[Update: Hibernation revisited. As I just mentioned, I did not try to get hibernation to work because, at the time, I did not have a floppy drive and I needed to get my production partition up and running quickly. To get around the dire warning in the hibernation utility instructions I thought all I needed to do was create the first primary partition as a FAT formatted drive (C:) and install the boot manager as the second primary partition. I was reluctant to try this because I had never seen anyone mention doing this approach successfully until, on January 23, I read a news net posting by Doug Bissett. Search news://news.ecomstation.nl/ecomstation.support.hardware for 'Thinkpad T20 with eCS' With all of my end-of-the-year financial transitions completed, I was now willing to try to get hibernation working.
I shut down my production partition which had been running continuously since mid-December using suspend to save the system when there were going to be long idle periods. I then booted to the Maintenance partition. There, I backed up my utilities directory on the Maintenance partition; and the entire eCS 1.1, Programs and Data partitions to a file on the Archive partition using BackAgain/2000. To be triply safe, I copied the backup file to removable media and another computer. I booted to the eCS Installation CD and used the miniLVM program to change the layout of the disk partitions. Unfortunately I had guessed wrong about the size that the C: drive needed to be. It turned out that the drive needs to be able to hold a file that is sized to the amount of memory installed plus an additional 35 MB. I was 5 MB too small, so I ended up deleting all of the partitions except for the Archive partition. Next, I changed the Archive drive letter from G: to H: I then created a suitably sized primary partition (C:) for the hibernation file; installed the boot manager as the second primary partition; and created logical partitions for eCS 1.1 (D:, bootable), Programs (E:), Data (F:) and a new Maintenance partition (G:, bootable). I had to adjust the size of the Programs partition from what I had previously assigned to make room for the expanded C: and the new G: drives.
Initially, I tried to install Warp 4.0 onto the Maintenance volume, but I kept getting the ubiquitous "Unable to operate ..." message. Warp 4.0 worked when the Maintenance partition was the C: drive, but rather than take the time to troubleshoot the problem, I installed a bare-bones version of eCS 1.1 without all of the frills, fewer utility applications, and no networking. It became obvious that the designers of the eCS installer had never thought that anyone would want to take this approach:
Next, I ran the hibernation utility file, stndalhd.exe, obtained from the previously mentions Web page, to create the "Hibernation Utility Diskette II for Standalone Boot" floppy disk. The disk is bootable and automatically starts a Windows 98 DOS session that displays the hibernation setup options. Ignoring option 1, Info: hibernation is not supported in OS/2, I selected option 2, Create a hibernation file. Less than a minute later, the file was created, BIOS was reset to enable hibernation, and I was booting back to the eCS Maintenance partition. When the boot process completed, I pressed [Fn]-[F12] and, lo and behold, the hibernation process started. Pressing the power button successfully resumed the eCS session. The total time to complete a hibernate and resume cycle for a 512 MB system is approximately two minutes. I was now ready to recover my saved drives.
I installed BackAgain/2000 and restored the contents of the previously created backup file, redirecting the utility applications to the G: drive. My production partition was back as before and all that remained to do were a few tweaks to the BIOS power management settings, primarily enabling hibernation when the battery capacity was low, and reset the shared peer folders on the Archive partition since the drive letter had changed. When a PC Card network adapter or modem is inserted, the steps detailed later for suspend need to be performed for hibernation.
The hibernation enabling process encompassed a short evening and was well worth the effort. I now have a laptop that is truly portable without requiring the power cord be almost continually connected to avoid draining the battery.]
To suspend a laptop the network PC Card must be removed. The proper way to do this in OS/2 is to power off the card first. Other operating systems call this 'stopping' the card. Power management for PC Cards is handled by the PC Card Director utility, System Setup folder | PC Card Director folder | PC Card Director. Before attempting the following make sure ALL network activities are stopped, especially Requester. On the PC Card Director utility menu bar select Actions|Control Power..., highlight the card to turn off, press the Off button, and press the Enter key to select the default Yes button in the Action dialog that is displayed. To access the menu when the compact view is enabled, right click on either PC Card icon. After waiting a few seconds for the driver to handle the process, the card can be removed and suspend initiated by closing the laptop display cover or via the Fn-F4 key combination. To resume, simply open the lid. After waiting a few seconds for the system to completely restart, the network PC Card can be inserted.
The key to a successful suspend-resume cycle is patience! One must wait for the process to complete before doing anything at all, even moving the trackpoint can cause problems, which is why I specified using the Enter key to close the Action dialog. Also wait a few seconds between powering off the PC Card, removing the card, initiating suspend, resuming, inserting the card, and using the network. Finally, while the network PC Card is removed do not allow ANY network activity at all to occur, otherwise the network connection to the PC Card will break. I even keep the network printer queues on hold if the PC Card is not in. I have had an accidental pressing of the PrtSc key destroy the link. The only recovery for a broken network I have found is to reboot.
Now for the problem with the Cardbus 8 drivers: they do not turn the power off to the network card. The wireless network is properly disconnected, the card can be removed, and, when reinserted, the network will reestablish. However, the card is never turned off. I felt things were a little flakey with the Desktop after resuming, but I couldn't pin down the problem until I inserted a modem PC Card. The network connection immediately stopped! I had to reboot to recover the network. A little experimentation revealed that for the first two suspend-resume cycles the network and modem PC Cards could peacefully coexist. But after the third cycle, no network. At first I thought that this was the same issue I have with my TP i1721 where the audio drivers do not properly resume. Oddly enough, the work around I have for the TP i1721 worked here: disable system sounds before suspending, run a Win-OS2 session after resuming, then insert the network PC Card! Further experimentation revealed the true problem: the cardbus 8 PCMCIA.SYS driver breaks power management. The solution is to replace PCMCIA.SYS with the version in the earlier Cardbus 5 package. Currently this package is still available from the eComStation FTP site. You will need to supply your eComStation FTP id and password. Hopefully, the cardbus 5 package will stay there.
As I said before, power management in OS/2 is not a pretty sight, but I have been able to go several days without rebooting by using the suspend-resume process; currently 15 cycles and counting. The only rub is that the power cord needs to be connected while in suspend to avoid draining the battery.
The network link performance was assessed by using Kai Uwe Rommel's NetIO utility. I ran tests between two systems that were on the wired side of the LAN, a wired system and a system on the wireless side of the LAN, and two wireless systems. In each connection type the T41 was one of the computers used and a test was run when the TP 41 was the server (upload), and the second computer was the server (download). A single test measures the transfer rate for packet sizes of 1KB, 2KB, 4KB, 8KB, 16KB and 32KB. For the three types of connections, I performed ten repetitions for a total of 160 measurements each. Even though there were noticeable differences, in some cases, between the performance of a given packet size, I averaged all of the measurements to produce a single result for each connection type and transfer direction.
The comparison was made between three systems: 1) The original TP i1721 with a 300 MHz Intel Mobile Pentium II CPU, a NeoMagic MagicMedia 256AV 2.5MB graphics card, a 5.4GB IDE drive, and a IBM High Rate Wireless PC Card; 2) a two years ago 'state-of the-art' desktop computer with an ASUS 4PT motherboard, 1.5 GHz Pentium-4 CPU, a Matrox Millenium II graphics card, a 40 GB ATA-100 drive, and a 10/100 Realtek PCI network card; and 3) the TP T41.
The results for the hardware tests are given in Table 1 and the network performance is in Table 2. Hardware wise, the T41 is certainly a vast improvement over my old Thinkpad and is almost twice as fast as the desktop. I am especially impressed with the file transfer rates. Looking at the network transfer rates, one can easily see why a hard-wired link is occasionally desirable.
| Test Section | TP i1721 | ASUS P4T | TP T41 |
| Graphics | 29.4 | 520.1 | ~1000 |
| CPU Integer | 231.4 | 834.7 | 1117.7 |
| CPU float | 45.0 | 102.3 | 250.0 |
| DIVE | 38.5 | 102.9 | 182.4 |
| File I/O | 4233.5 | 15682.7 | 61034.1 |
| Memory | 335.4 | 2243.6 | 2850.5 |
| Disk I/O | 64.0 | 170.5 | 206.7 |
| Link type | Download | Upload |
| wired to wired | 11318 | 11556 |
| wireless to wired | 786 | 820 |
| wireless to wireless | 206 | 208 |
Hopefully, I provided a few hints to snafu resolution and tips that will make your portable computing easier. For the most part these were not Thinkpad specific. All-in-all I heartily recommend the IBM Thinkpad T41. It is well worth the little bit more you have to pay over the discount brands.
PS. The Thinkpad i1721 has not been put out to pasture yet. With its 'legacy' operating system (OS/2 Warp 4.5), a surplus external monitor, an external mouse connected to the 'legacy' mouse port, and an USB keyboard my now home-bound 'legacy' system still has a few years of life left.
Feature Index
editor@os2voice.org
< Previous Page | Newsletter Index | Next Page >
VOICE Home Page: http://www.os2voice.org