 VOICE Home Page: http://www.os2voice.org |
[Previous Page] [Next Page] [Features Index] |
|
VOICE Home Page: http://www.os2voice.org |
[Previous Page] [Next Page] [Features Index] |
By: Dan Casey dcasey3@home.com
Part 1 of a Series
If so, this series of articles will explain the technology involved in TCP/IP
Networking for a small Local Area Network (LAN). We'll look at the basic concepts
of connecting a LAN to the Internet, as well as several methods of doing it. We'll
cover a Dial-Up Modem connection, Dial-Up ISDN (Integrated Services Digital Network),
Cable Modem and DSL (Digital Subscriber Line).
With the continually growing availability of Broadband (Cable Modem and DSL)
connections, we'll start with them. The concept is the same for either connection
in that your own computer sees this type of connection as a Networked TCP/IP Connection.
In the simplest terms, all you need is a Network Interface Card (NIC) and a properly
configured TCP/IP Stack (Networking protocol) in your system.
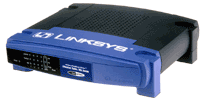 The
Linksys Cable/DSL Router is somewhat of an "All-In-One" Solution.
It combines a Router with Network Address Translation (NAT), a Firewall and a 4-Port
10/100 Fast Ethernet Switch (Hub) all in one unit. If you are currently in the "Planning
Stage" of putting together a small LAN, you might want to have a close look
at this solution. The 4-Port Fast Ethernet Switch allows you to connect 4 computers
to the LAN using 10Mbps (10BaseT) or 100Mbps (100BaseTX) NICs. This means that you
don't have to buy a separate Network Hub to connect the machines, and the Switched
Hub is faster than a standard 10/100 EThernet Hub.
The
Linksys Cable/DSL Router is somewhat of an "All-In-One" Solution.
It combines a Router with Network Address Translation (NAT), a Firewall and a 4-Port
10/100 Fast Ethernet Switch (Hub) all in one unit. If you are currently in the "Planning
Stage" of putting together a small LAN, you might want to have a close look
at this solution. The 4-Port Fast Ethernet Switch allows you to connect 4 computers
to the LAN using 10Mbps (10BaseT) or 100Mbps (100BaseTX) NICs. This means that you
don't have to buy a separate Network Hub to connect the machines, and the Switched
Hub is faster than a standard 10/100 EThernet Hub.The Linksys Cable/DSL Router also has a separate WAN (Wide Area Network) Port
for connecting to the Cable Modem or DSL adapter provided by your Internet Service
Provider (ISP). And, if you need the ability to add more computers to the LAN, the
Linksys unit has an "Uplink Port" that can be used to connect to another
Ethernet Hub so that you can expand your LAN.
NOTE: The Uplink Port is shared with Port 1, meaning that you can't use both of
them. If you use the Uplink Port to connect another Hub (or Switch), You can only
use 3 of the 10/100 Ports on the Linksys unit to connect other computers.
Yet another feature of the Linksys Cable/DSL Router is the DHCP (Dynamically
Configured Host Protocol) Client/Server. If, like many users, your ISP Dynamically
assigns your IP address using the DHCP Protocol, you can easily configure the Linksys
unit as a DHCP Client. When configured, the Linksys Router will automatically "get"
the IP address assigned to your current connection.
The built-in DHCP Server, when configured, allows you to have all the computers
on your LAN assigned an IP address when they are powered up and the Network Connection
is established. Simply configure the TCP/IP on your systems to Automatically Get
an IP Address.
NOTE: A new protocol called PPPoE (Point to Point Protocol
Over Ethernet) is currently being used by some DSL Providers. PPPoE Support for
the Linksys Cable/DSL Router is currently in Beta Testing, and a Firmware Upgrade
will be made available from the Linksys Website when testing is completed.
You are now ready to begin the configuration.
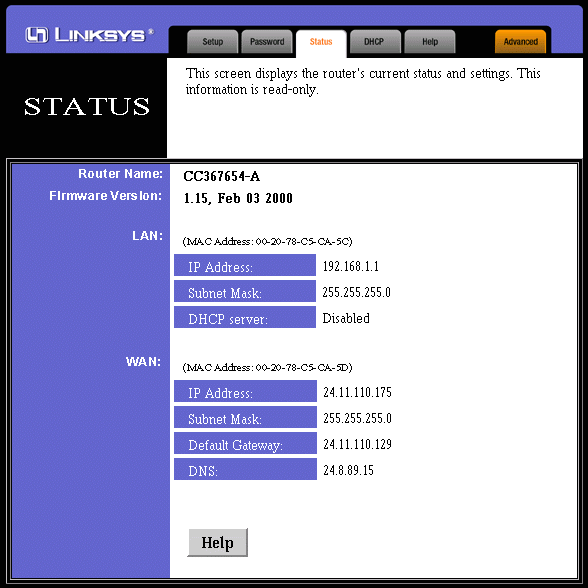
The Linksys Main Configuration Screen
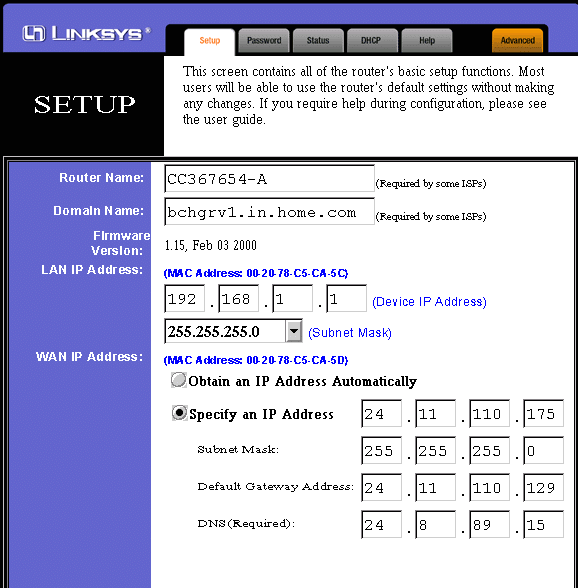
The "Router Name" in the above pictured screenshot is the "name"
of the Cable Modem assigned by my ISP.
The "Domain Name" is the fully qualified name of the main server.
The MAC Addresses are automatically found by the Linksys Router, and are permanent
Hardware addresses of the Linksys Router's onboard Network Interface Devices.
The IP Address, Subnet Mask, Default Gateway and DNS Address are all assigned by
my ISP.
In this example, you can see that I have a Statically Assigned IP Address, so
the Linksys Router is configured Manually (Specify an IP Address) rather than using
DHCP (Obtain an IP Address Automatically).
DHCP Server Configuration menu
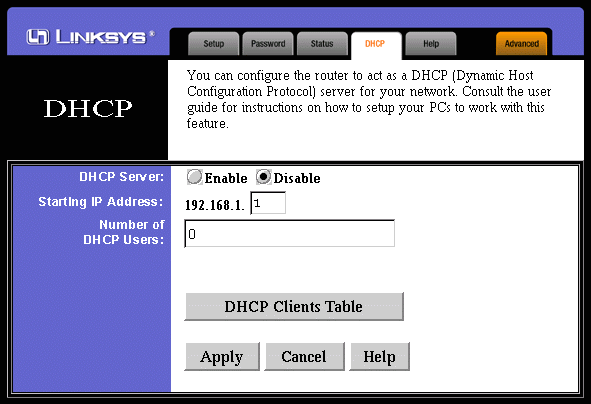
As you can see, this menu allows you to configure the DHCP Server feature of the
Linksys Router.
The addresses to be automatically assigned fall within the 192.168.1.x range of
IP address, and you can choose how many addresses to make available to the Network
(LAN).
NOTE: The IP Forwarding and Filters that we will discuss later
will NOT WORK if you use DHCP to assign IP Addresses to the other machines on the
LAN. In order for the Forwarding and Filters to work, each machine on the LAN MUST
have a Static IP address assigned to it.

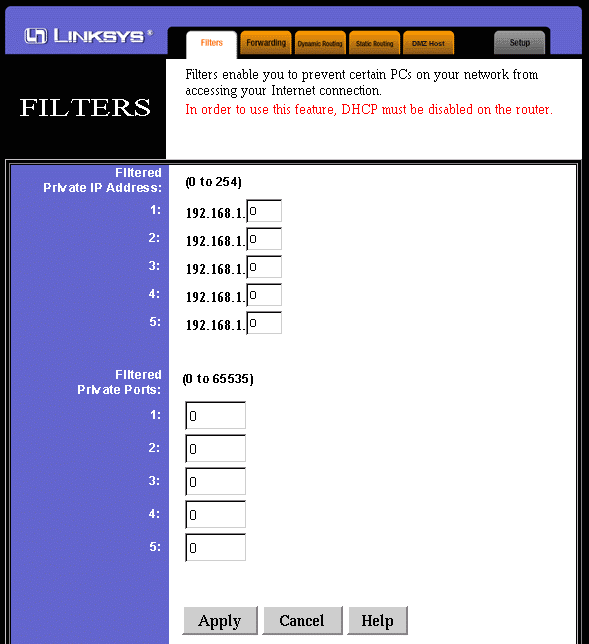
The first page of the Advanced Settings allows you to specify Filters. These
Filters will determine which machine, if any, will or won't be allowed to Access
the Internet.
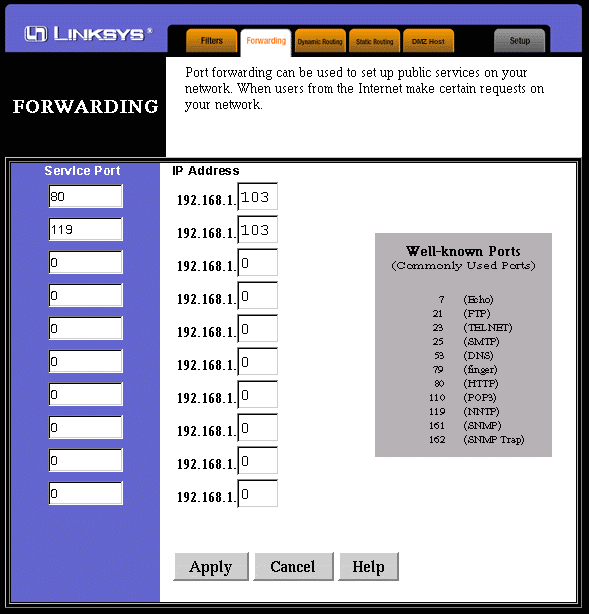
In this example, you can see that I've re-directed requests for HTTP (Port 80)
and NNTP (Port 119) to the machine residing at address 192.168.1.103. What this
means is that anyone who points their browser to my IP Address, will be re-directed
to the machine on the LAN that is running the Apache Webserver. Likewise, anyone
using a USENET News Client pointing to my IP Address will be re-directed to the
NNTP Server (Changi) running on that same machine.
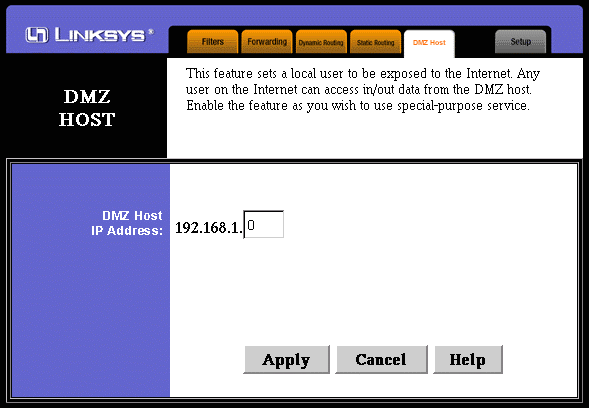
As the screen says, configuring a DMZ Host will, in effect, open up that machine
to the outside network (Internet).
Unless you have a specific reason to do so, you should NOT want to configure a DMZ
Host on your network.
Firewall and Security
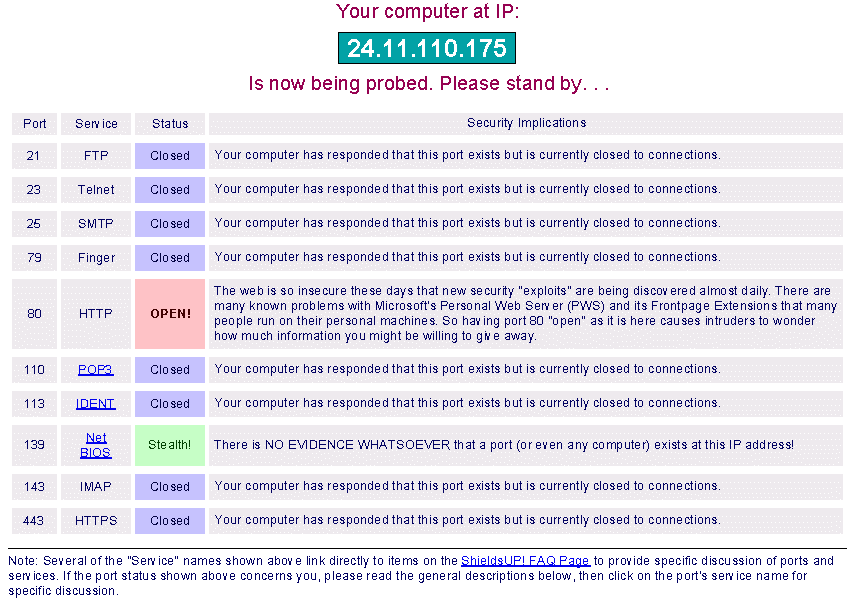
The above screen shows the results of a Port Scan done on my IP Address by a
utility residing on Steve Gibson's Gibson Research
Center Website.
NOTE: This is a Screenshot. The "links" shown will not
work from this screenshot.
The "Probe My Ports" utility at GRC does not probe Port 119, or it would
show as "OPEN" also.
There is a Port
Scanner for OS/2 available from Hobbes that will probe all 65,535 possible ports
on your system. Note, however, that it can take, literally, hours to scan all of
the ports.
Another hardware option that I'll mention, here, is the Macsense
XRouter.
Here is the information I have on that, from another user:
I have a Macsense XRouter (MIH-120) that I use to protect my Warp 4

system.  It is a 10BASE-T 4-port Ethernet hub with built-in Network

Address Translation (NAT) and sits between my DSL modem and

workstation.  It shares its look as well as its name with Apple computers

as it's enclosed in a small translucent green box.  The company is found

at www.macsensetech.com.


The setup is accomplished by a built-in java-based Web server and

is very easy to use.  The simplicity does sacrifice features found on

more complete solutions, logging for example.  And security is

limited to that provided by the NAT engine.


All I had to do was plug in the cables, point my browser to 192.168.1.1,

the default IP address for the XRouter, and log in.  Since I have a budget

DSL account with a dynamic IP address, I only needed to provide a

non-default password, and I was up and running.  If I use the XRouter's

DHCP server, it assigns my workstation an address of 192.168.1.100.

A static address for my TCP/IP 4.02y-based workstation works as well.


A good password is important since the XRouter provides for remote

configuration and the HTTP port 80 is open on the internet side, a fact

I did not discover immediately.  I emailed the company about this issue,

and received a prompt reply that the remote configuration would be

optional in new firmware.  A couple of weeks later, I received a second

email notifying me that the flash upgrade was available.  I haven't

tried it yet as it apparently needs a network-ready Windows machine

to do the upgrade.  I also read that the upgrade is now PPPoE ready

but can't comment.  Except for port 80, other common ports are

reported as "closed" by Steve Gibson's ShieldsUp program at

www.grc.com, but not as "stealth" .  I guess the bottom line depend on

your paranoia level.
One of the differences I noted is that unless you specifically turn on Port 80
via the Port Redirect feature of the Linksys, that port shows CLOSED by the ShieldsUp
utility at Steve Gibson's page. Port 80 (the HTTP port), is open on the LAN, so
that with the correct password, anyone on the LAN can get into the Configuration
and Setup of the Linksys. But it's closed to the outside, so Remote Configuration
is, apparently, not possible.
The next installment of this series will focus on Injoy
Firewall, a Software solution.
For now, I'll point out a few differences, so that you'll be able to make your
own decision when it comes time to decide which option is best for you.
The biggest difference is this .... when you implement a Firewall on a TCP/IP
Connection, the machine the Firewall is running on is open to the rest of the network.
Only the machines BEHIND the firewall are protected. Keep this in mind when making
your decision on a Hardware or Software solution. If you use a Software solution
(Injoy Firewall), then the machine that Injoy is running on is susceptible to "Unauthorized
Access". If you opt for the Hardware Solution (the Linksys Router), then any
machine attached to that piece of hardware is protected as it is "Behind the
Firewall".
Using the Linksys (or another Hardware Router/Firewall) means that you don't
have to dedicate a PC to the Router/Firewall operation. While OS/2 is perfectly
capable of letting you do other work on the Router PC, that PC is NOT behind the
Firewall, so it doesn't offer the same level of protection to that machine. The
other machines on the LAN are, however, protected.
Another difference is cost. Assuming a 5 user LAN, The Injoy Firewall is roughly
half the cost of the Linksys Router, not counting the PC that you'll load Injoy
on. The more users you want to add to the LAN, the more Injoy will cost. With the
Linksys Router, you have a 4-port 10/100 Switched Hub built in. If you want to add
more users, you'll need to buy another Hub, but there is no limit to the number
of users the Router itself will handle. I'll leave it to you to determine the cost
of adding users with either option.
The only other difference is that the Linksys Router uses a Web Interface (the
Help functions require JAVA) to set it up and configure everything. Injoy uses plain
text Configuration Files that must be created and edited when setting up the Filters
and Port Redirection.