
By: Don K. Eitner (freiheit@tstonramp.com)
http://www.tstonramp.com/~freiheit/
Lexmark have a bit of a reputation as one of the few printer manufacturers who
develop their own OS/2 print drivers for home and small business use. This reputation
is well deserved and continues to march along with their recent OS/2 drivers for
the 3000, 5000, 5700, 7000, and 7200 series Color Jetprinters. (available through
http://www.lexmark.com/software/driverlanguage.html)
I have installed the provided Windows 3.1 drivers as well as the free downloadable
OS/2 drivers for the 5700 on my system and, aside from some specific visual aspects
of the two systems, have found them to be identical in terms of features*
and options. Both provide on-screen ink level indicators to let you know when you're
running out of any color of ink, both provide button driven ink cartridge installation
and removal, both provide for up to 1200x1200 dots per inch printing, and more.
Installation of the OS/2 drivers was as simple as unpacking the self-extracting
archive file to a temporary directory (g:\os2zip\printers\lexjet\ in my case), double
clicking on the LEXIJET.DRV program object under the Drives folder, and dragging
the Lexmark 5700 Series ColorFine printer object to the desktop. It was then just
a matter of setting preferences within the resulting print driver object.
 |
|
Lexmark Color Jetprinter 5700 Retail price: $249 US List prices for ink cartridges Photo Color Ink : $39.99 Standard Black Ink : $29.49 Standard Color Ink : $35.99 Contact Lexmark 740 New Circle Road Dept. S78A, Bldg. 001-1 Lexington, KY 40550 http://www.lexmark.com |
My only complaint about the OS/2 drivers is that clicking the Job Properties
button in the standard printer setup notebook for OS/2 gives one less configuration
tab/page than right mouse clicking on the specific printer object within the printer
setup notebook and opening its properties notebook. The latter method makes you
work through two separate notebooks of settings, but gives the Setup Forms Connections
tab/page which lets you specify paper sources and sizes as well as the format for
the spool file (RAW or STD).
The 5700 is a very reasonably priced ($249 retail) printer that can achieve up
to 1200x1200 dots per inch printing in full color on a variety of paper types. Comparable
printers from Hewlett Packard or Canon can run as much as $400 retail and you'll
be lucky to get more than 600dpi from them. Whether this makes a difference is entirely
based upon how you will use the printer.
The printer features Accu-Feed paper handling, which does away with the myriad
levers and switches in many inkjet printers. These levers and switches usually select
either letter-size or envelope paper, normal thickness or cardstock paper, and sometimes
(as with the Epson Stylus Color 500) a lever which can alter the closeness of the
paper to the inkjets to improve clarity in some circumstances. There is only one
lever on the Lexmark 5700 and it's for the paper alignment (if using smaller than
8.5" x 11" paper) to ensure straight feed-through. The printer handles
envelopes and cardstock paper just fine.
Setting up the printer was remarkably simple. I've had more trouble hooking a
CD player to my home stereo system. No parallel cable is provided with the printer
(seems to be a common occurrence) and Lexmark recommend a bi-directional parallel
cable, which I already had for use with my Epson Stylus Color 500. The short printer
setup sheet provided easy to follow instructions but only mentioned Windows 3.1,
95, and NT. The OS/2 drivers didn't exist until months after the printer came on
the market, so I'm not at all surprised. However I am a bit dismayed that the website
for the 5700 still does not mention OS/2 support--a fact which might lead many borderline
OS/2 users to not consider buying the printer or to consider using Windows instead
of OS/2. To get to the OS/2 drivers, you must go instead to the Printer Software
section of Lexmark's website and click again for a list of all their printers. Here
you will need to click on the Color Jetprinter 5700 link to access all the available
drivers for this printer.
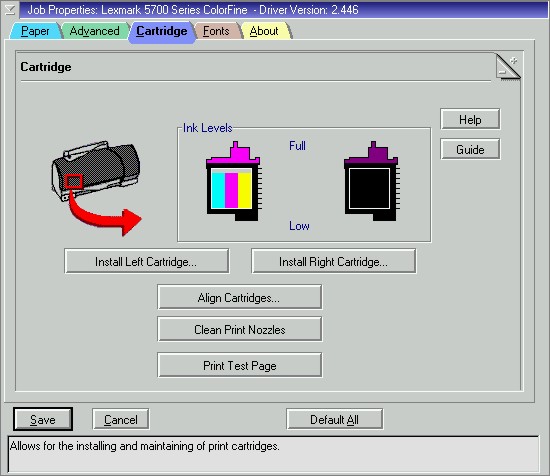
Installation of print cartridges is done through the aid of the driver. You open
the job properties notebook (shown below), select the Cartridge tab, and then click
on either Install Left Cartridge or Install Right Cartridge. The short setup sheet
tells you which side to place the color ink into and which side to place the black
ink (or optional photo ink) into. Furthermore, after you click Install Right Cartridge,
you will be asked whether you're installing a Black Ink or Photo Color cartridge.
The Photo Color cartridge can replace the black ink cartridge. It contains black
ink as well as light cyan and light magenta. The black ink in this optional cartridge
does not have the full 200 print nozzles of the dedicated black ink cartridge, and
as such prints of black text or black and white images may not be as precise, but
your color photographs should get quite a boost in color realism and overall quality.
In my opinion, the standard tri-color ink cartridge and dedicated black ink cartridge
do an incredible job of printing color photos.
Using plain paper and the Normal 600dpi setting (there's also a Quick 600 and
an Enhanced 600), photographs printed with more realistic colors and less spottiness
than the maximum quality (720dpi) of my former Epson Stylus Color 500 when printing
on coated inkjet paper. The ink also did not saturate the paper as much as the Epson
But no one really expects photographs to print well on plain typing paper. Prints
of the same images on the coated paper but using the Lexmark's Enhanced 600dpi quality
showed some improvement in color depth as well as overall clarity and would most
definitely make for excellent printing of a small circulation magazine, newsletter,
or greeting cards. It has also proven excellent for creating buttons of the mylar-covered,
pin-back variety. The glossy mylar film helping to bring out the colors of the print.
Using the same Enhanced 600dpi quality for the same images but printing on glossy
photo paper provided absolutely stunning results. Assuming a quality scan of the
image initially (say more than 200dpi) it's almost impossible to tell the difference
between these prints and real photographs that you get back from your local drug
store or 1 hour photo lab. Only close inspection revealed some red and green banding
in dark regions of my photo printouts. This would be excellent printing for postcards,
inserts for self-made CDs (if you plan to sell them on a private record label) or
the cover of the aforementioned small-circulation magazine.
It should be pointed out that when printing on the photo/glossy paper from Hammermill,
the ink remained fairly wet for quite some time (as many as three days for some
images). Conversely, printing on postcard paper from Hewlett Packard (not photo/glossy
but somewhat glossy) dried almost instantaneously and produced surprisingly similar
quality at Enhanced 600dpi.
Naturally the cost per page increases with the different types of paper. Good
photo paper will run you about $14 for 20 sheets, while coated inkjet paper may
cost $20 for 100 sheets. The results (as opposed to plain typewriter paper) are
certainly worth the cost of the coated paper and worth the cost of the photo paper
if you wish to make your own copies of existing photos and hand them out to friends
and family.
So what of the 1200dpi print mode, you ask. Well my suggestion is that unless
you have more than 32 megabytes of RAM and a swap file on a fast SCSI hard drive,
you shouldn't even try to print at this resolution (not in color, anyway). Remember
that the basic amount of memory needed to store a 4x6" (postcard size) image
at 1200x1200 dpi in true color is:
The next factor to take into account is print speed. True print speed, of course,
involves everything from the moment you tell PMView (or some other application)
to send the image to the printer until the moment the printer releases the printed
page for you to pick up and frame. The amount of RAM in your system and the speed
of your hard drive will make quite a difference, especially if you attempt to print
a 600dpi image at any size larger than about 4x6".
I tried to print a 5x7" photo that I'd scanned at 600dpi and after two and
a half hours it still hadn't made its way to the print spooler file--my swap file
went nuts, growing to 240 megabytes from its default of 64 megabytes. Apparently
it was doing a lot more in the swap file than just setting down a 100 megabyte raw
image--it seemed to be moving it around within the swap file almost constantly,
which made my whole system drag as OS/2 was forced to constantly monitor and change
the size of my swap file.
I wised up a little after this--I cut the size of the image down until it was
the equivalent of 400dpi and I converted it from 24-bit true color to 8 bit grayscale
(it was a mostly gray image to begin with). The swap/spool/print job took less than
two minutes with the actual print portion being only half of that. The results (printed
at Enhanced 600dpi on photo paper) are near photographic quality. Again, only close
inspection reveals slight red and green banding in the darker regions of the image--indication
that the drivers are using the tri-color cartridge rather than the black cartridge
for printing shades of gray (under both Windows and OS/2).
There's a great interview on the SCOUG (Southern California OS/2 User Group)
website about getting the most from color inkjet printers. This is a must read for
anyone thinking of printing anything that they wish to keep or sell. The URL is
http://www.scoug.com/os24u/1998/scoug805.2.dbaker.html.
Ratings are 1 (lowest) to 10 (highest)
|
Test System: Cyrix 6x86 P166+, 32MB of EDO RAM, bi-directional
parallel cable, Lexmark Color Jetprinter 5700, OS/2 Warp 4.0, fixpack 6,
Lexmark ColorFine printer driver v2.446 | |||||||||||||||
|
|
For the sake of comparison, I'd give my previous printer (Epson Stylus
Color 500) the following ratings when used with the same system: |
* Only one difference, being an Enable Buffer Mode
option in Windows 3.1. The manual claims this is unnecessary for Windows NT (and
therefore, apparently, for OS/2 as well).
Don Eitner has been an OS/2 user since 1995 and has maintained The 13th Floor
website since 1996. There he keeps an ongoing list of as many currently available
native OS/2 applications as he can find (http://www.tstonramp.com/~freiheit/os2apps.shtml)
which was awarded 3 A ratings, including an A+, from SCOUG
(http://www.scoug.com/os24u/1998/scoug806.2.webfoot.html) To date Don has written
13 articles for the VOICE Newsletter and was elected as Secretary on the Board of
Directors of VOICE in April, 1998.
Lexmark (http://www.lexmark.com)
Epson (http://www.epson.com)